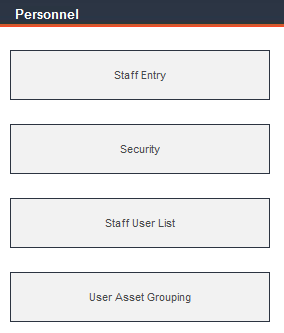
To enter staff records and create user security permissions, navigate to Personnel via the Main Menu.
Enter and view detailed employee records for your maintenance staff, including training information, assigned work orders and tools issued to each staff member.
Enter a unique alphanumeric identifier for each employee in the Staff ID field, the employee’s full name in the Staff Name field and all other information in the remaining fields.
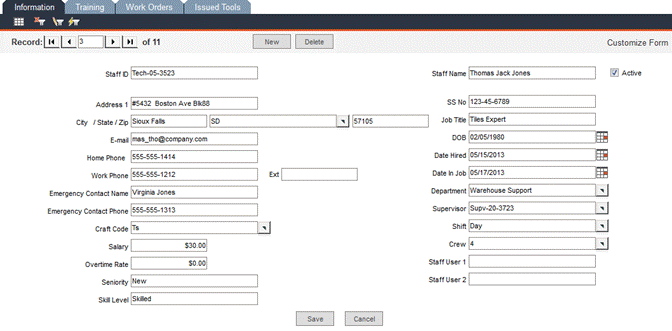
Check the Active checkbox to show that the employee is currently active. If the employee is not marked as active, his/her name will not appear on reports that list available employees, nor will it appear in pop-up lists for Staff ID fields on various data entry screens, such as the Data Administration -> Assets -> Auth. Persons tab.
IMPORTANT: It is important that you not delete staff records from the database. This action will create orphan records and therefore, all PMs and WOs associated with the deleted staff record will also be deleted. If the staff member is no longer a part of your organization, simply uncheck the Active checkbox.
Use the Craft Code field to categorize your workers by profession or trade. You can use a description, such as welder or electrical engineer or you can use a code, such as MIG-3 or a union number combined with a classification, such as 786-Journeyman or 786-Apprentice.
Fields such as Craft Code use pop-up lists. The contents of all pop-up lists within FaciliWorks are defined from within the Configuration -> Admin Settings -> Advanced tab and can be edited. Please see Admin Settings for detailed information.
Salary and Overtime Rate are used by FaciliWorks in the calculation of maintenance costs.
Enter the seniority or other work status of the employee in the Seniority field. For example, you could enter the number of years the employee has been in his field to determine seniority or you could use this field to store the date that determines seniority.
Using either an internal or external classification system, assign a Skill Level to each employee. You could also use this field to indicate multiple skills for your employees, assigning letters or numbers for different skills.
In the Date Hired and Date in Job fields, enter the date on which the employee was hired and the date on which the employee started his or her current position.
Staff User 1 and Staff User 2 fields can be used to store any additional information. This type of field can be defined within the Admin Settings -> Interface -> Custom Labels tab. Please see Admin Settings for detailed information. You can also modify all form labels using the Customize Form button located at the top right corner of each form.
Use the Staff Entry -> Training tab to keep track of the employee’s current and continuing education.
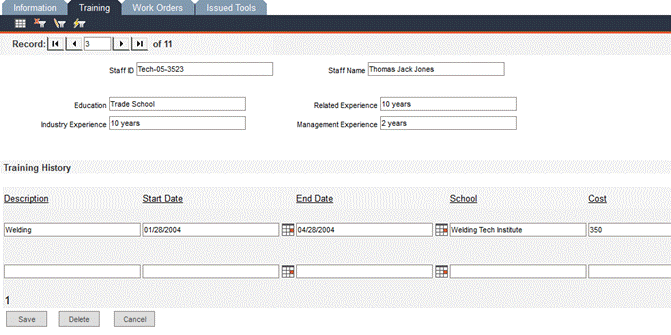
The Staff ID and Staff Name fields will be automatically populated from the data entered in the Information tab and are read-only on this form.
Education: Enter a brief description of the employee’s education.
Industry Experience: Enter a description of the employee’s industry experience here, such as “6 years Boiler Engineer, Class II.”
Related Experience: Use this field to enter any other useful experience, such as “Four years of mechanical drafting - three-dimensional blueprints.”
Management Experience: Enter any management experience that the employee has, such as “Supervised crew of 18 for installation of 3 cooling towers in 1996.”
In this section, track classes and certifications that each employee has completed. Scroll to the right to see additional available fields.
Enter the basic details of the certification or training class; use the Status field to indicate whether or not the training is complete.
If the training was for a particular certification, enter the type of certificate in the Certification field; enter the certificate’s expiration date, if applicable, in the Cert. Exp. Date field.
Hours: Enter the number of training hours the employee has completed.
CEUs (Continuing Education Units): In this field, enter the number of credit units earned for the training.
Enter any other relevant information for this training or certification in the Comments field.
This screen displays the work orders assigned to the staff member.

This information is not editable in this screen; it is automatically populated with information from work order records.
Click a column header to sort the list by that field.
Click the grey box to the right of a field to view the work order record; the form displayed is the same form that can be accessed by navigating to the Work Orders -> Work Order Manager -> Information tab.
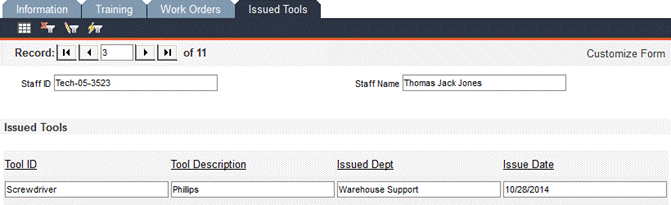
This screen lists the tools currently issued out to the staff member. This information is not editable in this screen; it is automatically populated with information from the issuance of tools. When a tool is returned, it no longer appears in this list (this is not an issuance history). Click a column header to sort the list by that field.
FaciliWorks offers you several system security options, including group and object permissions. Assigning users to defined user groups saves time versus assigning individual permissions. Access the security feature by navigating to Personnel -> Security.
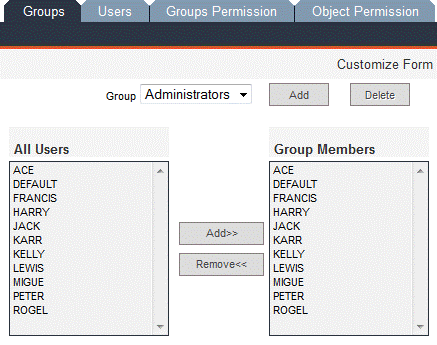
In this tab, create and edit names of security groups. The Group drop-down list will contain all groups you create. FaciliWorks 8i contains five configured groups for your convenience: Administrator, Guests, Requests, Users and Work Orders. In 8i Calibration, a Calibrations group is also included.
You can print out a listing of each group’s permissions by navigating to Reports -> Standard Reports -> Program Reports -> Group Permissions and Users. As the report is quite lengthy, filter for each group before printing.
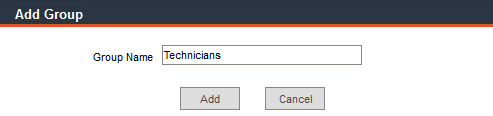
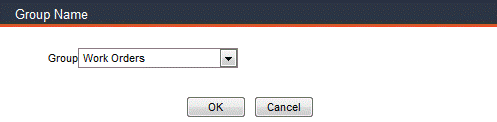
To add a new group, click the Add button. The Add Group form will open in a separate window. Type a name for the new group in the Group Name field.
Click the Add button to create the new group and the following message will appear:
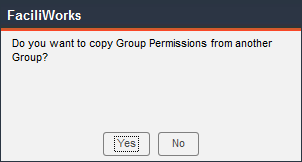
Click Yes to copy the rights (to save time, it is recommended that you copy permissions from another group). Clicking Yes will open the following window:

From the Group drop-down list, select the name of the group whose permissions you would like to copy to the new group and click OK. The following window will open:
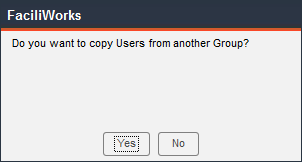
Click Yes to copy the list of users from another group to the new group. Clicking Yes will open the following window:
Use the Group drop-down list to select the group whose list of users you would like to copy to the new group. Click OK.
You are returned to the Groups tab. Use the Group drop-down list to select the new group and view the list of its members. You can then add or remove users from this list.
To add a new group, click the Add button. The Add Group form will open in a separate window. Type a name for the new group in the Group Name field.
Click the Add button to create the new group and the following message will appear:
Click No to assign unique permissions to this group.
You are returned to the Groups tab. Use the Group drop-down list to select the group you’ve just created. The All Users pane lists all current FaciliWorks users. To add users to the new group, click the user name and then click the Add>> button. The user is then shown in the Group Members list.
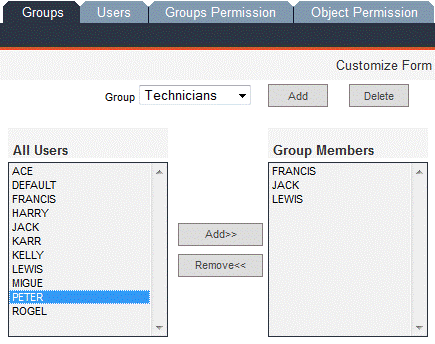
To remove a user from a group, select the user from the Group Members pane and then click the Remove<< button.
From the Group drop-down list, select the group you want to remove and then click the Delete button. The following confirmation message will open:
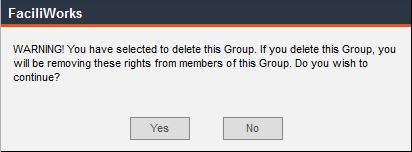
Click Yes to continue or No to cancel the deletion of the group.
Navigate to the Personnel -> Security -> Users tab to create, edit and delete FaciliWorks user records and assign users to security groups.
To create a new user, click the Add button. The Add New User form will open:
In the User ID field, enter a unique alphanumeric code. This will be the User ID used to log in to FaciliWorks. The User ID is not case-sensitive.
In the Name field, enter the user’s Staff ID. (The Staff ID is entered within the Personnel -> Staff Entry -> Information tab.) If the new user does not have a staff record or if you prefer not to link the new user to a staff record, leave the Name field blank. The name of the user will be displayed at the bottom middle section of the FaciliWorks screen.
Type a password in both the Password and Confirm Password fields. (The password must comply with specifications defined within the Configuration -> Admin Settings -> Security tab.) The password is case-sensitive.
Click the Require Password Change checkbox if it is required that the user change his password when he logs in to FaciliWorks for the first time.
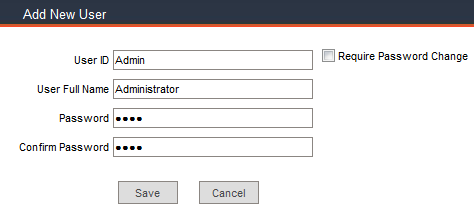
Click the Save button to save the new user record.
If you did not enter a Staff ID for the new user or you did enter a Staff ID and it doesn’t match any existing staff records, the following message will appear:
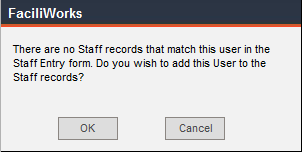
Clicking OK will open a staff entry form in another window. See Staff Entry for detailed information about entering staff records. Save the new staff record.
If you prefer not to link the new user to a staff record, click Cancel instead.
The new user record has been created and the following message opens, reminding you to add the new user to a security group.
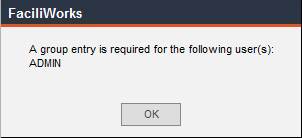
Click OK to return to the Users tab. (You can now proceed to add the user to a group or you can do it later, but you will continue to receive this message until that has been done.
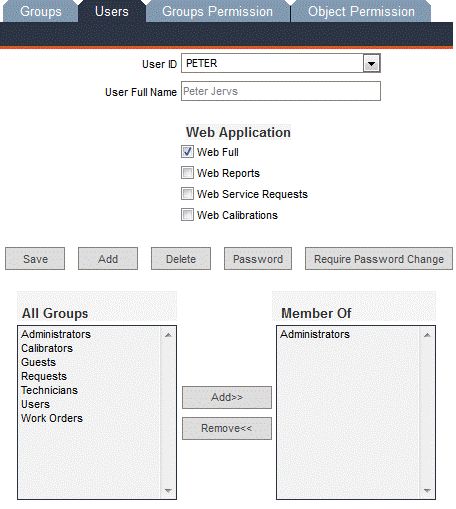
On the Users tab, use the User ID drop-down menu to select the newly created user; the Name field will be automatically populated with the user’s name.
Select the type of web application the user will be using: Web Full gives the user access to Web Reports, Web Service Requests and Web Calibration Module (Calibration Module is only available for 8i Calibration) or access to reports, service requests and calibration can be given separately by checking the corresponding checkboxes. If the user is given Web Full rights, it is not necessary to check any other checkboxes.
In the All Groups pane, highlight the group(s) to which this user should belong, then click the Add>> button. This assigns the user to the group(s) and the groups are then listed in the Member Of pane. You must assign each user to at least one group and it is recommended that each user be a member of only one group.
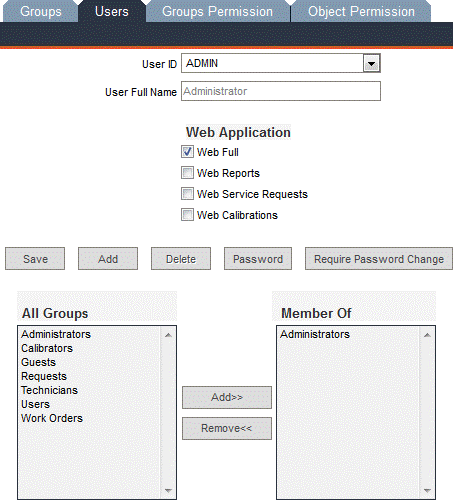
Note: The user receives the lowest level of privileges available in the groups to which he or she is assigned. For example, if the user is assigned to a group that cannot delete tool records, but is also assigned to a group that can delete tool records, the user will not have permission to delete tool records.
Click the Save button to save the new user record.
To change a user’s password, click the Password button on the Security -> Users tab and the following window will open:
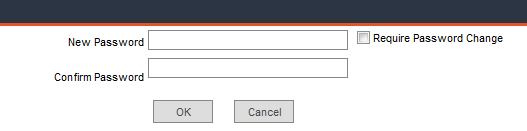
Enter a new password in both fields, click the Require Password Change checkbox (if necessary) and click OK.
You cannot change a User ID; you can only delete the user and create a new one. Once a User ID has been used, it cannot be reused; FaciliWorks retires the ID. The reason for this is that User IDs are shown in Audit Log records.
To delete a user, use the User ID drop-down list to select the record and click the Delete button. A confirmation message will appear; click Yes to delete or click No to cancel this action.
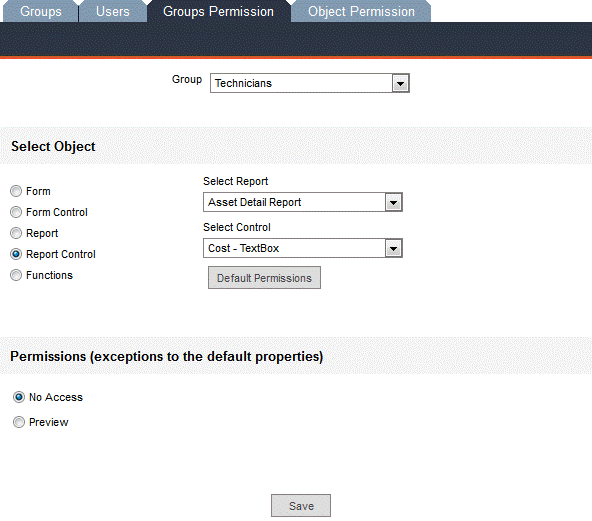
Use this form to create unique sets of rights for each group. If you need to assign unique rights to an individual user, create a unique group for that user, then go to this screen to assign the specific rights to the group. It is important to coordinate the permissions that you assign. For example, you can’t allow a group to add new asset records, but then remove their access to the Asset ID field.
Use the Group drop-down list to select the name of the group whose rights you want to edit.
In the Select Object pane, click one of the object radio buttons; upon selection of the object, the options for that object become available.
Click the Default Permissions button to restore the default rights for the group. You will receive a confirmation message; click Yes to continue or No to cancel the action. After specifying permissions, be sure to click the Save button.
This object is used to set permissions for the entire form.
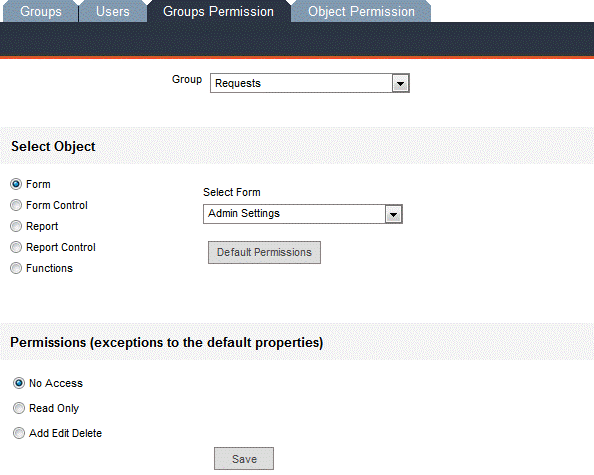
Form: Click this radio button to edit permissions to forms.
Select Form: This field appears when you select the Form radio button. Use the drop-down list to select each form to which you need to assign rights for this group. You can edit rights for only one form at a time.
Permissions: The available options in this field will vary depending on which form is selected. Each permission type is listed below; not all of them appear for every selection. Click the radio button for the appropriate level of access for the group.
No Access: Users cannot see, edit, add or delete records in this category.
Read Only: Users can only view records.
Add Only: Users can only add new records in this category.
Edit Only: Users cannot add or delete records, but can edit them.
Add Edit: Users can edit records and add new ones, but cannot delete them. It is highly recommended that general users not be given rights to delete records.
Edit Delete: Users can edit or delete existing records, but not add new ones.
Add Edit Delete: Users can edit, add and delete records.
All fields, radio buttons, checkboxes, buttons, drop-down menus and pop-up menus on a form are called Form Controls.
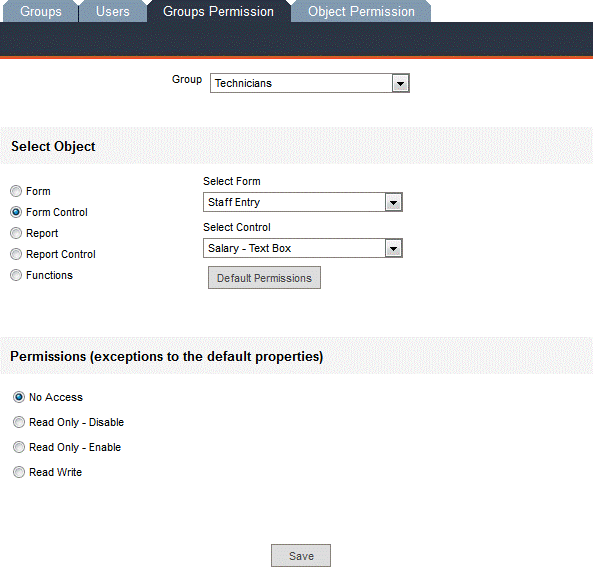
Form Control: Click this radio button to assign rights to specific controls within record entry forms.
Select Form: This field appears when you select the Form Control radio button. Use the drop-down list to select each form to which you need to assign rights for this group. You can edit rights for only one form at a time.
Select Control: The available options in this field will vary depending on which form is selected in the Select Form drop-down list. Use the drop-down list to select each control to which you need to assign rights for this group. You can edit rights for only one control at a time.
Permissions: The available options in this field will vary depending on which form is selected. Each permission type is listed below; not all of the types appear for every selection. Click the radio button for the appropriate level of access for the group.
No Access: Users have no access to the control; although
the control is visible, a security message will display if the control
is clicked:
![]()
To hide the control from the user group, be sure to activate this feature
by navigating to Configuration -> Admin Settings -> Security
and check the Hide Buttons with No Rights checkbox. (For example,
you can block users from viewing salary-related fields in the Staff
Entry form).
Visible - Disabled or Enabled: Users see the button control, but cannot use it; the disabled feature grays out the control (Disabled and Enabled refer only to the button’s appearance).
Read Only - Disabled or Enabled: Users see the control, but cannot change its contents; the disabled feature grays out the control (Disabled and Enabled refer only to the button’s appearance).
Read/Write: Users can view and change the contents of the field.
Use this radio button to set security permissions for an entire report.
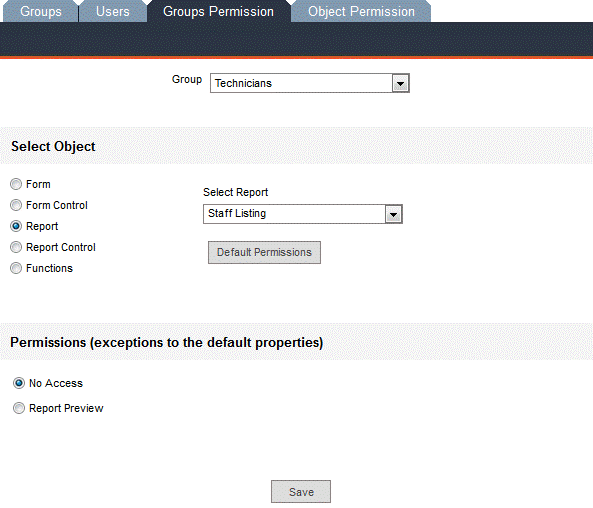
Report: Click this radio button to define permissions for FaciliWorks reports.
Select Report: This field appears when you select the Report radio button. Use the drop-down list to select each report to which you need to assign rights for this group. You can edit rights for only one report at a time.
Permissions: Click the radio button for the appropriate level of access for the group.
No Access: Users cannot view the report (it won’t appear in the list of available reports on the Reports menu).
Report Preview: Users can preview and print the report.
All labels, data field placeholders and checkboxes are Report Controls.
Report Control: Click this radio button to edit rights to specific controls in reports.
Select Report: This field appears when you select the Report Control radio button. Use the drop-down list to select each report to which you need to assign rights for this group. You can edit rights for only one report at a time.
Select Control: The available options in this field will vary depending on which report is selected in the Select Report drop-down list. Use the drop-down list to select each control to which you need to assign rights for this group. You can edit rights for only one control at a time.
Permissions: Click the radio button for the appropriate level of access for the group.
No Access: Users cannot view the report (it won’t appear in the list of available reports on the Reports menu).
Preview: Users can preview and print the report.
This gives the user group access to the features in the Utilities and Data Tools menus, which are called Functions.

Functions: Click this radio button to assign rights for FaciliWorks functions.
Select Function: This field appears when you select the Functions radio button. Use the drop-down list to select each function to which you need to assign rights for this group. You can edit rights for only one function at a time.
Permissions: Click the radio button for the appropriate level of access for the group.
Don’t Run: The function is not active.
Function Run: The function is enabled for the user group.
Use this screen to see a summary of the permissions that have been assigned for a particular form, report or function. Information in this tab is not editable here; it is an organized list of permissions assigned within the Group Permissions tab; i.e., it shows permissions sorted by object rather than by group.
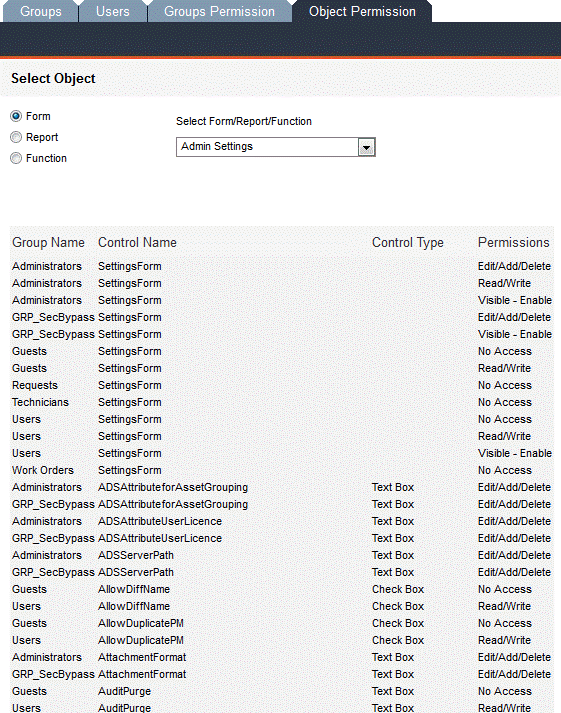
First, click one of the Select Object radio buttons. Then, use the Select Form/Report/Function drop-down list to select a specific object whose permissions you would like to see.
FaciliWorks will show you a listing of permissions for that object, including control permissions (fields/buttons) and group names.
You can print out a listing of each group’s permissions by navigating to Reports -> Program Reports -> Group Permissions and Users. As the report is quite lengthy, filter for each group before printing.
Sometimes when creating a FaciliWorks User ID for a staff member, you may neglect to link the ID to the staff record. To link the two records at a later time, use the Staff User List to attach the user’s User ID to his or her Staff ID.
Navigate to Personnel - > Staff User List. Locate the user record that needs a staff link.
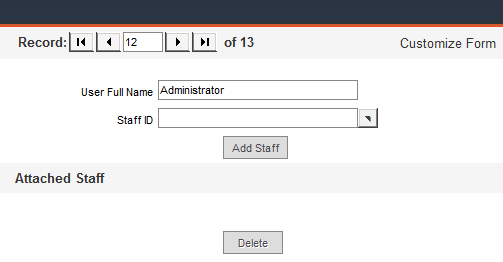
Click the Staff ID pop-up, select the staff member to link to the user and then click Add Staff.
Selecting a staff record from the list and linking it to the user record will automatically add that staff member to the security records using their Staff ID as the User ID. The added staff member will then be able to log in to the application using the User ID and password when logging in for the first time. The linked staff record will be displayed in the Attached Staff section in the lower part of the window. Only one staff record can be assigned to a user record.
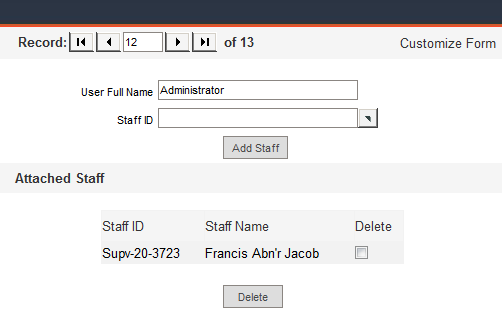
To delete the staff record link, check the Delete checkbox and then click the Delete button.
The User Asset Grouping form contains the same information as the Configuration -> Asset Grouping Entry -> User tab, but the data is sorted by the user instead of being sorted by the group.
The Asset Grouping Entry -> User tab displays one Asset Group at a time with a list of users who have access to that group, whereas the User Asset Grouping form displays one User Name at a time with a list of Asset Groups to which that user has access.
This form contains one record for each user in the system. Use the record navigation bar to locate the record for the user. Use the Grouping ID pop-up list to select the group to which this user should have access; the Grouping Description field will be automatically populated.
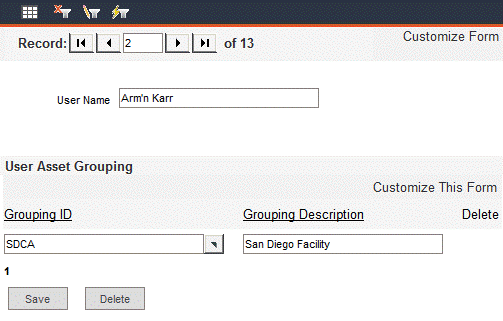
Click the Save button. This will save the record and will create another Grouping ID field to assign another group to the user.
Remember that in order to use Asset Grouping, the feature must be enabled from within the Configuration -> Admin Settings -> General tab by checking the Enable Asset Groupings checkbox.