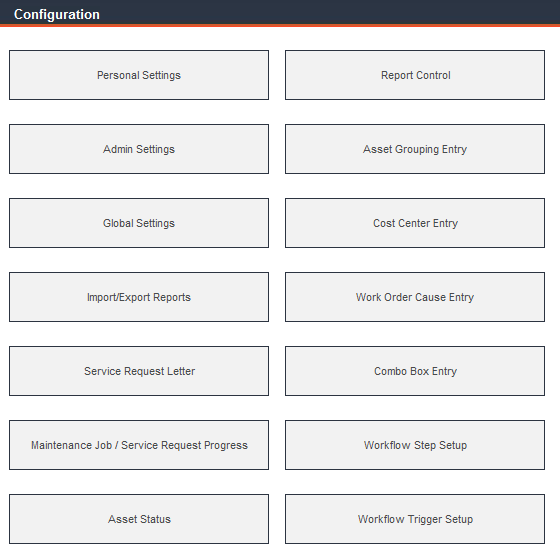
To set your program preferences and enter user information, select Configuration from the Main Menu.
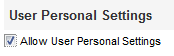
By default, all preferences set in Global Settings override any choices made in Personal Settings. To allow personal settings to be used, go to the bottom of the Global Settings form and check the Allow User Personal Settings checkbox.
Click the Save button at the bottom of the Global Settings form to save any changes. Re-login is required for changes to take effect:
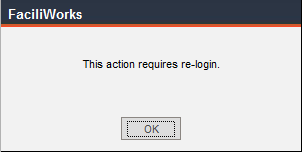
Click OK to be directed to the Log In form. Log into FaciliWorks to see the results of your changes.
Following are all of the options in Global Settings, most of which are also available in Personal Settings.
Enter an interval of time, in minutes, for the automatic refresh of the Maintenance Jobs Calendar. When you view the calendar, the program will automatically update the data according to this interval.

To view the calendar, click the calendar icon in the header bar on the Dashboard. The number of minutes remaining until the next refresh will be displayed toward the top of the calendar. To refresh the calendar manually, click the Refresh button.
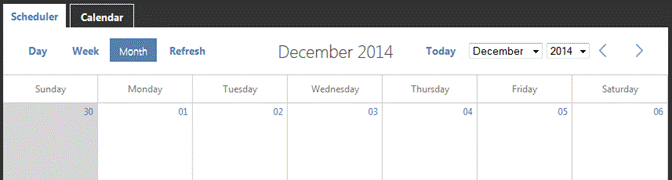
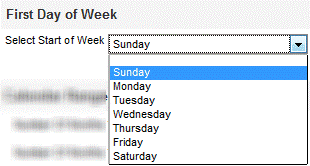
Use the Select Start of Week drop-down list to select the day of the week on which your work week begins. This day will be the first column in your Maintenance Jobs Calendar and all calendar pop-ups.
In the Calendar Range section, define the range of time available for viewing in the FaciliWorks’ calendar. The two fields in this section are Number of Months to Look Ahead and Number of Months to Look Before. To make only the current month available for viewing, enter 0 in both of these fields. These fields default to 6 and 0, respectively.

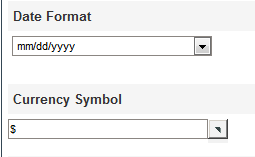
Select a date format and currency symbol from the respective drop-down lists:
Use the Select Viewer Type drop-down list to select your preference for viewing reports on-screen.
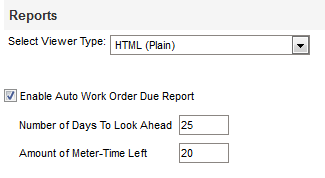
Check the Enable Auto Work Order Due Report checkbox; the Number of Days to Look Ahead and Amount of Meter-Time Left fields are automatically populated with 25 and 20, respectively. If you change these values, be sure to click the Save button at the bottom of the form to save your changes.
With this report enabled, each time you log in to FaciliWorks, you will receive the following prompt:
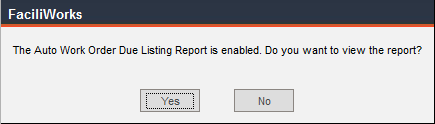
Click No to close the message and return to the program or click Yes to view the report:
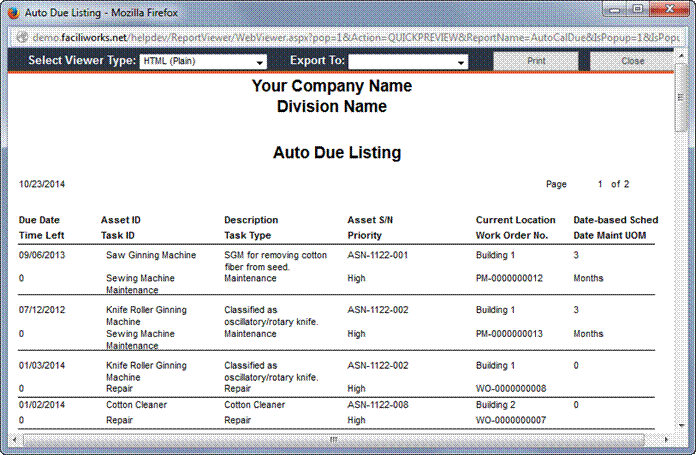
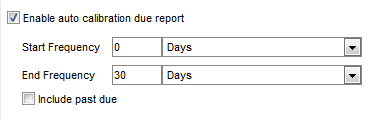
This report is a detailed list of all calibrations currently due. Check the Enable Auto Calibration Due Report checkbox. In the Start Frequency and End Frequency fields, enter a numeric value in the left-hand fields and select a unit of time from the drop-down lists in the right-hand fields. If you would like past due calibration orders to be included in the report, check the Include Past Due checkbox. After making any changes, be sure to click the Save button at the bottom of the form.
With this report enabled, each time you log into FaciliWorks, you will receive the following prompt:

Click No to close the message and return to the program or click Yes to view the report.
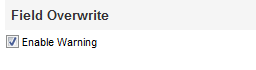
Check the Field Overwrite Enable Warning checkbox to receive a warning message when you attempt to overwrite any identification or key field contents.
With this warning enabled, you will receive the following message when you attempt to save such changes:
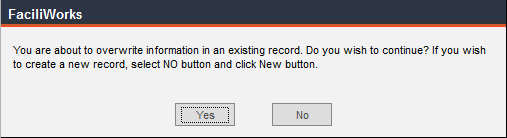
To overwrite the data, click Yes; otherwise, click No.
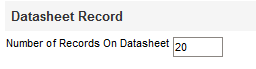
Type a numeric value in the Number of Records on Datasheet field; the default quantity is 20. This record quantity refers to the number of rows shown at a time when in Datasheet View. A larger number will take longer to load with fewer pages to view.
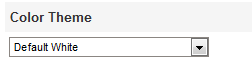
Use the Color Theme drop-down list to select your color theme preference.
Several forms within FaciliWorks have configurable filter and view options.
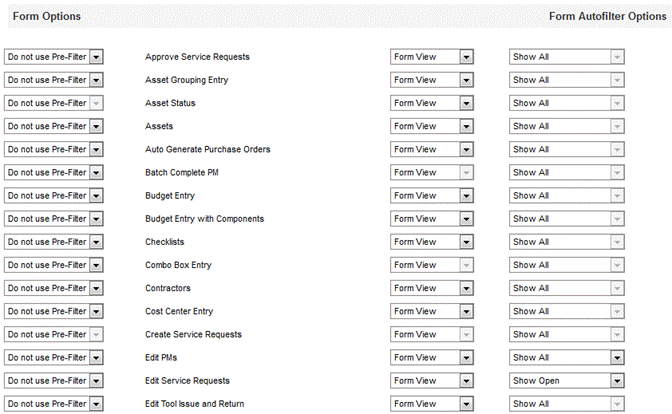
The second column in the screen above lists form names. In the field to the left of the form name (the first column), select whether or not to open the form with a pre-filter. The default is to not use a pre-filter which means that the form will open and immediately show the data records. If a form is set to use a pre-filter, upon entering that data entry point, you will be prompted to filter the records.
In the third column, select the view option to open the form; either form view (default) or datasheet view.
In the fourth column, for forms such as Edit PMs, select to Show All, Show Open or Show Closed/Completed orders. It is recommended that Open is selected for Edit PMs and Work Order Manager; when you navigate to these areas, only the incomplete PMs and WOs are initially visible, making it easier to locate orders that must be completed. If filters are enabled here, the filters can be removed when viewing the individual forms by clicking the form’s Show All Records icon located on the filter icon bar at the top left of the window.

Check the checkbox shown above to receive a pop-up alert when service requests are created. Type a numeric value in the next field to represent the number of service requests that must be created before you receive the alert.
Check the checkbox to make the Main Menu item visible; uncheck the checkbox to hide it. The Configuration checkbox cannot be unchecked; this prevents the user from being locked out of the software.
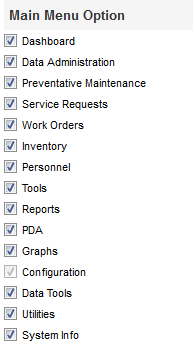
The items in the Main Menu are sorted as follows by default (Calibrations is only present when using FaciliWorks 8i with Calibration):
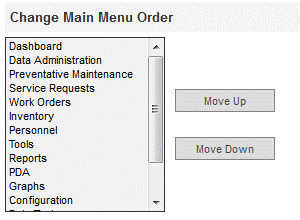
Change the order of these items by clicking an item to highlight it, then clicking the Move Up or Move Down buttons to move the item up or down in the list.
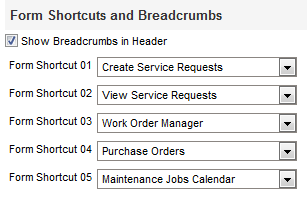
Check the Show Breadcrumbs in Header checkbox to view your current location within the software in the header of the FaciliWorks window (the bottom row of text in the image below). The example below shows that from the Main Menu, the Configuration module was selected and then you navigated to Global Settings.

To create shortcut links to the areas of the software you use most often, use the drop-down lists in the Form Shortcut fields (01-05). The text versions of these shortcuts appear in the header of the FaciliWorks window above the breadcrumbs (pictured above).
Breadcrumbs and shortcuts can be deactivated by un-checking the Show Breadcrumbs in Header checkbox and leaving the five Form Shortcut fields blank.
In the Admin Settings -> User Information tab, enter your company information in the appropriate fields and upload your logo. The address entered here will appear as the ship-to address on all purchase orders created within FaciliWorks, along with the Taxpayer ID Number and Purchase Order Statement. The two fields for company name (Name and Division Name) and the optional logo will appear at the top of all of your reports. The Maintenance Certificate Statement includes Certificates of Maintenance which might be required to satisfy asset warranties. This statement is printed on all completed work order reports.

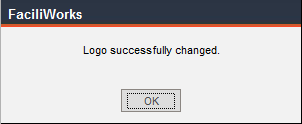
In the Logo pane, click the Browse button to locate and select your digital company logo. Ideally, the logo graphic you insert or paste should be no larger than the space provided (about 2” x 1.25”) at up to 300 dpi. Larger graphics may use system resources unnecessarily; this may slow down report printing or prevent your logo from being printed at all. If your logo is visible on this form after uploading, but does not appear on your reports, it requires too much memory and should be replaced with a smaller graphic using fewer colors. Your logo will be displayed on screen and you will receive the following message; click OK to close the message.
To disable your logo, click the Disable Logo button. Click Save after any changes.
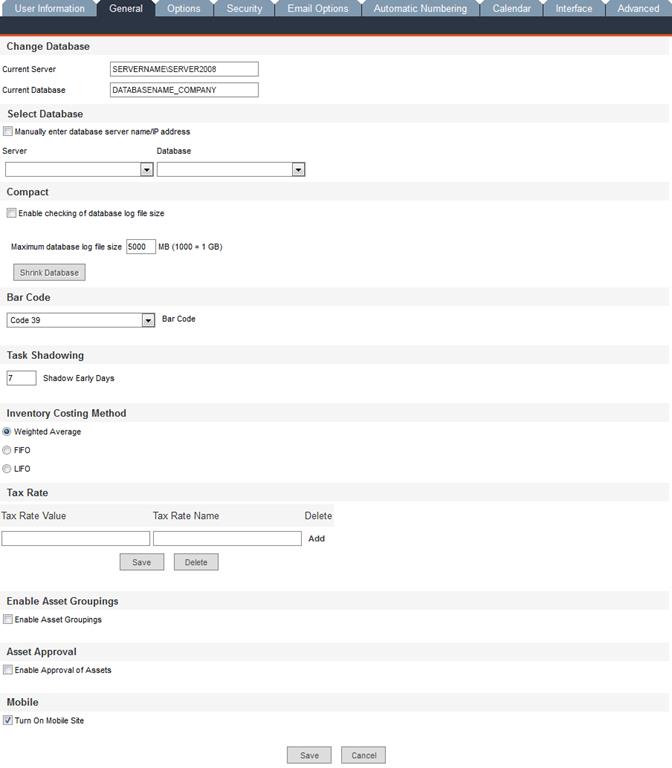
Current Server: The name of the database server FaciliWorks is currently using.
Current Database: The name of the database FaciliWorks is currently accessing.
Server: If you need to change to a different database server, select the name of the server from the drop-down list. Once a server is selected, a dialog box will appear requiring a user ID and password to access the database server.
Database: Once the server has been selected, choose a database from the drop-down list. The list will consist of databases that are available on the selected server. The default listing of database names consists with a prefix of “PM.”
If you do not find the name of the database you are looking for, i.e., default name was changed, then check the Manually enter database server name/IP address checkbox to enter these values manually.
Use the Bar Code drop-down list to select the type of barcode format you want to use. You can select Code 39 (contains capital letters and numbers) or Code 128 (contains letters, numbers, control characters and some symbols). Code 39 is the default value.
Shadow Early Days: Indicate the maximum number of days between the completion of a shadowing task and the completion of a shadowed task.
When using the task shadowing feature, a shadowed task PM will not be created if the shadowed task and the shadowing task are due within the specified number of days identified here. For instance, entering 7 will mean that if the dates for the shadowing task and shadowed task fall within 7 days of each other, the shadowing task PM is the only PM that will be scheduled. When the shadowing task is completed, the shadowed task is also closed so that the next due date remains on schedule.
In this pane, indicate the Inventory Costing Method used by your accounting department: Weighted Average, LIFO or FIFO by clicking the appropriate radio button.
Enter the tax percentages in the Tax Rate Value fields and types (such as State, County or City) in the Tax Rate Name fields. When you create purchase orders, you can select the tax rate from this list.
Delete Checkbox and Delete Button: After entering values into the first row of fields, click Add; this will present an additional row of fields for another entry. At this point, there will now be a Delete checkbox to the right of the row. To delete a row from the Tax Rate pane, check the Delete checkbox associated with that row and then click the Delete button.
Check this checkbox to enable Asset Grouping. Asset Grouping must be set up prior to checking this checkbox. For more information, see Asset Grouping Entry.
When the Enable Approval of Assets checkbox is checked, every time an asset record is created, it will have a default Status of For Approval. A manager/administrator can then periodically filter assets by Status, go through all of the newly created assets, edit the records as necessary and then change the Status to Active.
Check the Turn On Mobile Site checkbox to allow access to the Mobile version of FaciliWorks. When this checkbox is checked, the FaciliWorks window will include a link to the mobile site in the upper right corner:
For instructions on how to use FaciliWorks 8i Mobile, please see the FaciliWorks 8i Mobile User Guide.
If you have the optional Service Request Module installed, select from the following options:
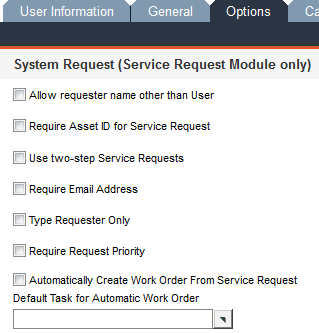
Allow requester name other than User allows users to select service requester names other than their own from the pop-up menu.
Require Asset ID for Service Request allows you to select whether you require requesters to reference an Asset ID with every service request.
Use Two-Step Service Requests requires approval of service requests before they become work orders.
Require Email Address requires that the requester supply his/her email address with each service request. This field auto-fills from the email field on the requester’s staff record if the requester has a staff record in the database.
Type Requester Only requires the user to manually type a name in the Requested By field; the user pop-up list is not active.
Require Request Priority requires that service requesters fill in the Priority field on every service request.
Automatically Create Work Order from Service Request will create a work order from each service request that is submitted. This action will bypass both the approval and edit procedures. You must select a default task before enabling this feature.
Default Task for Automatic Work Order: Before enabling the automatic creation of a service request feature, this field must contain your selection from the pop-up list for the single default task that to be used on all automatically created work orders.
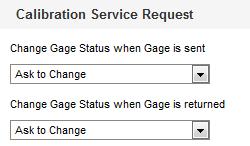
Use the drop-down boxes in the Change Gage Status When Gage Is Sent and Change Gage Status When Gage Is Returned to select whether you want a gage’s status to change automatically, if you want FaciliWorks to ask you each time or if you do not want the status of gages to change at all.
This is the gage Status pop-up list found on gage records within the Assets -> Information tab:
Check the boxes to specify the required identification fields on PMs and WOs.
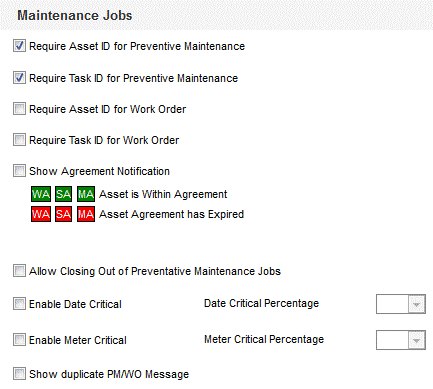
Require Asset ID for Preventative Maintenance, Require Task ID for Preventative Maintenance, Require Asset ID for Work Order and Require Task ID for Work Order: Check the checkboxes for the conditions that need to be met regarding the asset and task ID fields for preventative maintenance jobs and work orders. It is recommended that all boxes be checked for better tracking.
Show Agreement Notification: Checking this checkbox will result in a red or green tag next to the Asset ID field (in Asset Filter and WO and PM events), indicating whether the asset is within (green) or out of (red) its warranty/asset agreement. The warranty/asset agreement period is defined within the Assets -> Financial tab.
Allow Closing out of Preventative Maintenance Jobs permits you to close a PM without actually completing it. This will force FaciliWorks to generate the next scheduled PM. All closed, incomplete PMs will be listed at the bottom of the Manual Create PMs form.
Enable Date Critical: Enables the software to display scheduled jobs in Manual Create PMs based on the critical % of the date-based schedule, overriding the lead time specified in Auto/Manual Create PMs.
Date Critical Percentage: The scheduled date-based job will display when it reaches this %.
Enable Meter Critical: Enables the software to display scheduled jobs in Manual Create PMs based on the critical % of the meter-based schedule, overriding the lead time specified in Auto/Manual Create PMs.
Meter Critical Percentage: The scheduled meter-based job will display when it reaches this %.
Check the Show Duplicate PM/WO Message checkbox to receive an alert when a duplicate PM or WO has been created. This alert will ask if you want to delete the duplicate(s). Click Yes to delete or click No to manually review/edit the duplicate(s).
The options in this section give you control over whether or not preventative maintenance records are created automatically and if so, how frequently.
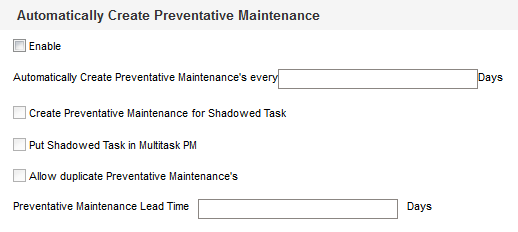
Checking the Enable checkbox allows PMs to be created automatically. Enabling this function requires that you enter a frequency (in days) in the Automatically Create Preventative Maintenances Every ____ Days field.

When this function is enabled, as in the image above, every seven days, upon logging in to FaciliWorks, the following message opens:
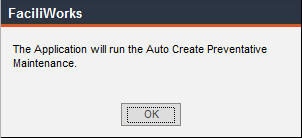
Click OK. A list of any PMs that could not be automatically created will appear in a separate window:
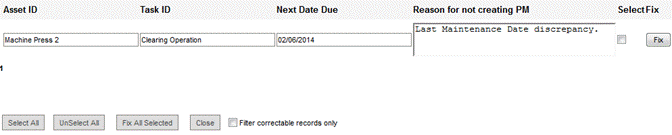
An asset that already has an open PM or work order will appear in this list only if the Allow Duplicate Preventative Maintenances checkbox is unchecked. If that checkbox is checked, these PMs would have been automatically created because duplicates are allowed.
If an asset’s schedule contains a date discrepancy, this can be corrected. Click the Fix button beside the individual records or check multiple checkboxes associated with the assets and click the Fix All Selected button at the bottom of the form. When the record has been fixed, you can either navigate to Manual Create PMs and manually create the adjusted PM or you can log into FaciliWorks again and rerun Auto Create Preventative Maintenance.
Create Preventative Maintenance for Shadowed Task will create a PM for any shadowed task when the parent (or shadowing) task is due. Checking this checkbox activates the Put Shadowed Task in Multitask PM checkbox; checking this checkbox instructs FaciliWorks to create a multitask PM with the shadowed/shadowing tasks.
Enter a numeric value in the Preventative Maintenance Lead Time ____ Days field. This field specifies the number of days into the future that scheduled jobs will be displayed on the Manual Create PMs form. For example, show jobs scheduled for the next 7 days.
In this section, set the conditions for the manual creation of PMs.

Create PM for Shadowed Task: When this box is checked, all shadowed tasks will be created as PMs.
Put Shadowed Task in Multitask PM: Instructs FaciliWorks to create a multitask PM with the shadowed/shadowing tasks. This option is activated only after checking the Create PM for Shadowed Task checkbox which will create a PM for any shadowed task when the parent (or shadowing) task is due.
Allow Duplicate Preventative Maintenance Jobs: Checking this box will allow a PM to be created for a task even if there is currently an open PM order for the same task.
Enter a numeric value in the Preventative Maintenance Lead Time ____ Days field. This field specifies the number of days into the future that the jobs will be displayed on the Manual Create PMs form. The default is set to show jobs scheduled for the next 7 days.
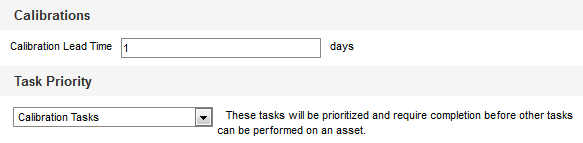
Calibration Lead Time ____ Days field (8i Calibration only): Enter a numeric value to specify the number of days into the future that scheduled calibrations will be displayed on the Calibrate Gages Due form.
Task Priority (8i Calibration Only): From the drop-down list, select Calibration Tasks, Maintenance Tasks or No Priority Tasks when both maintenance and calibration is due on the same asset at the same time.
Any spare parts that have fallen below their predefined reorder points appear in Inventory -> Create Purchase Orders (formerly Inventory -> Auto Generate Purchase Orders). If you enable Automatically Create Purchase Order here within the Configuration -> Admin Settings -> Options tab and set an interval in days, FaciliWorks will automatically create those purchase order(s) at that interval, grouping them by supplier, when possible.
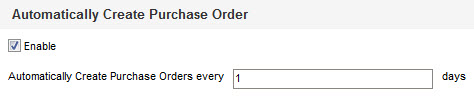
FaciliWorks can also automatically dispatch emails when POs are created; see the Admin Settings -> Email Options tab for details.
You can create a meter-based schedule here based on either the estimated due date or the actual meter remaining.
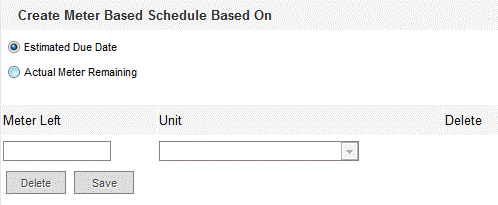
If Actual Meter Remaining is selected, then below it, the Meter Left and Unit fields will become editable, allowing you to enter values to determine the remaining amount that will trigger the creation of a PM order. Enter a numeric value in the Meter Left field and use the drop-down list in the Unit field to select a unit of measure. Then, click the Save button below the Meter Left field to save the data. A new, blank record will appear, allowing you to enter another meter amount and unit of measure.

To delete a meter value, click the associated Delete checkbox, then click the Delete button. When the confirmation window appears, click OK to delete the record(s).
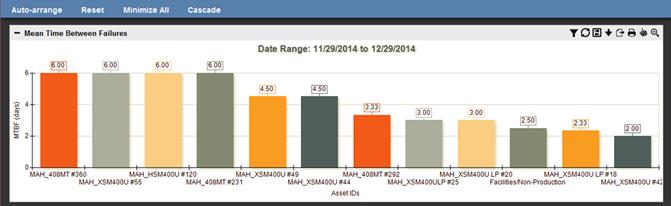
There are four KPI graphs: Mean Time between Failures, Assets with Highest Downtime for WOs, Top 10 Assets with Most Work Orders and Percent PMs Completed On Time vs. Completed Late.
To enable the KPI functionality, navigate to the Configuration -> Admin Settings ->Options tab and check the Turn on KPI checkbox. To access the KPI graphs, click the KPI icon (next to the Calendar icon) on the header bar of the Dashboard:
![]()
The graphs will open in a separate browser window.
Each KPI graph provides the user with access to a filter, which will allow you to filter by date range, Asset Type, Priority and specific asset ID(s), depending on the graph. If asset grouping is enabled, a user will only have access (here in KPIs) to the asset groups to which the user is assigned. The Administrator must be a member of all asset groups to have all assets and filtering available here.
You can expand the view of a KPI, print the KPI, export the raw data that was used to calculate the KPI and rearrange the display of the four KPIs. All of these functions are accessible via the set of icons in the upper right portion of each graph.
Use Auto-arrange, Reset, Minimize All and Cascade to alter the arrangement of the graphs.
These settings determine how FaciliWorks export reports.
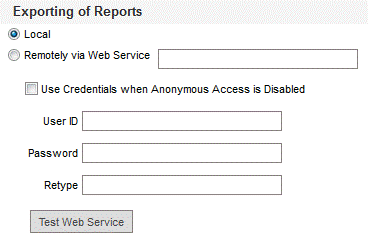
Local: Select this option to use default export report function in the reports module.
Remotely via Web Service: Select this option to use a deployed web service in a remote web server. This option is selected when using Web Single Sign On. The text box next to this option is used for entering the path of the remote web service, for example: http://www.faciliworks.net/FSW8iNET20/ReportsWebService.asmx.
If the remote web service is not configured as Anonymous Access (or Anonymous Authentication), then a windows user ID and password should be supplied to gain access to the web service.
User ID is the windows account
Password is the password of the windows account
Retype is the confirmation of the windows account password
If the remote web service is configured as Anonymous Access, then leave the User ID and Password fields blank.
Click the Test Web Service button to ensure settings are correctly configured.
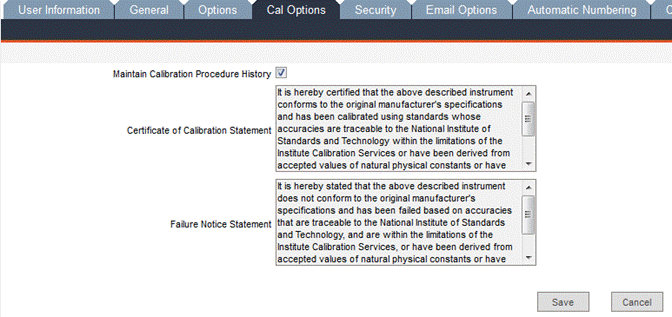
If Maintain Calibration Procedure History is set to true (checked), then the text of a specific procedure can be edited until it is used in a calibration record. Once it is added to a calibration record, the procedure is locked down so no changes can be made to it. If Maintain Calibration Procedure History is set to false (unchecked), then edits can be made any time even if the procedure is used in a calibration.
Certificate of Calibration Statement: The text entered here appears on certificates of calibration when gages pass calibration.
Failure Notice Statement: The text entered here appears on failure notice statements when gages fail calibration.
In this window, you can enable and set options for FaciliWorks’ security and audit trail features.
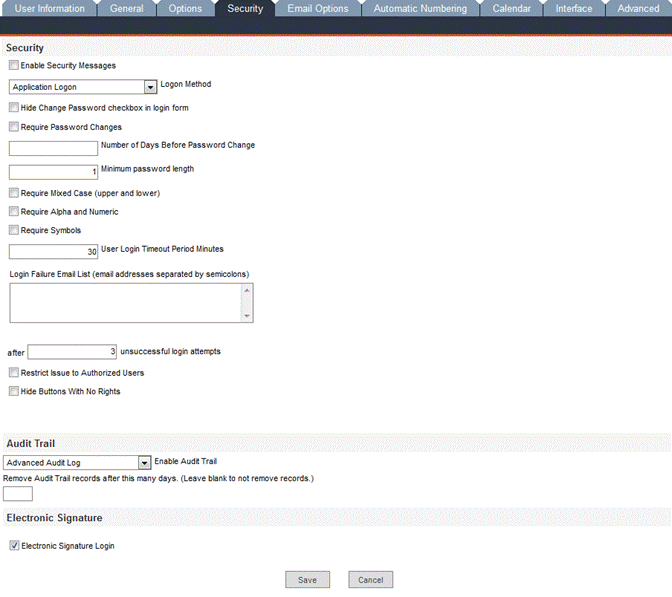
If you check this checkbox, FaciliWorks will display warning messages if users try to perform actions (such as deleting records) for which they don’t have permission. If you leave this box unchecked, users will still be unable to complete any action for which they don’t have permission, but no warning messages will be displayed.
Use this drop-down list to select the method by which users will log in to FaciliWorks.
Windows Logon uses security from your Windows operating system. When users access FaciliWorks 8i, they will be prompted with the standard Windows Login dialog. Thus, management of users and password is done through the server’s local Users and Groups security object. This is disabled under 21 CFR Part 11 implementation of the system.
Application Logon (default setting) uses security specific to the FaciliWorks program; you must set up user IDs and passwords in Security. When you launch FaciliWorks, you will be directed to a Log In screen. For the 21 CFR 11 compliant version of FaciliWorks, this field is locked to Application Logon.
ADS Logon: FaciliWorks 8i can integrate with Active Directory Distributed Systems for the authentication method. Currently, this function works with ADAM (Active Directory Application Mode). Contact CyberMetrics for updated news for compatibility with Windows Active Directory. This is disabled under 21 CFR Part 11 implementation of the system.
Web Single Sign On: FaciliWorks 8i allows the use of third-party WSSO authentication methods which utilizes the HTTP Header Variable method. This is disabled under 21 CFR Part 11 implementation of the system.
Method Requires Authentication Requires Form Entry
Application Logon Yes Yes
Windows Logon Yes Yes
ADS Logon Yes No (Seamless)
Web Single Sign On Yes No (Seamless)
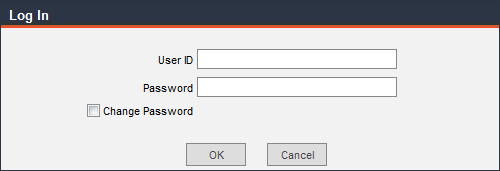
Hide Change Password checkbox in login form: Checking this checkbox will keep users from changing their passwords. When this checkbox is hidden, the Log In form will appear as follows:
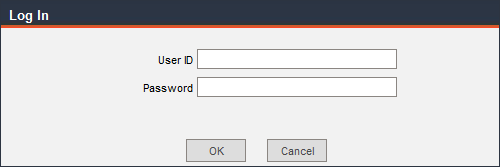
Default Log In form:
Require Password Changes: For security reasons, you may want users to periodically change their passwords. Check this checkbox and enter a password change frequency in the Number of Days before Password Change field. When this period of time passes, the Log In window will display “Password has expired. Please change your password.”
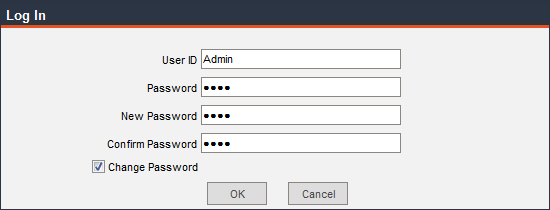
To change your password, check the Change Password checkbox. FaciliWorks will prompt you to enter your old password and then enter and confirm your new password.
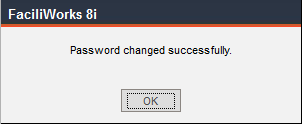
Enter those values and click OK. You will receive the following message:
Minimum Password Length: Enter the minimum number of digits required for passwords.
Require Mixed Case, Require Alpha and Numeric and Require Symbols: Check these checkboxes to require these characteristics in all passwords. These requirements make passwords difficult to guess, which increases security.
The numeric value in this field represents the number of minutes of inactivity allowed before FaciliWorks will automatically log out a user. There is a similar setting within the System Info -> Usage screen which overrides the setting here in the Security tab. Please see System Info for more details.
FaciliWorks can be configured to dispatch a notification email after a specified number of unsuccessful login attempts are made (use of incorrect User IDs and/or Passwords). The default is three attempts, but this number can be modified. See the Email Options tab to define email settings.
Login Failure Email List: Enter the email address of each person to be notified of the unsuccessful login attempts and separate multiple email addresses with semicolons.
After ____ Unsuccessful Login Attempts: Enter the number of attempts allowed prior to an alert being sent to the recipient list.
When this number of attempts has been made, the user will receive the following message:
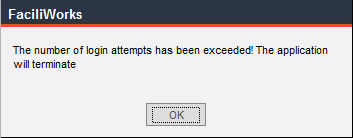
The email alert will be sent. The user can then click the OK button and immediately try again.
Checking this box will mean that assets can only be issued to users who are specifically authorized to handle them. FaciliWorks requires you to re-login for the changes to take effect. To select the authorized user(s) for each asset, navigate to the Data Administration -> Assets menu.
Within an asset record, click the Auth Persons tab. Click the Staff ID pop-up menu to select the authorized users. Navigate to the Information tab. Click the Usage button at the bottom of the form. Click the Issued / Used By EmpTo drop-down; only those authorized to use the asset are in the list.
Within a gage record (in 8i Calibration only), click the Issuances tab. Click the Staff ID pop-up menu to select the authorized users. Navigate to the Information tab. Click the Issue/Return button at the bottom of the form. Click the Issued / Used By EmpTo drop-down; only those authorized to use the gage are in the list.
If the Enable Security Messages checkbox is checked, FaciliWorks will display warning messages if users try to perform actions (such as deleting records) for which they don’t have permission. If the box is unchecked, users will still be unable to complete any action for which they don’t have permission, but no warning messages will be displayed.
By default, when a user’s rights are limited, the user will receive the following message when attempting to enter a restricted area:
![]()
If the Hide Buttons with No Rights checkbox is checked, the navigation buttons for the areas that are restricted will be hidden from the user. For example, a user with limited rights will not see buttons such as Personnel or Configuration in the Main Menu.
The Audit Trail records the actions performed within the program, such as record modifications and deletions, the date and time of each action and the name of the user who performed each action. The preferences for this feature are set here in the Security tab, but the Audit Log is accessed from the Utilities menu.
In the Enable Audit Trail drop-down list, choose from the following options:
No Audit Log
Basic Audit Log
Advanced Audit Log
Choose No Audit Log if you prefer not to keep track of record modifications, etc.
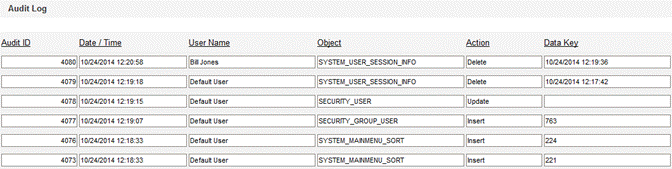
Choose Basic Audit Log to keep track of date and time, user name, record accessed, action performed and data key:
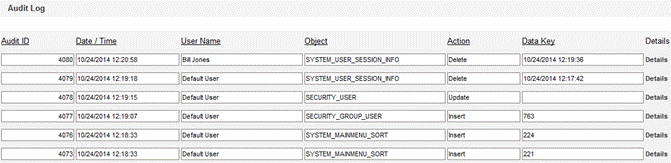
Choose Advanced Audit Log to be able to view all of the above details plus have the option to click Details (to the right of each record) to view data values before and after each modification:

Remove Audit Trail Records after this many days: Enter the number of days of Audit Trail data to store. FaciliWorks will automatically purge data older than this value. For example, enter 7 to keep the last week’s Audit Trail data. Enter 0 to keep a comprehensive audit trail record.
NOTE: If you have installed the 21 CFR 11 compliant version of FaciliWorks, the Advanced Audit Log is permanently enabled.
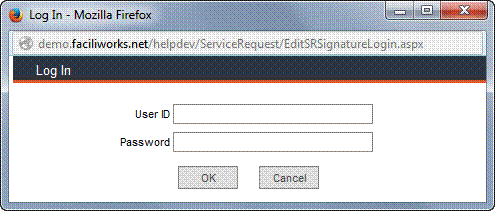
Check this checkbox to require a user to enter his User ID and Password in order to sign a record. After a PM or work order is completed and the record is saved, FaciliWorks will also prompt you to the Signature tab to sign off on the order.
NOTE: If you have installed the 21 CFR 11 compliant version of FaciliWorks, Electronic Signature Login is permanently enabled.
For instance, in a PM record, on the Signature tab, a user clicks the Sign button (in the Done By pane) to signify that he has completed the work on that PM. If Electronic Signature Login is disabled and a user clicks the Sign button, the signature record is automatically populated with the user’s name from the initial login screen and the current date and time. When Electronic Signature Login is enabled, the following window will appear requiring that the user sign in with his User ID and Password in order to sign the record:
The record is then populated with the signature information.
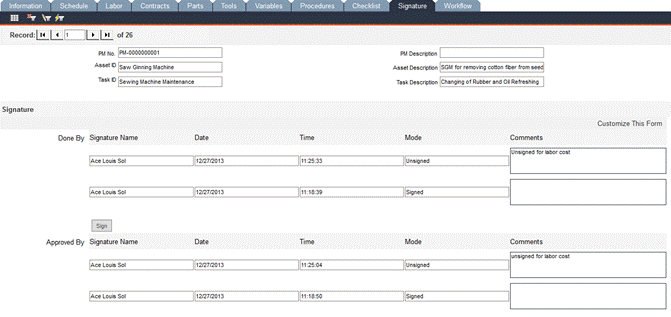
The same steps are taken to sign an approval of a record. Once the approval is signed, the Done By pane cannot be unsigned unless the approval is unsigned first. A record can only be unsigned by the original signer.
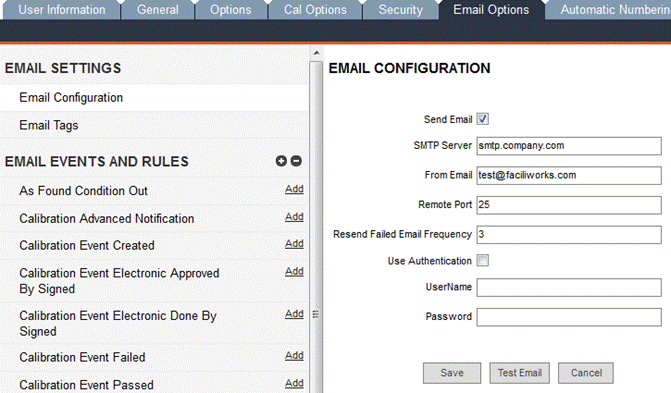
Under Email Settings, click Email Configuration; the configuration options appear on the right-hand side of the window. Enter the appropriate information (most likely supplied by your IT team). The Send Email checkbox must be checked in order for any email features to function. Test the settings and be sure to click Save when finished.
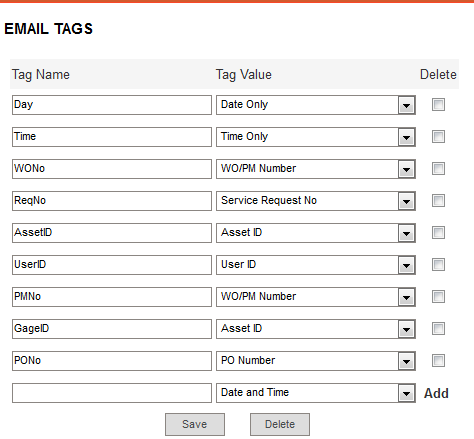
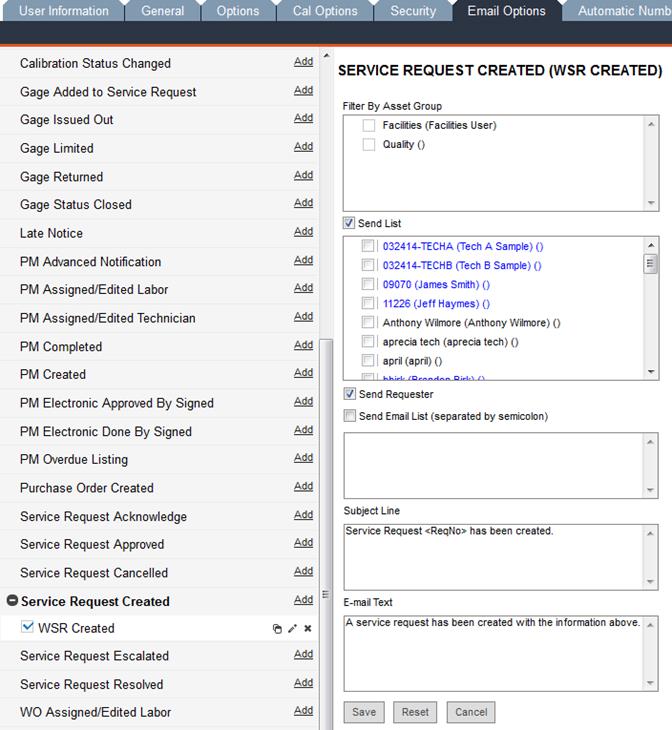
Under Email Settings, click Email Tags. Email tags insert specific information into your emails regarding the event. To use email tags, add <TagName> in the Subject Line or Email Text fields, for example, “Service Request <ReqNo> has been created.”
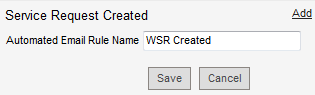
Under Email Events and Rules are multiple events that trigger rules to run. To add a rule, click the Add button next to an event; a field appears beneath it, allowing you to enter a name for the rule. Enter an appropriate name:
Click Save; FaciliWorks automatically checks the checkbox next to the new rule, meaning that the rule is active. If you want to deactivate a rule, uncheck this checkbox. The three icons to the right of the new rule name allow you to clone, edit and delete the rule.

The right side of the window will display the configuration options for this email rule.
In the Filter by Asset Group pane, select an asset group (available in FaciliWorks 8i Enterprise only) for an event that pertains to an asset that belongs to that asset group.
Check the Send List checkbox to utilize staff email addresses and then check the checkboxes next to each staff member who should receive the email.
Check the Send Requester checkbox if you would like the email to also be sent to the person who initiated the request (for Web Service Request events only).
If you would like the email to be sent to email addresses other than those of staff members within the system, check the Send Email List checkbox and then enter the email addresses in the box below, separated only by a semicolon.
Enter appropriate text in the Subject Line and Email Text fields and then click Save.
You can add as many rules as you like for any event; just click the Add button again and repeat the steps.
Within this tab, you can configure FaciliWorks to email certain reports on a recurring basis: PM Overdue Listing, Calibration Overdue Listing, PM Advanced Notification and Calibration Advanced Notification.
Click the Add button next to the event, name and save the event and then specify the other email options in the right-hand side of the window, as instructed for other email events.
Now, configure the email’s schedule. The specific interval configuration depends on which radio button is selected on the left, i.e., Daily, Weekly, Monthly or Yearly.

Click the Test button and FaciliWorks will display information regarding the email event’s last run date and next run date. To reset the last run date, click the corresponding button.
Be sure to click the Save button at the bottom of the form when finished.
Use this form to create the automatic numbering formats for your work orders, PMs, service requests, requisitions, purchase orders, assets and gages. (Gage ID numbering is only available with 8i Calibration.) For your convenience, basic instructions and codes are listed on the right side of this screen, including notes about date formats.
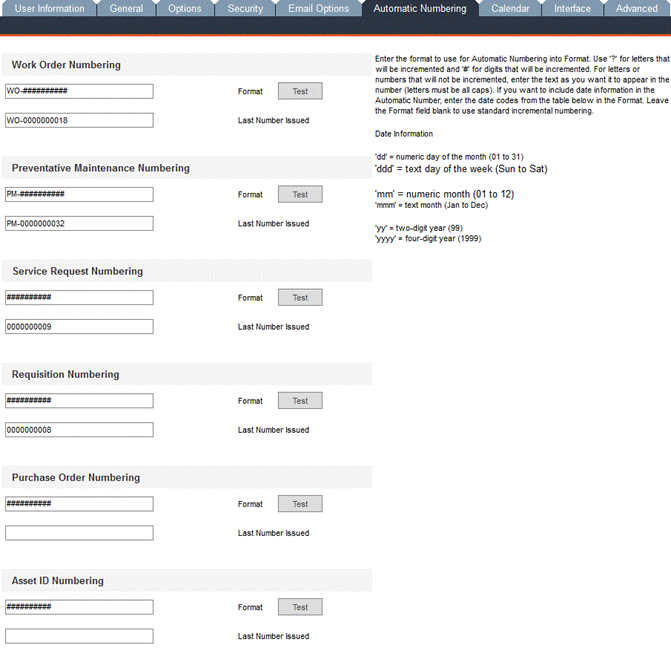
To enable this function, scroll to the bottom of this form and check the Enable Automatic Numbering for Asset ID and Numbering Schemes checkbox.

Your number formats can include numbers, letters, day of the week, dates or a combination thereof. For formats utilizing months or days in their letter format (Mon, Jan), you must use lowercase letters in your format scheme.
For example, you can create a work order numbering system that includes the code WO (for Work Order), the day of the week on which the work order is created and a sequential number using the format WO-ddd-###. In this example, the sample work order number would be WO-MON-014.
You can also create a format that uses the current date for the number, such as yyyymmdd##. Then, for work orders created on May 10, 2010, the first work order number would be 2010051000; the tenth number would be 2010051010.
Here are some basic tips for creating your numbering formats:
Use all capital letters for those letters to appear on every generated number.
Use the # symbol for incremental digits.
Use the ? symbol for incremental letters.
Use the code “dd” for the numerical day of the month created.
Use the code “ddd” for the day of the week created (Mon, Tue, etc.).
Use fewer than 21 characters in your numbering format to ensure that the numbers will fit on your reports.
To start your numbers with A or 0, use the # and ? symbols in your format. For example, if you enter ??-# # in this screen, your first purchase order number would be AA-00. Following this numbering scheme, after number AA-99 is generated, the next number generated would be AB-00. After number AZ-99 is generated, the next number generated would be BA-00 and so on.
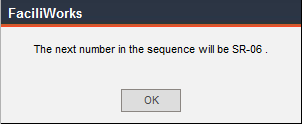
To start your numbers with a specific number and/or letter code, enter the last exact number in the Last Number Issued field. For example, if you entered SR-00 in this field, the next number generated would be SR-01.
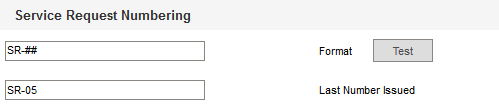
Click the Test button to see a preview of the next number in the sequence, based on the format you’ve created.
NOTE: Once FaciliWorks creates an automatic number, it will not reissue that number. For example, if you create a new record in Purchase Orders, FaciliWorks automatically generated a new purchase order number. If you then decide to close that record without saving it, FaciliWorks will not regenerate that number for the next new purchase order; it will generate the next number in the sequence.
The Numbering Schemes pane is used to define the schemes for types of assets, parts, staff members and gages (schemes for gages are only available with 8i Calibration). If you set up multiple numbering schemes, use the record navigation bar at the bottom of that pane to browse through the records.
Suppose you have 10 types of assets, one of which is Vehicle. You can create a numbering scheme specific to vehicles. For example, select Asset ID from the Number Field drop-down list and then select Vehicle from the Asset Type pop-up list (your Types list must already be in your database). Enter a Number Format and Last Number.
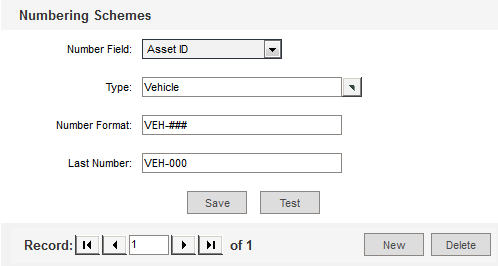
Click the Test button to receive the following message:

Click OK to continue. Save the new numbering scheme.
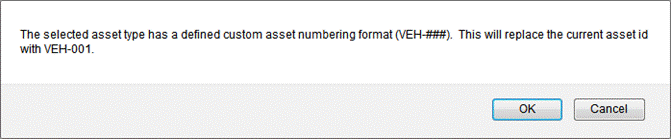
To add a new vehicle asset using the new numbering format, navigate to Data Administration -> Assets and click the New button (in 8i Calibration, click the New Asset button). Click the Asset Type pop-up and select Vehicle; the following message displays:
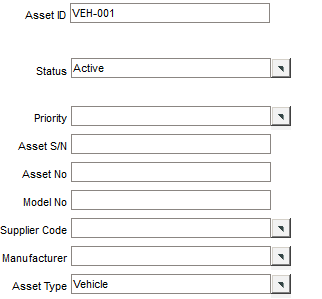
Click OK. FaciliWorks inserts the newly generated number into the Asset ID field.
The Calendar tab within Admin Settings allows you to define certain dates and days of the week that you want to skip. These can be weekends, holidays, vacation periods or plant shutdown periods. FaciliWorks automatically sets the next maintenance due date of an asset based on a user-defined frequency. If the next due date must fall on a weekday, FaciliWorks has a Skip Date feature which will force a due date to the last working day before a skipped day.
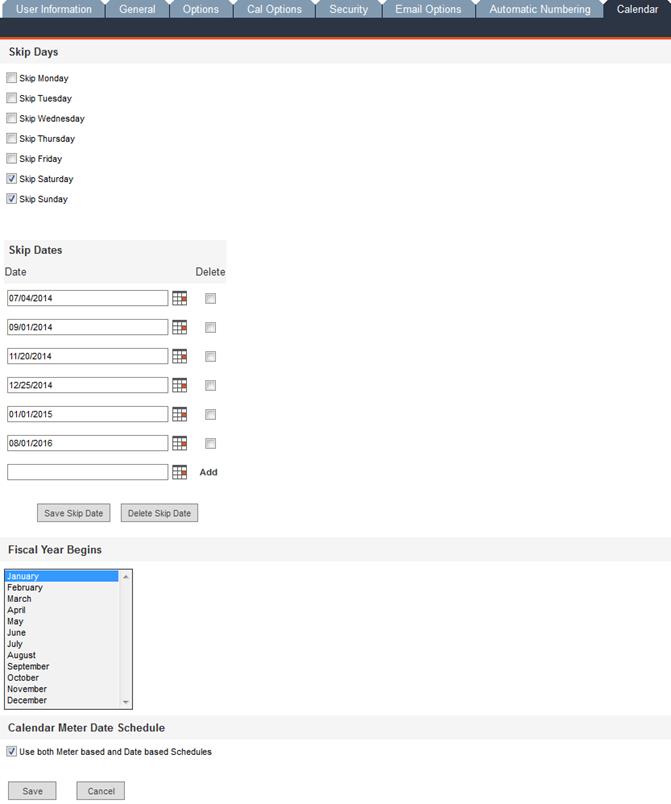
Each day of the week is listed with a corresponding checkbox; check the box to skip the day. To change the order of this list, navigate to Configuration -> Global Settings and using the Select Start of Week drop-down list, select your preference. The selected day will be listed first in the Calendar tab and it will be the first column in the Maintenance Jobs Calendar and all calendar field pop-ups. The image above is the product of having chosen Sunday as the preferred Start of Week.
In the Skip Dates pane, type the date into the Date field or click the calendar icon to the right of the field to select the date. Click the Save Skip Date button. Clicking this button inserts a new blank field in which you may enter another date to skip. After each date entered, click the Save Skip Date button. To delete a date, click the corresponding Delete checkbox, then click the Delete Skip Date button.
If a calculated maintenance due date falls on a skipped day or date using the Calculate Next Date Due button, FaciliWorks reschedules it for the first working day prior to the skipped day(s). However, if the maintenance due date has been manually entered, then FaciliWorks won’t apply this skip day rule.
The calendar shows maintenance of assets that have exceeded their meter time as due on the current date, regardless of whether or not it is a skipped day.
When you complete a work order, if the skip days or skip dates cause the next due date to occur on or before the date on which you completed the work order, then the next date due moves to the next available date after the skipped days or dates. For example, if a work order that must be completed daily (a one-day frequency) is completed on Friday, and Saturday and Sunday are skipped days, then the next maintenance would be due on Monday. However, if a work order with a frequency of two or more days is due on a Saturday or Sunday, and those days are skipped days, the maintenance will be due on the preceding Friday.
Fiscal Year Begins: Select the month in which your company’s fiscal year begins. FaciliWorks uses this information in calculating budgets.
Check the Use both meter-based and date-based schedules checkbox to use both meter-based and date-based schedules. If this checkbox is not checked, FaciliWorks uses date-based schedules only.
The interface settings permit you to customize labels and captions for forms throughout FaciliWorks. Each form that has a Customize Form link in the upper right-hand corner can also be altered within the Interface tab.
Use the Form Name drop-down list to select a form whose labels you would like to customize.
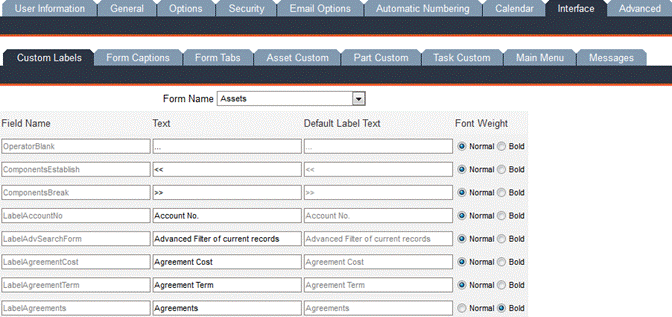
Selecting Assets, for example, will open the same list of labels here as it would if you clicked Customize Form from within the Assets -> Information tab.

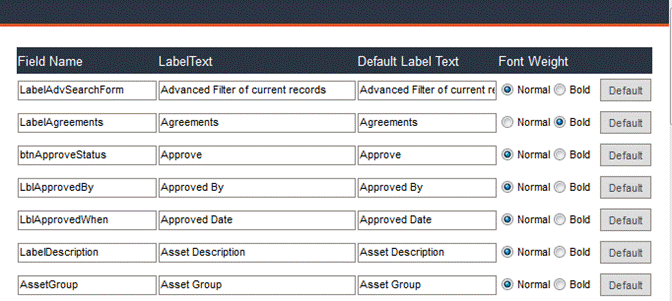
To change a label, highlight the contents in Label Text and type in the desired text. Use the Normal and Bold radio buttons to set the preferred font weight. To revert to the default FaciliWorks labels for a particular field, click the associated Default button. After any changes, be sure to click the Save button at the bottom of the form.
Scroll to the bottom of this screen:
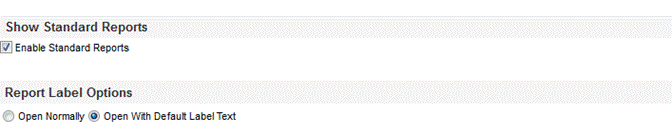
There are two groups of reports – Standard and Enhanced. The Enhanced Reports group contains several of the most popular Standard Reports plus some new reports that are column-driven for the sake of easy export. The Standard Reports group contains reports found in previous versions of FaciliWorks. In the Show Standard Reports pane, check the Enable Standard Reports checkbox to be able to access both Standard Reports and Enhanced Reports from the Report menu.
In the Report Label Options pane, click the Open Normally radio button if you would like your reports to use your customized label text. To use the default text, click the Open with Default Label Text radio button.
Use the Form Captions sub-tab to change the display names of
various forms and navigation buttons. Some items in this list are also
found in the Main Menu sub-tab; if a change is made to a name in
one tab, it is reflected in the other tab as well.
To see an example of a change made within the Form Captions sub-tab, click the About link in the upper right corner of the program window.
The name of this form is About Page (displayed on the left side of the window, above the Main Menu.
Navigate to Configuration -> Admin Settings -> Interface -> Form Captions sub-tab. The first form in the list is About Page. In the Form Caption field of that row, replace About Page with This is the About Page. Click the Save button at the bottom of the form.
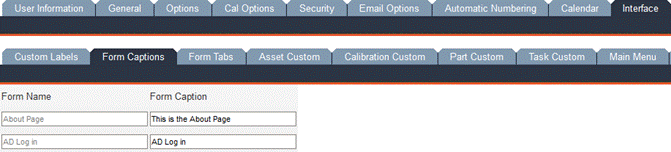
Click the About link again; the new name of this form that you just entered is now displayed above the Main Menu.

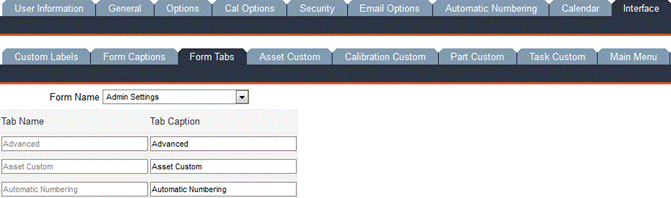
From the Form Name drop-down list, select the form whose tab names you would like to change. In the Tab Caption field, overwrite the existing contents with your preferred text and click the Save button.
Field types, field text, attributes and font weight for the user-defined fields within Assets (and Gages in 8i Calibration) can be customized in this section.
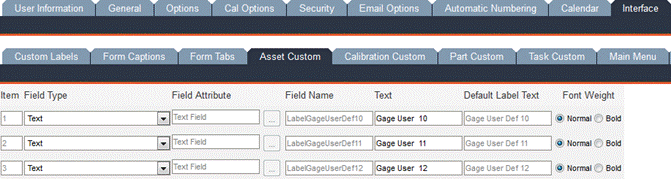
Use the Field Type drop-down list to select the type of field: Text, Date or List. Text fields can contain letters and/or numbers, Date fields can only contain properly formatted dates and List fields have associated pop-up lists from which field contents are chosen. Please see the Admin Settings - Advanced tab for more information on customizing pop-up lists.
In the Text field, enter the name of your custom field as you would like it to appear on a form.
Use the Font Weight radio buttons to specify your text weight preference.
If you’ve chosen to create a List field, click the […] button associated with the field. The following window will open, allowing you to specify the items within the new list:
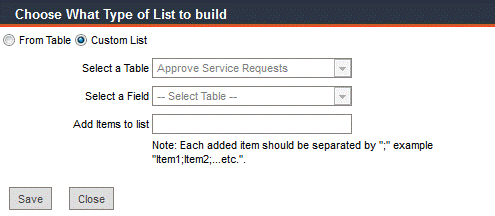
If you click the From Table radio button, the two drop-down lists become active: Select a Table and Select a Field; the Add Items to List field becomes inactive. Selecting a table activates choices for the field. Creating a list from a table allows you to use existing FaciliWorks lists for your new List field.
To create a custom list, click the Custom List radio button; this activates the Add Items to List field. Enter multiple list items by separating them with semicolons; do not insert spaces between list items.
Click Save and close the window. Also be sure to click Save at the bottom of the Asset Custom form after any changes.
Changes made to asset fields appear in the Data Administration -> Assets -> User Defined tab; changes made to gage fields (8i Calibration only) appear in the Data Administration - > Assets (Show All Gages) -> Additionals tab.
Customizing user-defined fields here works the same way as in Asset Custom. Please refer to the Asset Custom sub-tab section for details. Field changes made here are displayed in the Calibrations -> Calibration Entry -> Additionals tab.
Customizing user-defined fields here works the same way as in Asset Custom. Please refer to the Asset Custom sub-tab section for details. Field changes made here are displayed in the Inventory -> Part Entry -> User Defined tab.
Customizing user-defined fields here works the same way as in Asset Custom. Please refer to the Asset Custom sub-tab section for details. Field changes made here are displayed in the Data Administration -> Tasks -> User Defined tab.
This form allows you to customize your menu names. Use the drop-down list at the top of the form to select the menu type.
Top Links are the four icons in the upper right corner of the program window.
Navigation Menu includes the list of buttons on the left-hand side of the program window.
Main Menu items are the objects shown after clicking an item in the Navigation Menu.
This form is used to change titles and text of various FaciliWorks messages. HTML code can be used in these fields to dictate font color, etc.
This form is used to define pre-filters for entry forms and to limit and detail the self-building pop-up lists such as task priority, manufacturers, etc.
You can choose to have forms open first to a pre-filter instead of the form displaying all records; this setting is defined in Global Settings:

For instance, normally when you navigate to Data Administration -> Assets, the Information tab is displayed and all records can be accessed via the record navigation bar. If, in Global Settings, you choose for the Assets form to open with a pre-filter, you will instead be prompted with the following window when navigating to Data Administration -> Assets:
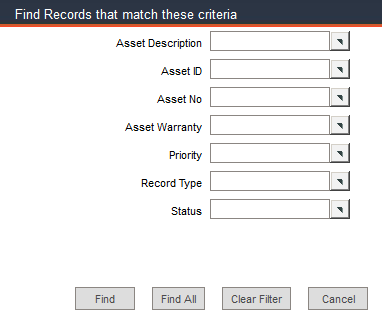
The fields here in the pre-filter are identical to the fields displayed in the Quick Filter.
To modify the pre-filter (and the form’s Quick Filter), navigate to the Configuration -> Admin Settings -> Advanced tab. Click the Define Pre-filter link to the right of the entry form you want to modify.

A Pre-filter Criteria for Assets window will open to display a list of all fields by which the asset records can be filtered:
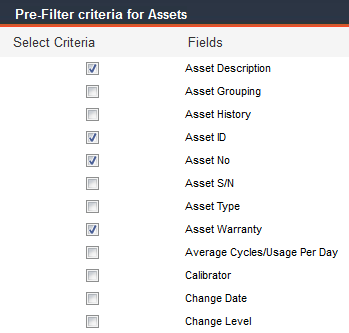
In this window, check the checkbox associated with the fields to be included on the pre-filter. Click the Save button at the bottom of the window to save any changes and close the window when finished.

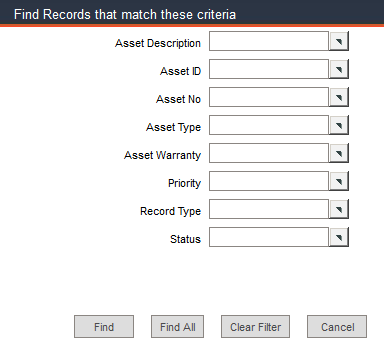
Navigate to the Data Administration -> Assets -> Information tab; the pre-filter now contains the Asset Type field that can be used to filter asset records. These same fields are also going to be shown in the asset Quick Filter.
For each self-building list within FaciliWorks, items can be added to the list and the list can be locked down. Navigate to the Configuration -> Admin Settings -> Advanced tab and scroll to the lower portion of the form.
If you want to lock down a list, click the List Limit checkbox to the left of the list name. This action deactivates the field textbox on the form and forces the user to select an item from the pop-up menu.
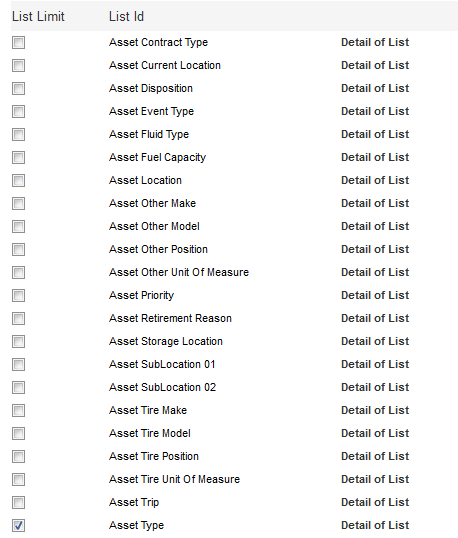
Click the Detail of List link associated with a list name, for example, Asset Type. A window will open that lists all available values (if any).
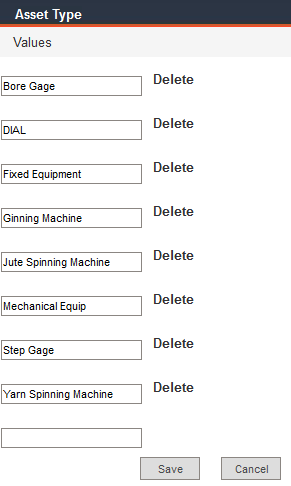
To delete an item from the list, click Delete (to the right of the item).
To add an item to the list:
Scroll to the bottom of the list and in the Values field
of the blank row, type a new item for the list.
Click the Save button and the new item will be alphabetized
in the list:
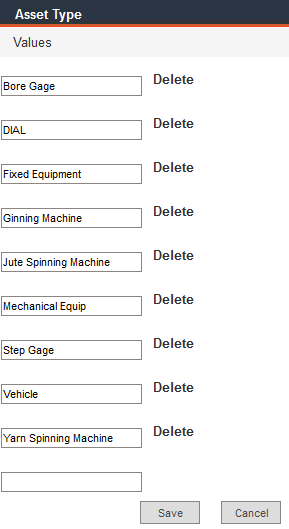
Close the window to return to the Advanced tab.
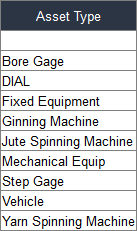
Navigate to the Data Administration -> Assets -> Information
tab and click the pop-up list icon for the Asset Type field.
The pop-up list now contains our new item, Vehicle:
There is another way to add an item to a pop-up list. For this example, uncheck the List Limit checkbox for the Asset Type list and click Save. Navigate to the Data Administration -> Assets -> Information tab. In the Asset Type field, enter a value that is not currently in the pop-up list, for example, Calibration. The following dialog will open:
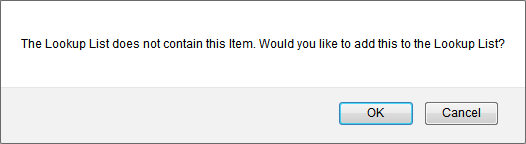
Click OK to add the new item.
Return to the Configuration -> Admin Settings -> Advanced tab and click the Detail of List link for Asset Type. The new asset type value is now in the list.
Adding a value to a pop-up list in this manner is something that can be done by any user from within the individual forms unless the lists are locked down.
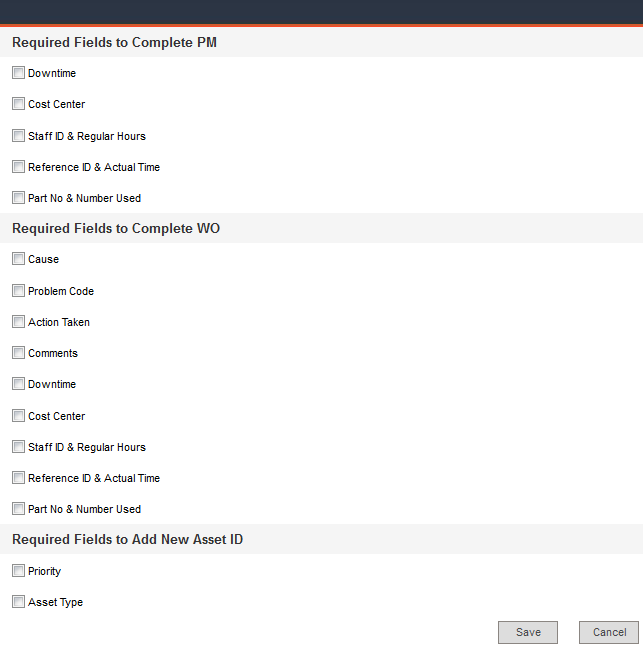
Required Fields are fields that must contain data in order for a user to be permitted to complete a PM or work order and/or to be permitted to create a new asset record. Check the checkboxes for any fields you want to require and then click the Save button.
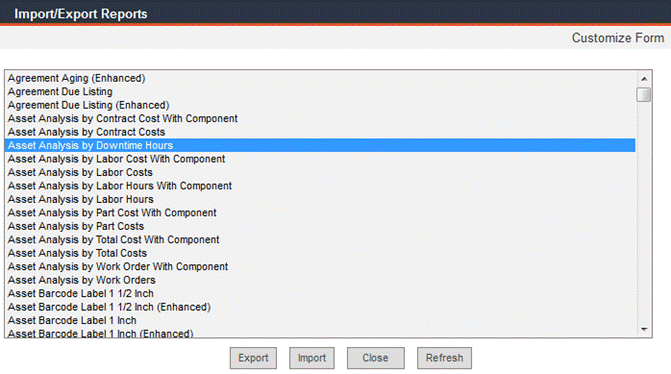
Though FaciliWorks provides a comprehensive set of reports, you may have additional reporting requirements. Per your company’s specifications, the CyberMetrics Client Solutions team can create customized reports for you that are quickly and easily imported into your FaciliWorks database via this Import/Export Reports utility.
You also have the option of customizing your own reports using CRD2 (Custom Report Designer), which is a desktop software included with FaciliWorks 8i. For more information about customizing reports, please see the Custom Reports chapter of the FaciliWorks 8i User Guide.
From the main menu, click Configuration and then click Import/Export Reports.
To export a report, click a report name to highlight it and then click the Export button. You will then be prompted to open or save the file. FaciliWorks saves encrypted reports in .rpt format.
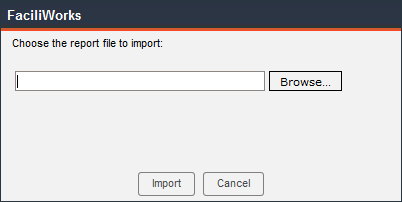
To import reports, click the Import button. In the resulting window, browse to and select the report you want to import (must be in .rpt format) and then click Import.
To create or edit Service Request Letters, navigate to Configuration -> Service Request Letter.
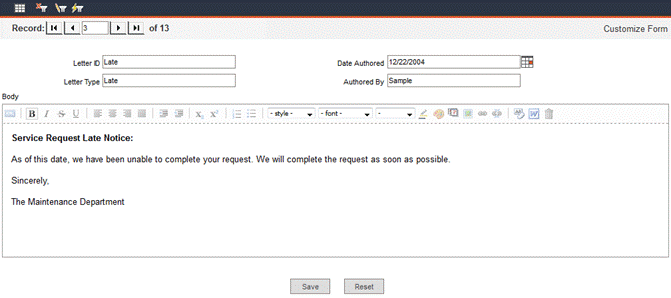
In the letter entry screen, enter the Date Authored, Authored By and Body of each letter. Character and paragraph options are available. Be sure to click Save after any changes.
Navigate to Configuration -> Maintenance Job / Service Request Progress to create and edit the progress names that FaciliWorks displays in work orders (the Work Orders -> Work Order Manager -> Information tab) and service requests (the Service Requests -> Edit Service Requests -> Information tab).
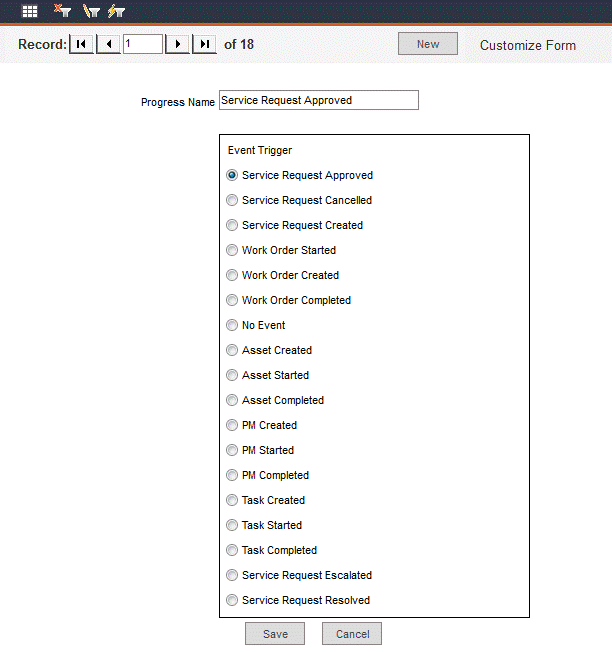
The Progress Name (status) displayed in each work order and service request changes automatically as the work order or service request goes through the steps in the process.
The Event Trigger radio buttons indicate when FaciliWorks will automatically change the status of a service request or work order.
Click the New button to create a new progress name; click Save to save any changes; click Cancel to discard any changes.
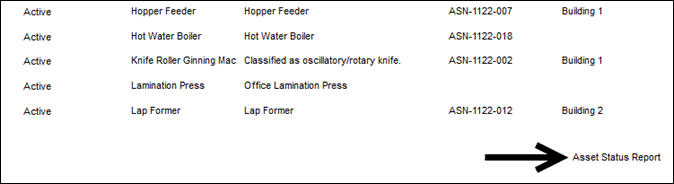
The asset Status field (found in the Data Administration -> Assets -> Information tab) is user-defined.
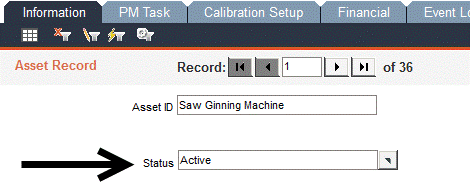
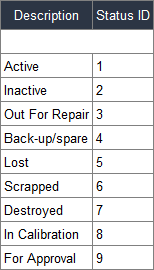
Navigate to Configuration -> Asset Status to create new Status ID records or to edit existing records. The records for Status ID 1 and Status ID 9 cannot be edited or deleted. Status ID 1 tells FaciliWorks that the asset is currently in use; only assets marked with this status will appear on lists of assets due for maintenance and on automatic work orders.
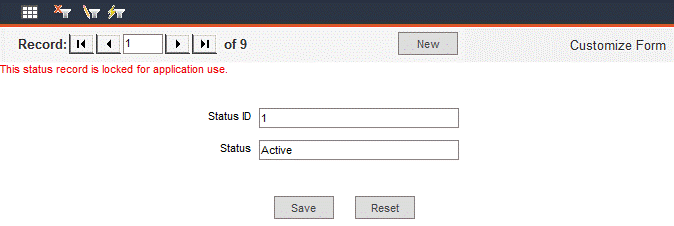
To edit any other existing record, use the record navigation bar to locate the record and edit as necessary. Click the Save button to save any changes. To discard any changes made since the last save, click the Reset button.
To create a new record, click the New button. Enter an ID in the Status ID field and a description in the Status field. Some examples of status descriptions are: Inactive, Out for Repair, Backup/Spare, Lost or Retired.
If your company must comply with Document Identification and Control requirements, you can set up FaciliWorks to identify each report with a document control number. To use this feature, navigate to Configuration -> Report Control.
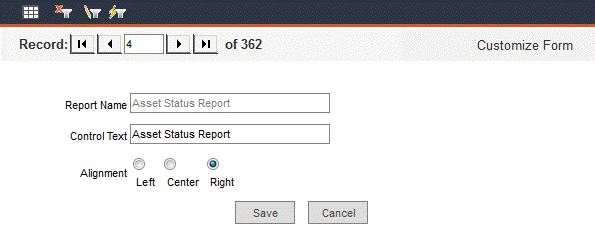
The Report Name will appear at the bottom of each report, using the alignment you have chosen for each report (left, center or right). In the Control Text field, enter your control text for each report. If you aren’t required to use control text, you may enter any other information you want to appear at the bottom of your reports, such as your company address.
Click the Datasheet View icon in the upper-left corner of the Report Control screen to see the records in table format. Be sure to click Save after any changes.
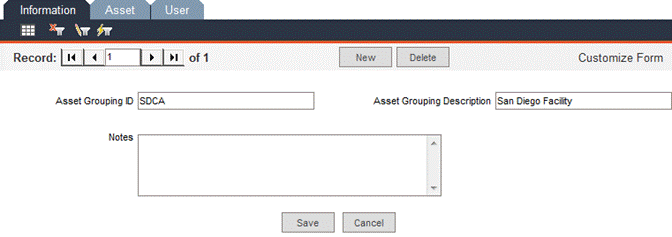
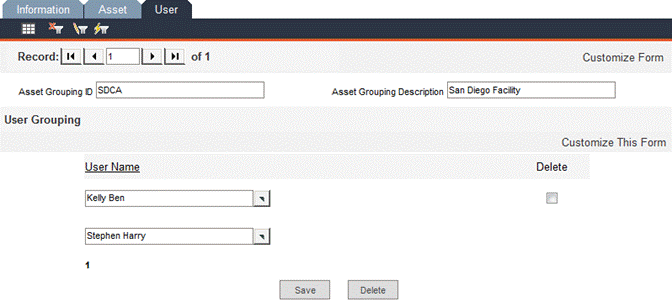
Asset grouping can be used to partition the shared database by location, division, specific groups of staff members or any other criteria. Doing this allows each group to view only the assets that pertain to that group. After setting up asset grouping in these tabs, navigate to the Configuration -> Admin Settings -> General tab and enable asset grouping.
To create a new group, click the New button. Enter an Asset Grouping ID and Asset Grouping Description in this screen along with any applicable notes. Click the Save button to save the new record.
In this tab, assign multiple assets to be used by the group. Click the Asset ID pop-up list icon:
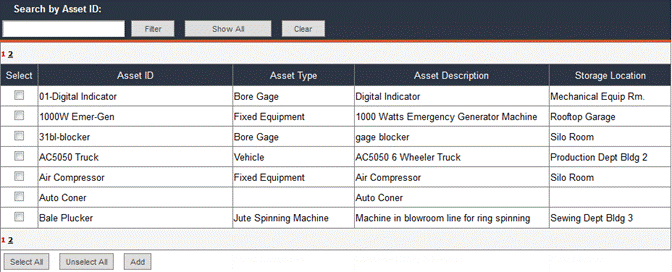
Check the Select checkboxes associated with the assets you want to add to the group and then click the Add button at the bottom of the window. Navigate to the next page of assets by clicking the next page number at the bottom of the window.
To add all assets to the asset group list, click the Select All button and then click the Add button.
When you select the desired assets and click the Add button, the list will close and the fields within the Asset tab will auto-fill. At the bottom of the last page will be an empty Asset ID field. Use the pop-up list in the empty field to go through the process again to add more assets to the group, if necessary.
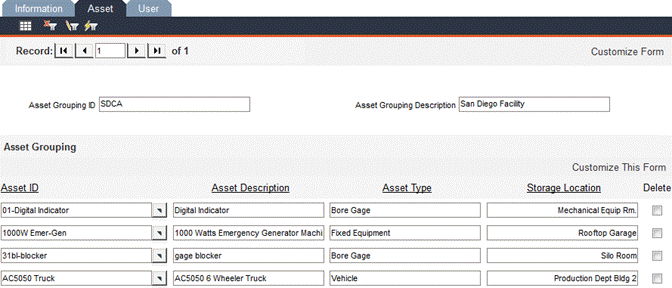
Be sure to click Save at the bottom of the Asset tab after any changes.
To delete an asset from the list, check the associated Delete checkbox and click the Delete button.
In this tab, assign users to a group, one by one. Use the User Name pop-up list to select a user. Click the selected user on the list and close the window. Click the Save button. Saving the information creates a blank User Name field to add another user.
To delete a user from the list, check the associated Delete checkbox and click the Delete button.
In this form, enter a name, description and any applicable notes for each cost center, such as an office, warehouse, scheduled maintenance, unscheduled maintenance, transportation, etc.
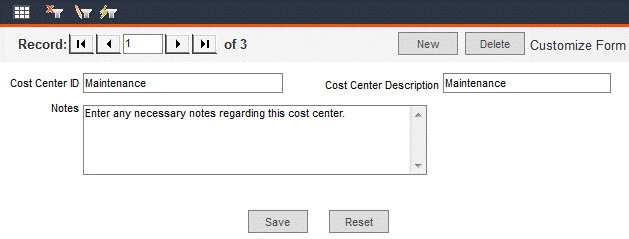
Cost center information is associated with budgets, PMs and work orders. To see an example, navigate to the Work Orders -> Work Order Manager -> Information tab and scroll down to the Budgeting pane:

For more information about setting up cost center budgets, please see the FaciliWorks User Guide.
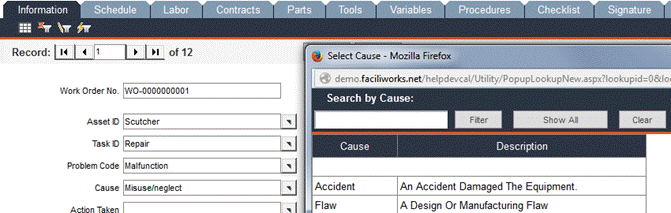
In FaciliWorks, you can track your work orders and service requests by cause. To define causes, navigate to Configuration -> Work Order Cause Entry. In this screen, you can name and describe causes and allow or disallow their use.
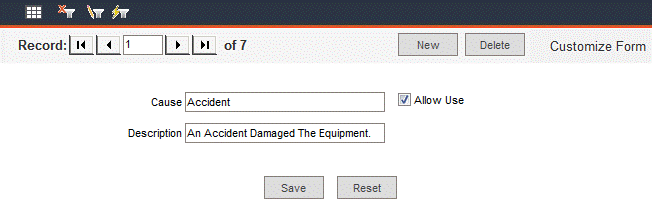
Checking the Allow Use checkbox makes the cause available in Cause pop-up lists in work orders and service requests:
Leaving the Allow Use checkbox unchecked removes the cause from the list of available causes seen by users, but does not delete the cause record from your database. This means that the cause can still be used for report filtering and it can always be reactivated later.
Navigate to Configuration -> Combo Box Entry to edit the names of the options that appear in drop-down lists throughout FaciliWorks.
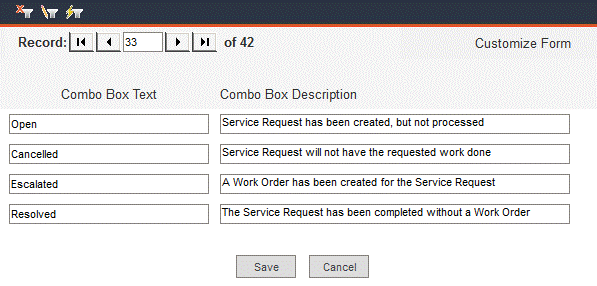
In the Combo Box Text fields are the names of the options that appear in the drop-down list (see the Resolution Code drop-down in the service request image below). These names can be edited.
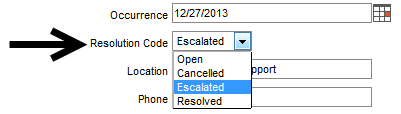
For example, in the various steps of a service request from creation to becoming a work order to completion, FaciliWorks automatically updates the contents of the Resolution Code field. The words in this drop-down list can be changed to better suit your needs, i.e., you can change the Combo Box Text from Escalated to WO Created.
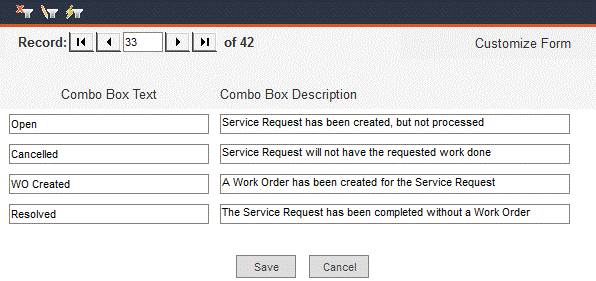
Be sure to click Save after any changes.
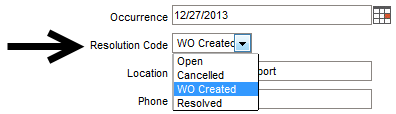
The Combo Box Description fields cannot be changed because these fields describe the FaciliWorks functionality. The resolution code that you’re now calling WO Created will still be used when a work order is created for a service request. Regardless of the name, the underlying functionality does not change.
Use Workflow to create a series of steps to be followed when a specific event occurs. The Workflow process includes step setup and trigger setup.
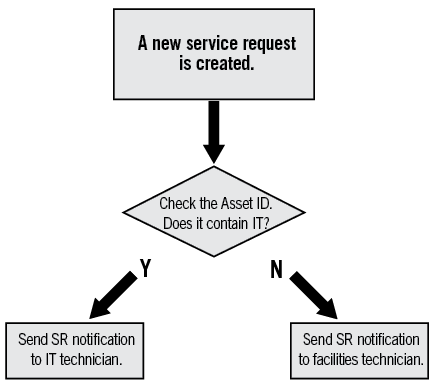
The following example will show the creation of workflow for routing email messages when a new service request is created, depending on what kind of asset the service request is referencing.
Suppose that when we entered assets into our database, we had automatic numbering schemes set up for assets, so that every IT-related Asset ID would contain IT (such as IT - upstairs server) and that all other assets were presumed to be facilities-related and not contain IT.
When a service request is submitted for an asset that requires maintenance, an email is to be sent to the technician assigned to that kind of asset; IT assets are sent to the IT technician and other assets are sent to the facilities technician.
A workflow process will be created to accommodate this task.
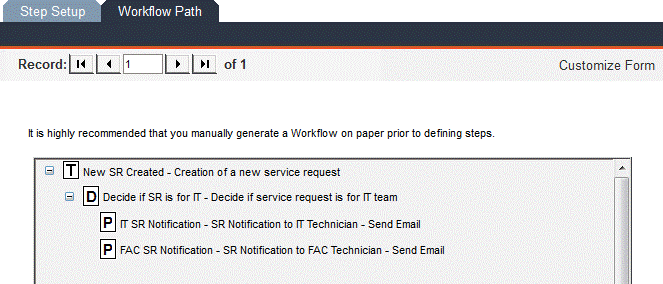
First, create the workflow on paper. The following flowchart illustrates the sample situation. When a new service request is created, the Asset ID field is checked to determine if it contains the letters IT. If it does, send an email to the IT technician. If it does not, send an email to the facilities technician.
To create the workflow, begin by creating the last step first and working backward. The reason for this will become apparent shortly.
Navigate to Configuration -> Workflow Step Setup. Workflow Step Setup enables the user to define the specifics of the action to be taken when an event is triggered. Use the Step Setup tab to identify the details of the step. Once the entire process is created, it can be displayed using the Workflow Path tab.
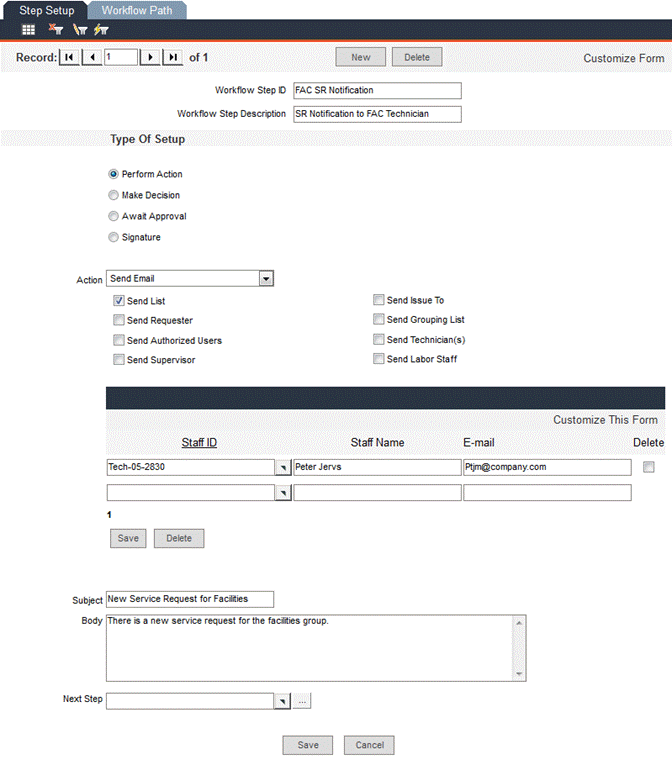
Create the step to send an email to the facilities technician.
IMPORTANT: Email options must be activated within the Configuration -> Admin Settings -> Email Options tab for email to function.
Workflow Step ID: Enter a unique name for your step.
Workflow Step Description: Enter a brief description of your step.
Type of Setup: Select the type of action to perform. For this example, click the Perform Action radio button.
Action: Select the action to be performed from this drop-down list: Send Email or Send SMS Message. SMS allows for short text messages to be sent from one cell phone to another. For this example, we’ll select Send Email.
Check the Send List checkbox. Thus far, we have specified to send an email to a recipient list. The list is created using the Staff ID pop-up list. Use the pop-up to select the technician(s) who will receive the email for the facility assets. Notice as you save the record, FaciliWorks makes another record available for you. Continue to add staff as needed and save each record.
Subject: Enter the text for the subject line of the email.
Body: Enter the message of the email.
Next Step: Use the pop-up to select the name of the step to be performed next. After selecting the step, click the […] button to view the specifics of the next step. In this example, there is not a next step; the email being sent to the technician is the final step of our workflow example.
Click the Save button at the bottom of the form.
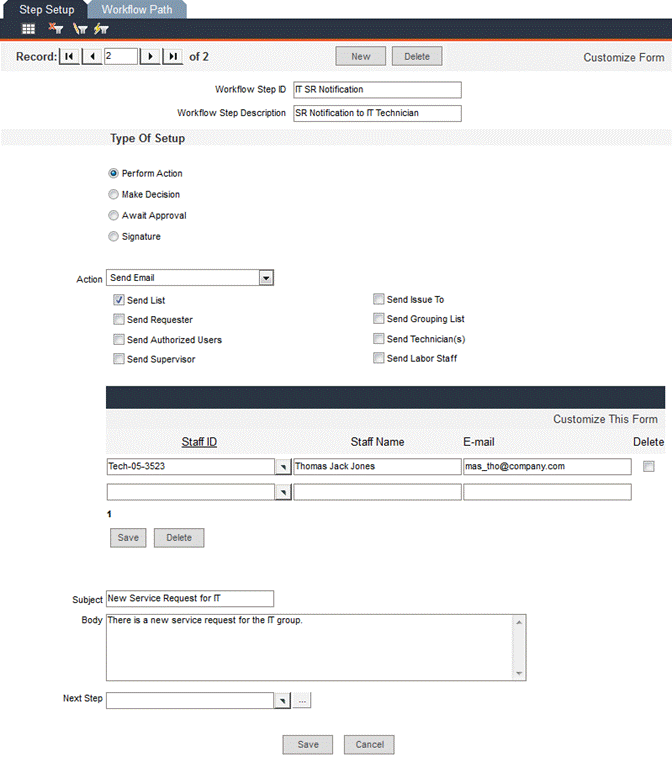
Next, create the step to send an email to the IT technician. Click the New button at the top of the form to create a new step. Enter a Workflow Step ID and Workflow Step Description.
Click the Perform Action radio button. Use the Action drop-down list to select Send Email and then check the Send List checkbox. Use the Staff ID pop-up to select the technician who will receive the email for the IT assets and save the record.
IMPORTANT: Email options must be activated within the Configuration -> Admin Settings -> Email Options tab for email to function.
Complete the Subject and Body fields. When you are finished, click the Save button at the bottom of the form.
The decision action requires the user to set up criteria much the same way that the advanced filter is used in other forms; if the criteria are true, another step is performed. The user can also specify a step to be performed if no other steps are executed.
The next step going backward in our flowchart is to determine whether or not the Asset ID field contains the letters IT.
Click the New button at the top of the form to create a new step. Enter a Workflow Step ID and Workflow Step Description.
Click the Make Decision radio button. The form changes to allow you to set up a decision.
Run this Step when below Criteria is true: Use the pop-up to select the name of the step to be performed. For this example, we will select the step that sends the email notification to IT. After selecting the step, you can click the […] button to view the specifics of the step.
IMPORTANT: Email options must be activated within the Configuration -> Admin Settings -> Email Options tab for email to function.
Select Records From: Use the drop-down to select the location of the data from which to create the criteria. For this example, select Asset Entry.
In the Define More Criteria section, the contents of the Field drop-down list depend on the selection made in the Select Records From drop-down. For this example, use the Field drop-down to select Asset ID and the Condition drop-down to select Contains. Type IT in the Value text box. Click the Add to List button; this action adds the criteria to the list of criteria. You would select And or Or for multiple criteria; however, in this example, it is not necessary.
Run this Step when no other Steps are run: Select a step from the pop-up list if you need to run an alternate step when no other steps are triggered. In this example, if the Asset ID does not contain IT, then notification should be sent to the facilities technician.
Click Save at the bottom of the form.

We have defined this step to check if the Asset ID field contains the letters IT. If it does, perform the step to notify the IT technician. If it does not, perform the step to notify the facilities technician.
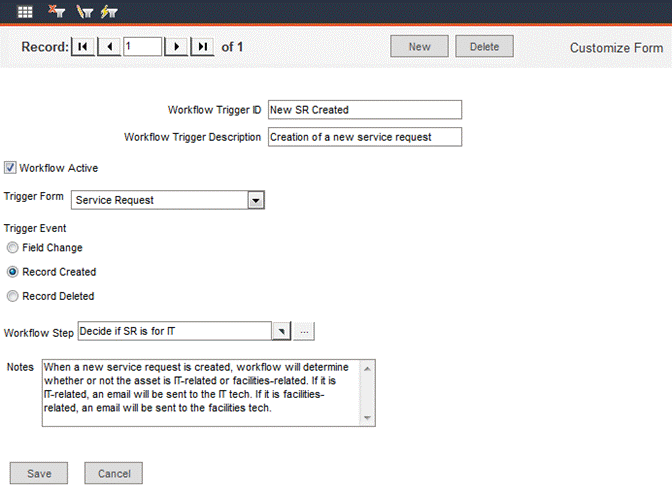
Now that all steps are configured for this workflow, we can set up the trigger. Navigate to Configuration -> Workflow Trigger Setup. The events that can cause a process to be triggered include a field change, the creation of a record or the deletion of a record. When the event occurs, this will trigger an action (or series of actions) to be performed as specified within the trigger setup.
Workflow Trigger ID: Enter a unique name for your trigger.
Workflow Trigger Description: Enter a brief description of your trigger.
Workflow Active: Check this box to activate your trigger.
Trigger Form: Select a form from the drop-down list on which to base the trigger. For this example, select Service Request.
Trigger Event: Select from three possible events to trigger a process: Field Change, Record Created or Record Deleted. Each of these events refers to the form specified in the Trigger Form field. For this example, select Record Created.
Workflow Step: When the trigger occurs, the software will perform this step. The specifics of this step are defined in Workflow Step Setup. All workflow steps, once defined, will appear in the pop-up list. Clicking the […] button will display the specifics of the step. For this example, select Decide if SR is for IT.
Notes: Enter any pertinent information as required. You can use this field to describe the actions that take place when triggered.
Click the Save button at the bottom of the form.
After defining all of the appropriate steps and triggers for workflow, it’s important to test them.
IMPORTANT: Email options must be activated within the Configuration -> Admin Settings -> Email Options tab for email to function.
In this example, our workflow is set up to send email when a new service request is created; the recipient of the email depends on whether or not the Asset ID contains IT. It is assumed that all of our IT-related assets contain IT and that facilities-related assets do not. Navigate to the Configuration -> Workflow Step Setup -> Workflow Path tab and verify that the Workflow Path looks correct.
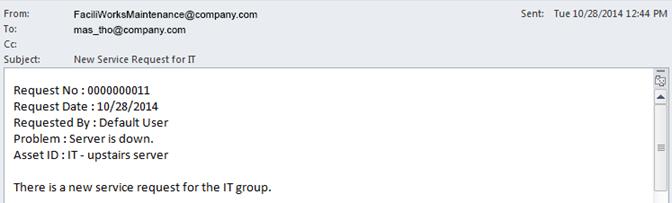
For the sake of this example, create a service request for an IT-related asset and make sure that the IT technician receives the email notification, containing all intended information:
Then, create a service request for a facilities-related asset and make sure that the facilities technician receives the email notification, containing all intended information:

The example workflow process is now complete.
In our workflow example, we did not utilize an approval step, but read below for how this would be done.
When you select to await an approval, you need to check the checkbox that will specify the type of approval you are awaiting. You then can then decide on your courses of action for approval and non-approval. For example, you could create a workflow setup that sends an email to the supervisor of the assigned technician when a work order is created. Just like in the previous example, we start at the end and work our way backward.
Create the step that is taken when a work order is approved;
this step will send an email to the technician assigned to the work
order. In the Workflow Step Setup -> Step Setup tab, select
to Perform Action, Send Email, Send Technician.
Do not make a selection in the Staff ID field; because the email will
be sent to the work order’s assigned technician, the recipient will
vary. Enter an email subject line. Enter an email body such as, “A
new work order has been approved by your supervisor. Log into FaciliWorks
and print the work order.” Do not select a Next Step.
Create the step that is taken when a work order is not approved;
this step will send an email to a specified user. In the Workflow
Step Setup -> Step Setup tab, select to Perform Action,
Send Email, Send List. Select an appropriate staff member
in the Staff ID field. Enter an email subject line. Enter an
email body such as, “The supervisor has not approved this work order.
Please check into it.” Do not select a Next Step.
Create the step to await approval. In the Workflow Step Setup
-> Step Setup tab, select to Await Approval, Send
Email, Approval from Supervisor. Do not make a selection
in the Staff ID field; because the email will be sent to the
supervisor of the work order’s assigned technician, the recipient
will vary. Enter an email subject line. Enter an email body such as,
“A new work order has been created and is awaiting your approval.
Log into FaciliWorks to approve the work order before scheduling.”
In the Next Step Approved field, select your work order approval
step (step created in #1). In the Next Step Not Approved field,
select your work order non-approval step (step created in #2).
Create the workflow trigger that is activated when a work order is created. In Workflow Trigger Setup, give your new trigger a name and description. Check the Workflow Active checkbox. In the Trigger Form field, select Basic WO. For Trigger Event, select Record Created. In the Workflow Step field, select the step to await approval (step created in #3). In the Notes field, explain the workflow process, “When a new work order is created, send an email to the supervisor of the assigned technician that will request approval prior to scheduling.”
IMPORTANT: Email options must be activated within the Configuration -> Admin Settings -> Email Options tab for email to function.
Now, test your workflow. Create a new work order (with an assigned technician, making sure that in your staff records, the technician’s supervisor is noted and that the supervisor also has a staff record). An email will be sent to the supervisor requesting approval of the work order.
In the work order record, go to the Workflow tab. The record will show that the email was sent to the supervisor, along with date and time. From this screen, the supervisor either approves or does not approve the work order by clicking the appropriate button. The record will then reflect the approval status. If approved, an email is sent to the technician (step created in #1). If not approved, an email is sent to the person specified in #2.
In our workflow example, we did not utilize a signature step, but read below for how this would be done.
You can create a workflow setup that will send an email to the supervisor when work orders are signed and unsigned. Just like in our previous example, we start at the end and work our way backward.
Create four steps that email the supervisor in these four circumstances:
· A step that is run when the work order is done signed
· A step that is run when the work order is done unsigned
· A step that is run when the work order is approved signed
· A step that is run when the work order is approved unsigned
In the Workflow Step Setup -> Step Setup tab, select to Perform Action, Send Email, Send List. In the Staff ID field, select the appropriate email recipient. In the Subject and Body fields, enter appropriate text for the first step. Do not select a Next Step, because each of these emails is a final step in the workflow process. Repeat this process for the other three steps.
IMPORTANT: Email options must be activated within the Configuration -> Admin Settings -> Email Options tab for email to function.
Create the last step that will be attached to the trigger. This step runs the appropriate step (from #1) when a signature is added to a work order. In the Workflow Step Setup -> Step Setup tab, select Signature. Upon making that selection, four fields appear: Done Sign, Done Unsign, Approved Sign and Approved Unsign. In each of these fields, select the corresponding step created in #1.
Create the trigger that is activated when a signature record is added to a work order. In Workflow Trigger Setup, give your new trigger a name and description. Check the Workflow Active checkbox. In the Trigger Form field, select Basic WO Signature. For Trigger Event, select Record Created (which is the only possible option - this is because signing a record means “adding a signature record”). In the Workflow Step field, select the step created in #2. In the Notes field, explain the workflow process, for example, “Trigger is activated when a work order is signed or unsigned. An email is then sent, the content of which is determined by the nature of the signature.”
Now, test the workflow. Create and complete a work order and then proceed to the Signature tab.
· In the Done by pane, sign the record; make sure the appropriate email is sent.
· In the Approved by pane, sign the record; make sure the appropriate email is sent.
· In the Approved by pane, unsign the record; make sure the appropriate email is sent.
· In the Done by pane, unsign the record; make sure the appropriate email is sent.