
From the Main Menu, navigate to the Inventory menu to track spare parts inventory and purchase orders. You can also receive parts into stock that are not associated with a purchase order, record where the parts are used by identifying work order number, asset ID, cost center and warehouse, and calculate ideal order quantities.
Easily maintain up-to-date inventory records for your suppliers and assets. You can also track the cost of parts and supplies that are used during maintenance. From the Main Menu, select Inventory and then click Part Entry.
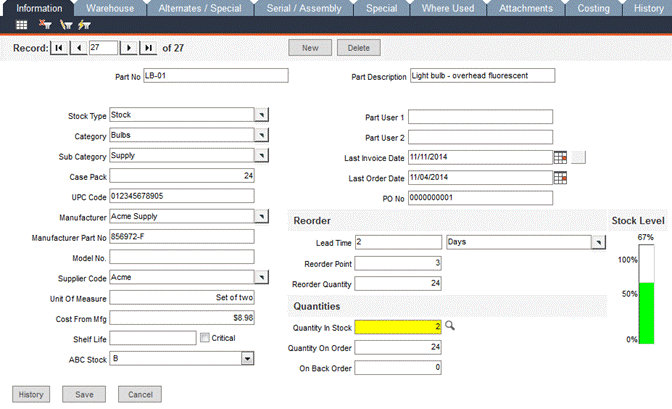
To add a new part, click the New button. Enter data per the field descriptions below:
Part No: Enter a unique alphanumeric identification code for each part.
Part Description: Enter a brief description of the part.
Stock Type: Parts can be classified according to ordering, stocking or job assignment policies.
Category: Parts can be categorized for ease in grouping in reports and graphs.
Sub Category: Categories can be divided into subcategories to help you sort parts in reports and graphs.
Case Pack: Enter how many parts a typical package or shipment contains. For example, enter the number of items per case, i.e., 12-pack, 24-pack or 96-pack carton.
UPC Code: Enter the UPC code assigned to this part.
Manufacturer: Enter the name of the manufacturer of this part or select it from the pop-up list.
Manufacturer Part No.: Enter the manufacturer’s part number. Your printed purchase orders will show this number instead of your internal part number. However, if you leave this field blank, your POs will show your company number.
Model No.: Enter the part’s model number, if applicable.
Supplier Code: Select the code of your supplier for this part from the pop-up list.
Unit of Measure: Enter the unit by which you usually use the part for a PM or WO, such as each, gallon, or pound.
Cost from Mfg: Enter the current price of the part as per the unit of measure entered.
Shelf Life: If the part is perishable or will soon be obsolete, enter its shelf life.
Critical: Place a check in this box to indicate that this part is critical.
ABC Stock: ABC Stock items fall into one of three categories. Select a category from the drop-down list.
A: Items are expensive to keep on hand, but are critical items. You would keep a small number of these on hand, but manage the stock level closely. If you select A from the drop-down list, FaciliWorks will automatically check the Critical checkbox.
B: Items are not very expensive to keep on hand, but are still required. You would keep a moderate amount of parts in stock, but would not monitor the stock level closely.
C: Items are inexpensive parts that may not be critical. You may keep a large number of these parts on hand, but would not monitor the stock level closely.
Part User 1 and Part User 2: Use these user-defined fields to track additional information.
Last Invoice Date: Enter the invoice date for the most recent order of the part. Click the calendar icon to the right of this field to choose a date, type the date directly into the field or click the blue button to the right of the calendar icon to insert today’s date. When you create purchase orders in FaciliWorks for this part, this field will auto-fill with the invoice date of the most recent purchase order for this part.
Last Order Date: Enter the date on which the most recent order was placed. Click the calendar icon to the right of this field to choose a date or type the date directly into the field. When you create purchase orders in FaciliWorks for this part, this field will auto-fill with the order date of the most recent purchase order for this part.
PO No.: Enter the PO number for the most recent order.
Lead Time: In this field, enter the estimated lead time for the part.
Reorder Point: Enter the minimum quantity of the part that should be in stock before a reorder is necessary.
Reorder Quantity: Enter the number of parts to order. The total quantity to order will be the difference between the quantity in stock and the reorder point, plus this field.
(Reorder Point - Quantity in Stock) + Reorder Quantity = Total Quantity to Order
This section displays information about the current inventory level for this part.
Quantity in Stock: This field shows your current inventory level of this part; it will automatically update as parts are received into stock through a purchase order. To manually change this amount, see the instructions below.
Quantity on Order: Based on your purchase order records, this field shows the quantity currently on order. This number is editable.
On Back Order: If any of the parts are on backorder, this window shows that amount (based on your purchase order records). This number is editable.
Stock Level: This field gives you a quick visual graph of the current quantity in stock compared to the reorder point.
History Button: Clicking this button opens a Part History window, detailing work orders and purchase orders associated with the part, tasks that required the part and estimated and actual quantities used.
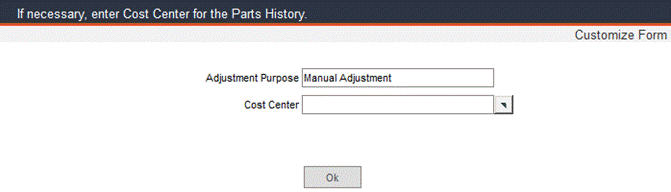
Manually Changing the Quantity in Stock
If the Quantity in Stock amount is incorrect, double-click it or click the magnifying glass icon to the right of it; the Calculate Part Quantity window will open
In the designated fields, enter the number of parts that need to be added or subtracted from the current quantity. Press the Tab key on your keyboard or click in the next field. This action deactivates the field you’ve just altered and allows FaciliWorks to calculate the new total and display it in the Final Stock Level field. If you want to accept this new quantity, click the Close button. If you decide not to change the Quantity in Stock, click the Cancel button.

If you click Close, you will be prompted to confirm the change; click Yes to proceed. FaciliWorks will update the Quantity in Stock field and close the window. If you click No, i.e., you do not accept the new amount, Quantity in Stock will remain at the current level. The Calculate Part Quantity window will remain open; you can either enter another adjustment or click Cancel.
After a manual adjustment, FaciliWorks will prompt you for adjustment purpose and cost center information. If desired, make a selection from the Cost Center pop-up list and then click Ok; otherwise, close the window.
Use this screen to divide all parts in inventory into different warehouse locations. When parts come in, enter the quantity and storage information and click the Save button; a new blank row of fields will appear, allowing you to enter another record. If you are receiving parts through a purchase order record, these fields will be automatically updated. From the Reports menu, you can produce an inventory report sorted by part number or location. By selecting one of several options from the Graphs menu, you can see this information graphed.
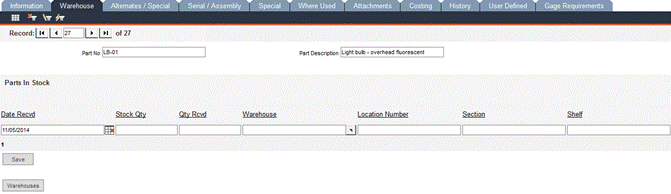
Part No: Displays the identification number for the current record as entered in the Information tab.
Part Description: Displays the description for the current record as entered in the Information tab.
Date Recvd: Enter the date on which the order was received.
Stock Qty: Enter the number of parts in stock prior to the receipt of the current order.
Qty Rcvd: Enter the number of parts received in the current order.
Section, Shelf, Aisle and Bin: Specify the exact storage location for this part in these fields.
Warehouse: Use the pop-up list to select the part’s warehouse. If the warehouse isn’t in the list, click the Warehouses button at the bottom of the form to add a new warehouse location; the following window will open:
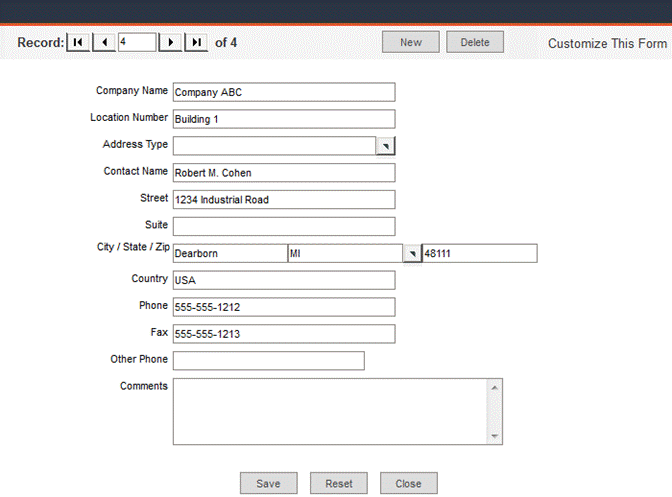
Click New to create a new warehouse record. Enter the appropriate information; enter the name of the warehouse location in the Company Name filed and enter the numerical Location Number. Click Save. Click Close to return to the Warehouse tab.
Click Reset to clear the form; click Delete to delete a warehouse record.
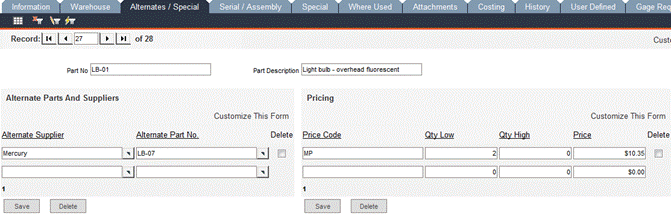
Enter alternate supplier and price information for the part.
Alternate Supplier: Use the pop-up list to select an alternate supplier for the part.
Alternate Part No.: Select an alternative part from the pop-up list.
The Save and Delete buttons in this pane affect only the records in this pane. When saving a record, a new blank row of fields will appear, allowing you to enter another record.
In the Pricing section of this screen, identify your alternate part pricing by assigning a code to different purchasing options. For example, you might identify a minimum purchase price code. You can also use special codes to identify the lowest price, highest price or optimum quantities for your needs. Your code system could indicate the best price for this part or the smallest order quantity. You could also use the code to reflect a particular product or location number.
Price Code: Enter a price code in this field (maximum of 10 characters).
Qty Low: If applicable, enter the minimum purchase quantity to qualify for special pricing or discounts.
Qty High: Enter the maximum purchase quantity to qualify for special pricing or discounts.
Price: Enter the price for the quantity specified.
The Save and Delete buttons in this pane affect only the records in this pane. When saving a record, a new row of fields appear, allowing you to enter another record.
In this screen, enter serial number and assembly number information about this part.
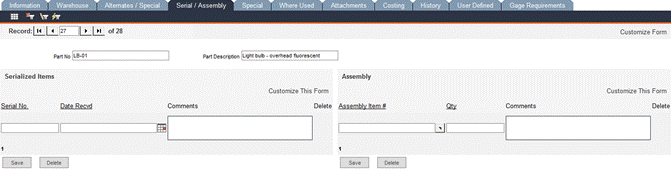
Serial No.: If you track parts by serial number, enter that information here.
Date Recvd: Enter the date on which you received the part.
Comments: Enter information regarding this particular serial number record.
The Save and Delete buttons in this pane affect only the records in this pane. When saving a record, a new row of fields appear, allowing you to enter another record.
Assembly Item #: If you track parts by assembly number or name, enter that information here.
Qty: Enter the quantity of parts for the assembly item.
Comments: Enter comments about the assembly item or part.
The Save and Delete buttons in this pane affect only the records in this pane. When saving a record, a new row of fields appear, allowing you to enter another record.
In this screen, you can record the part’s special features and engineering data.

Enter the part’s distinctive characteristics, if any.
Drawing No and Drawing Date: If applicable, enter the drawing number for this part, then enter the date of the original drawing or click the calendar icon to select a date.
Change Level and Change Date: Enter the current change level characters that identify the current drawing, then enter the date of the most recent drawing change level for this part or click the calendar icon to select a date.
In this screen, manually create a list of assets for which this part is used. When you select an Asset ID from the pop-up list, the asset’s description, model number and current location will automatically populate the appropriate fields. When a record is saved, a new blank row of fields will appear, allowing you to enter another asset.
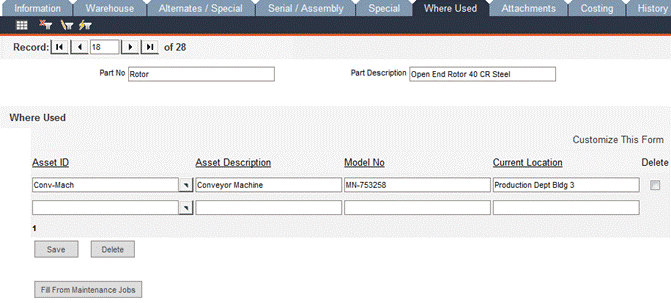
Click the Fill from Work Orders button to automatically add assets from completed work orders to this list. This feature is useful if you need to scavenge a part from a non-critical asset and use it until you receive a new part.
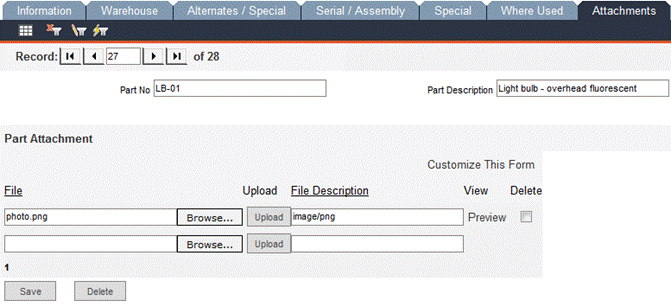
You can attach images, maps, other drawing objects or any other files to parts in the Attachments tab. Click the Browse… button to browse through your directories to locate a file. After selecting the file, click Upload; the File Description field will be populated automatically, but this value can be edited. Upon successful upload of a file, a new blank field appears, allowing you to select another file. There is no limit to the number of files you can attach. Be sure to click Save before exiting this screen. To view or print attached files, click Preview.
The Costing tab is a record of all of the various cost levels of the part. There may be multiple records here depending on the inventory costing method used: LIFO, FIFO or a weighted average. This keeps track of the date, quantity and cost of each set of parts.
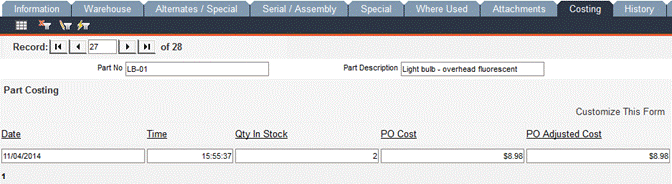
If a quantity of parts comes in at the same cost as the previous set, the quantity is added to the previous set. If the cost is different, then a new record is created with the new cost.
If using weighted average, the new parts are averaged in the existing record. They are weighted by the number of parts already in stock and the number of parts in the new set. Essentially, this is a cost history for all parts.
The values in this form cannot be changed.
This form shows a record of every change that is made to a part’s inventory level. It may be useful to think of this form as an audit log that is specific to part quantities. The values on this form cannot be edited here.
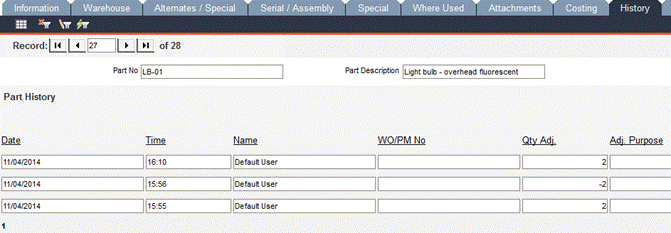
Click a column header to sort the list by that column in ascending order. Click the same column header a second time to sort by that column in descending order.
This screen is available for any data that does not belong in any of the predefined fields in the other screens of Part Entry.
The field types (i.e., text field, date field or pop-up list) are edited within the Configuration -> Admin Settings -> Interface -> Part Custom sub-tab. Please see the FaciliWorks Administrator Guide for detailed information about Admin Settings.
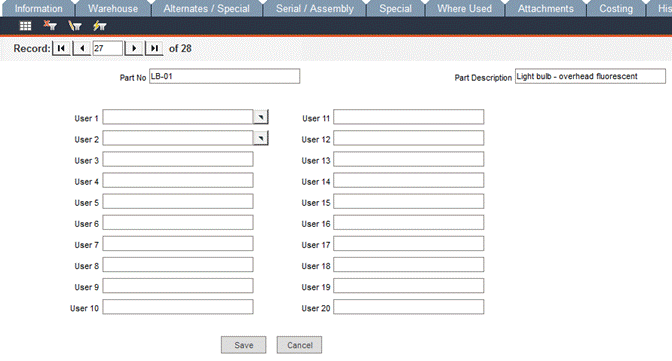
Click Customize Form to change the names of the fields. In the Label Text field, overwrite the default text with a new, customized field name. Scroll down to the bottom of the form and click Save; close the window. Refresh the User Defined tab by clicking the Save button and the new field name will be displayed.
Use this tab to set up lists of gage requirements (lists of gages that you need to use to inspect parts as you produce them).

Gage ID: Use the pop-up list to select the gage you will use to inspect the part.
Description: FaciliWorks will automatically enter the description of the gage you selected in the Gage ID field.
Method: Enter the control method, such as Inspection Sheet or Control Chart.
Dimension: In this field, enter the dimension or characteristic that you will check with the gage.
Comments: Record any notes about the dimension or characteristic that you’re checking.
Frequency: Specify the frequency at which the part will be inspected with this gage, such as 5 per Shift or 10 per Day.
When the quantity in stock of a part falls to or below the reorder point entered in the Part Entry -> Information tab, FaciliWorks uses the inventory information to automatically generate purchase order notifications here in the Inventory -> Create Purchase Orders -> Information tab. The records generated here are reported on the Dashboard under the Inventory Summary as parts that have reached a critical limit.
If all the parts you have in stock are above their reorder threshold, this window will display a message that no parts need to be ordered instead of displaying the Information tab below.
Fields in this screen are populated with information from Part Entry; the Order Quantity value can be changed here.
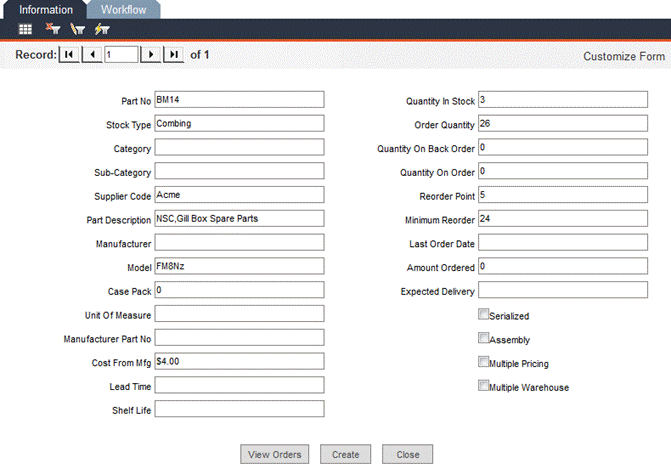
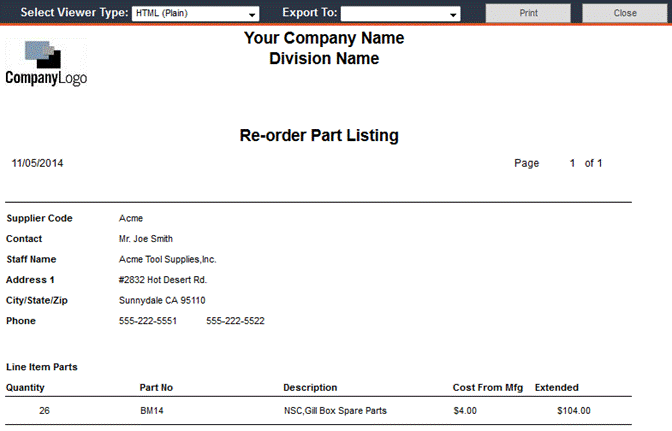
Click View Orders to see the Re-Order Part Listing in its print layout. From this screen, you can print the listing or export it as various file types.
Click the Create button at the bottom of the Information tab to create all purchase orders. If all entries have the necessary information, a message similar to the following will appear:
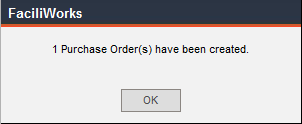
Click OK.
If any necessary information is missing (such as Supplier Code), FaciliWorks will not create the purchase order; the following message will be displayed:
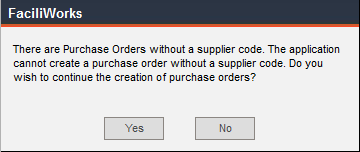
Clicking Yes will allow FaciliWorks to create any complete purchase orders. Go to Inventory -> Part Entry to correct the information on incomplete purchase orders and then return to Create Purchase Orders. Clicking No will cancel the operation altogether; go to Inventory -> Part Entry to correct order information.
Once a purchase order has been created here, it will then appear within Inventory -> Purchase Orders.
Create Purchase Orders - Workflow Tab
If workflow steps and triggers have been defined within Configuration -> Workflow Step Setup and Configuration -> Workflow Trigger Setup, this screen will display the workflow history associated with the purchase order. Please see the FaciliWorks Administrator Guide for workflow setup instructions.
Navigate to Inventory -> Purchase Orders to view and modify purchase order data or to create a new purchase order.
If a purchase order has been created via Create Purchase Orders, it will be available within this section for modification.
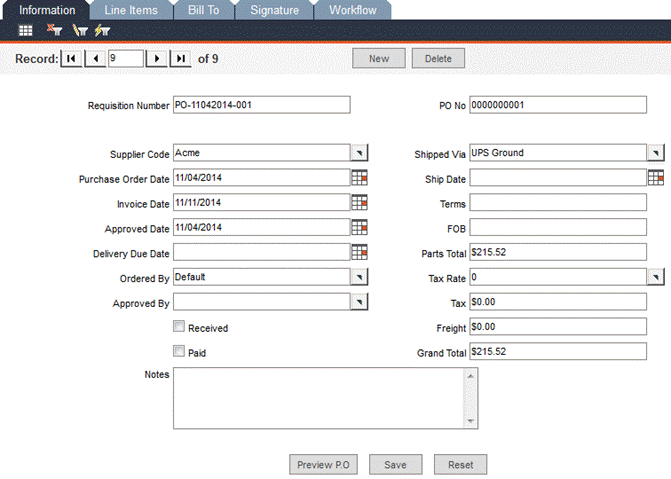
Requisition Number and PO Number: FaciliWorks automatically creates these numbers based on the format specified within the Configuration -> Admin Settings -> Automatic Numbering tab. Please see the FaciliWorks Administrator Guide for more information about automatic numbering.
Supplier Code: Select a supplier from the pop-up list.
Purchase Order Date: Enter the date of the order.
Invoice Date: Enter the invoice date for this order.
Approved Date: Enter the date on which the purchase order was approved, if applicable.
Delivery Due Date: Enter the anticipated delivery date, if known.
Ordered By: This field auto-fills with the name of the user currently logged into the software. To change it, use the pop-up list to select the Staff ID of the person who requires the items.
Approved By: Use the pop-up list to select the Staff ID of the person who approved the purchase order.
Received: Check this checkbox when the order is received; then, go to the Line Items tab to enter the quantities received.
Paid: Check this checkbox when the accounting department pays the invoice for the order.
Notes: Enter any notes that should appear on the purchase order.
Shipped Via: Use the pop-up list to select the shipping method.
Ship Date: Enter the date on which the supplier shipped the order.
Terms: Enter the payment terms for the order.
FOB: Enter the location from which your company is responsible for the freight cost.
Parts Total: This is the total cost of the parts as calculated by FaciliWorks. You cannot edit this field.
Tax Rate: Enter or select the tax rate.
Tax: This is the total tax on this order as calculated by FaciliWorks based on the Parts Total and Tax Rate. You cannot edit this field.
Freight: Enter any freight costs included with the order.
Grand Total: This is the total cost of the order, including parts, freight and tax. You cannot edit this field.
Reset: Click this button to undo any changes since the last time the record was saved.
Preview PO: Click this button to see a print preview of the purchase order. From this screen, you can print the PO or export it. The text in the Instructions pane is populated from the Purchase Order Statement entered in the Configuration -> Admin Settings -> User Information tab. For more information about these settings, please see the FaciliWorks Administrator Guide.
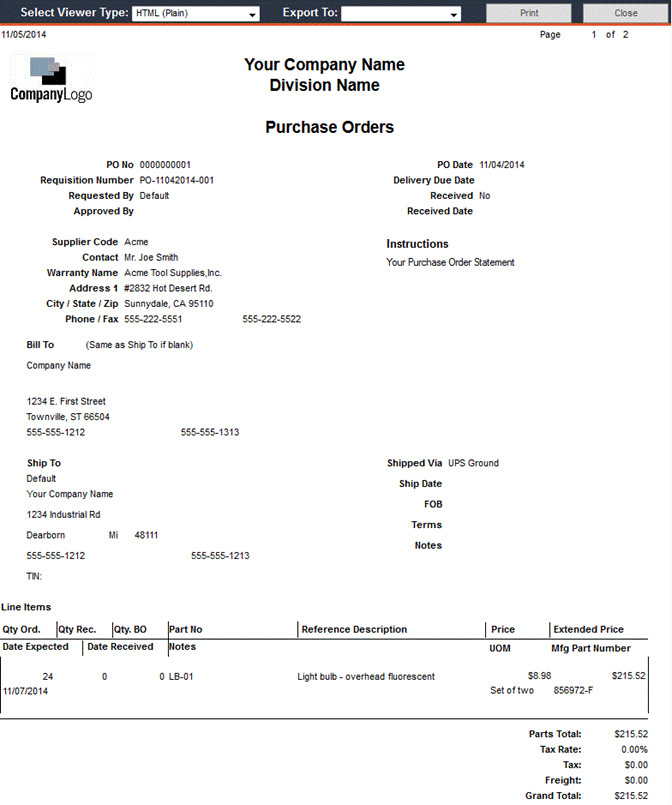
The Line Items tab lists the parts that will be contained in the purchase order.

One way to add a part to the list is to use the Part No pop-up list to select the part. The only parts available in this list will be parts associated with the supplier specified on the Information tab. When a part is selected, the Part Description and Model fields are automatically populated and a new row of fields appears, allowing you to enter another part.
The other way to add a part to the list is to type it into the Part No field and then either press the Tab key on your keyboard to advance to the next open field or click in the next open field. If you enter a part number that is not in the database, the following window will appear:
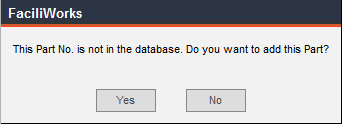
Clicking Yes will open the Part Entry window wherein you can enter the information for the new part. If you click No, the following message will appear:
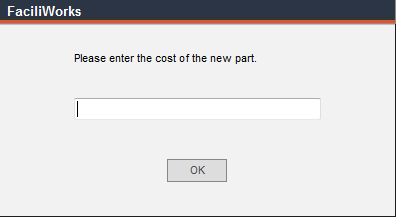
Type in the part cost and click OK. This value will populate the Price field.
Enter the number of parts to order in the Quantity field and Tab to the next field. FaciliWorks multiplies the Price value by the Quantity value and enters the product in the Extended field.
Alt. Supplier: Check the checkbox if the part is from an alternate supplier.
Part Description, Model and Price: Upon selecting a part number from the pop-up list, these fields are populated from the contents of the same fields within the Part Entry -> Information tab and calculated from values entered. These field values cannot be edited in this screen.
Quantity: Enter the quantity ordered for each part.
Qty Rcvd: When an order is received, go to the Information tab to check the Received checkbox and then revisit this form to enter the quantity received of each part. Upon entering the quantity received, the following window will open:

If you would like to select a Cost Center for the received item, use the pop-up list to do so and then click OK. If you do not want to select a Cost Center, leave that field blank and then click OK. FaciliWorks automatically updates the Quantity in Stock (shown in the Part Entry -> Information tab).
Qty Back Ordered: Enter the back ordered quantity for any back ordered items; the value will be reflected in the Part Entry -> Information form for that part. When the backordered item arrives, revisit this form to remove the quantity from the Qty Back Ordered field and add the quantity to the Qty Rcvd field. Because you are updating the Qty Rcvd field, the following window will open:
If you would like to select a Cost Center for the received item, use the pop-up list to do so and then click OK. If you do not want to select a Cost Center, leave that field blank and then click OK. FaciliWorks automatically updates the Quantity in Stock (shown in the Part Entry -> Information tab).
Price: Enter the price for the part ordered if entering a new part manually. This field is read-only if the part is selected from the list.
Extended: This field value is automatically calculated as the product of Quantity and Price.
Date Expec: Enter the date on which you expect to receive this order.
Date Recvd: When you receive the shipment, enter the date in this field.
Comments: Enter any additional comments regarding this item.
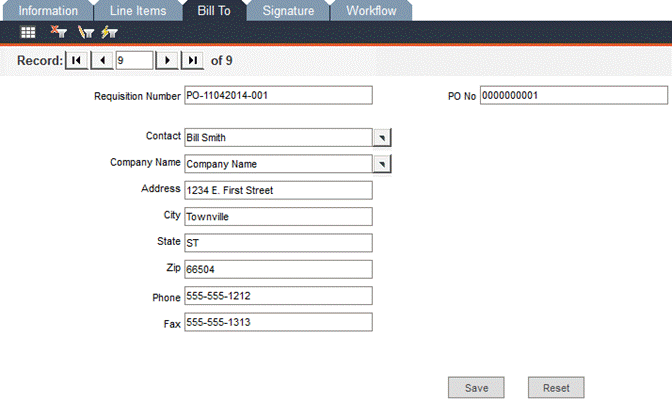
The default Ship To and Bill To address is the address entered within the Configuration -> Admin Settings -> User Information tab. If, however, the Bill To address is different from the Ship To address, access the Bill To tab to enter the information. For more information about Admin Settings, please see the FaciliWorks Administrator Guide.
If the Bill To address is the same as the Ship To address, leave the Bill To form blank.
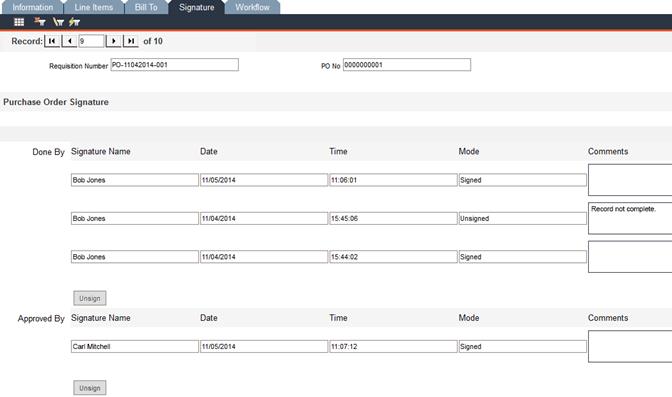
To sign a record as complete, click the Sign button in the Done By pane. This creates a new signature record containing the name of the user currently logged in, the date and the exact time. (The button previously labeled as Sign changes to Unsign at this time.)
If Electronic Signature Login is enabled (specified within the Configuration -> Admin Settings -> Security tab), clicking the Sign button will open the Electronic Signature Login window. Enter your User ID and Password and click OK. This creates a new signature record containing the user's name, the date and the exact time. (The button previously labeled as Sign changes to Unsign at this time.)
Once the record has been signed, then the Approved By pane can be signed. Once a record has been signed, it cannot be edited by anyone. A signed record can only be made editable if the original user unsigns it; if the record’s approval has been signed, the approval must be unsigned by the person who signed it before the record can be unsigned.
Unsigning a record is done in the same way as signing a record. During the course of the unsigning, a Comments box will open, allowing you to type any necessary comments. Click Save to save the comments or click Cancel to return to the Signature tab without entering any comments.
Purchase Orders - Workflow Tab
If workflow steps and triggers have been defined within Configuration -> Workflow Step Setup and Configuration -> Workflow Trigger Setup, this screen will display the workflow history associated with the purchase order. Please see the FaciliWorks Administrator Guide for workflow setup instructions.
When parts are received by means other than through purchase orders (such as a transfer of parts from one company location to another), navigate to Inventory -> Receive Parts to update your inventory.
Use the Part No pop-up list to select a part.
Qty Rcvd: Enter the number of parts received.
The Cost field is automatically populated with the part cost entered in Part Entry.
Order Cost: This field contains the total cost of the parts, which is the product of the values from the Qty Rcvd and Cost fields. This field can be left blank.
Use the Warehouse pop-up list to select the warehouse in which the parts are stored.
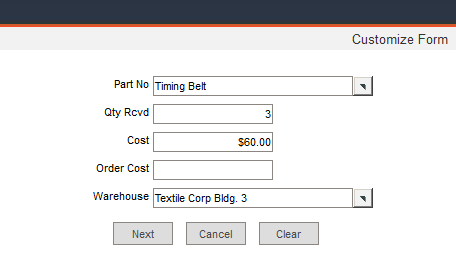
Click Next to complete the record and proceed to a new blank form. Click Cancel to exit Receive Parts or click Clear to clear the contents of the form without saving it.
FaciliWorks automatically updates the Quantity in Stock shown in the Part Entry -> Information tab.
You can manually update your inventory by navigating to Inventory -> Use Parts.

Use the Part No pop-up list to select a part number.
Enter the Quantity Used.
Use the WO/PM Number pop-up list to select an open PM or work order associated with the part’s use, if applicable. When part use is recorded here and associated with PM or work order, the part usage will be reflected in the Parts tab of the PM or work order record and also in the History tab of the part record.
Use the Asset ID pop-up list to select the asset on which the part was used.
When applicable, use the Cost Center pop-up list to select the liable cost center.
Manually type the purpose of the part’s use in the Purpose field.
Click Next to save the record and proceed to another blank form. Click Close to exit the Use Parts screen.
Economic Order Quantity (EOQ) is a formula that helps you optimize stock levels by determining the stock level that will cost your company the least amount of money. EOQ uses the number of parts that are needed for a specified time period and compares that to the cost of ordering the parts and the cost of keeping the parts on the shelf. Navigate to Inventory -> EOQ Analysis.
This form is a filter used to determine which parts are compared. By default, the date range is one year, ending on today’s date. The dates can be changed by using the pop-up calendar to the right of each field or manually typing the desired date. Use the pop-up lists in the other fields to select the values by which to filter.
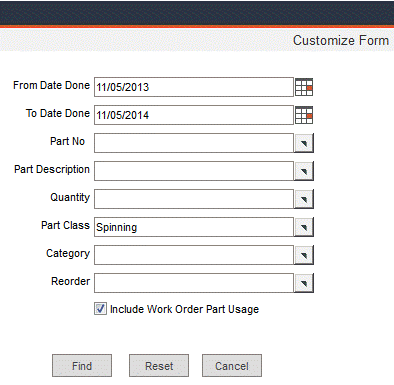
Click Reset to clear the contents of all fields except the date fields.
Click Cancel to exit the EOQ Analysis form.
Click the Find button to view information based on the criteria selected in the filter or leave the filter blank and click Find to display all data. A list of parts to be compared will be displayed. Holding Cost refers to the costs to keep a part on the shelf as a percentage of the part’s purchase cost. Order Cost refers to the miscellaneous costs associated with buying parts, including the time it takes to create the order, shipping costs or any costs other than the parts themselves and the taxes. These two values are the same for every part in the list. Click the Calculate button; FaciliWorks will recalculate reorder points based on the figures you enter.
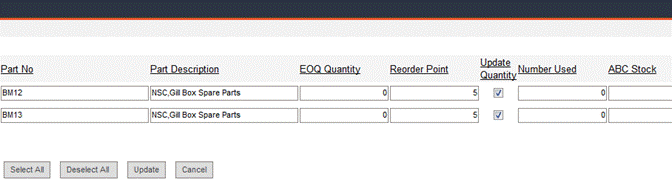
The current Reorder Point and the calculated EOQ Quantity reorder point are shown for each part in the list.
By default, all Update Quantity checkboxes are checked. Click Deselect All to remove all check marks.
To use the calculated reorder point for future orders of a particular item, check the item’s Update Quantity checkbox or to select every item in the list, click Select All.
After making your selections, click Update to update the FaciliWorks database.
To close this window without modifying your FaciliWorks database, click Cancel.