Some preventative maintenance (PM) orders may require repetitive route-based inspection, lubrication, mechanical, electrical and instrumentation activities for more than one asset. Rather than creating a separate PM order for each asset, a single PM entry is created for multiple assets. This Route PM entry contains the scheduled preventative maintenance activities for every asset included on the list. It also allows a change in activity from one asset to another, as well as the change in the required labor, parts, contracts, procedures, variables, tools and checklist inspections for each asset. Navigate to Preventative Maintenance -> Route Preventative Maintenance Setup.
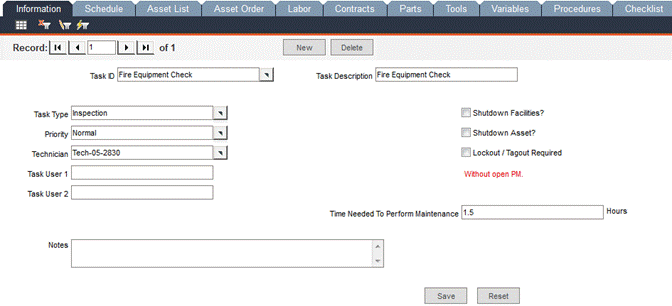
Create a Route Preventative Maintenance Setup record in this screen. Select a Task ID from the pop-up list and all related fields will auto-fill. Check the Shutdown Facilities, Shutdown Asset, Lockout / Tagout Required checkboxes as applicable. The Time Needed to Perform Maintenance _ Hours field displays the sum of the time recorded for each of the assets.
Enter the Route PM schedule in this window. See Maintenance Due Dates for detailed information about entering schedules.
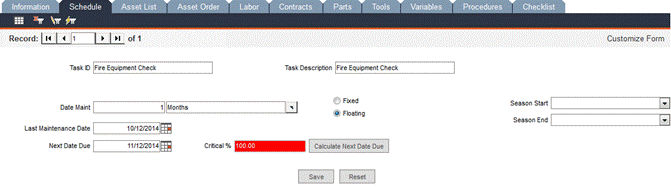
Enter the maintenance frequency in the Date Maint fields (type the numeric value in the left-hand field and use the pop-up list in the right-hand field to select the unit of measure.)
Enter the Last Maintenance Date.
Click the Calculate Next Date Due button.
Click the Save button.
Route Preventative Maintenance Setup - Asset List Tab
In this screen, you can assign multiple assets to the task. Select an asset in the Information sub-tab and enter further data in the remaining sub-tabs specific to that asset. Information from all of the Asset List sub-tabs is combined and displayed in the main tabs of Route Preventative Maintenance Setup. For example, if there are two assets in the Asset List and their Labor sub-tabs have been populated, view the main Labor tab for the Route PM Setup and see that the labor information for both assets is included.
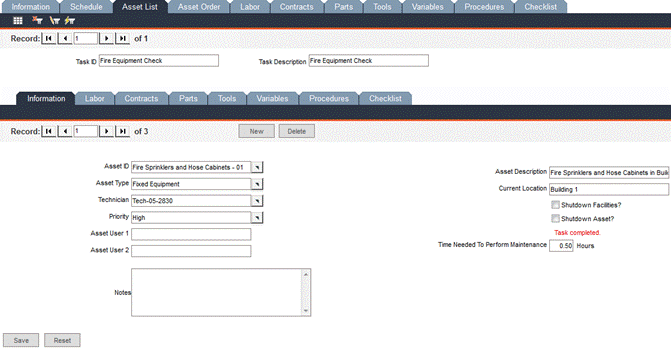
Click the Asset List tab.
The Information sub-tab will be displayed. Click the Asset ID pop-up and select an asset. All related fields (Asset Description, Asset Type, Current Location, Priority, Asset User 1 and Asset User 2) will be automatically populated.
Click Save.
Click the Labor sub-tab. Click the Staff ID pop-up and make a selection. The Staff Name and Craft Code fields will be automatically populated.
Click Save.
Click the Contracts sub-tab. Click the Reference ID pop-up make a selection. All of the related fields will be automatically populated.
Click Save.
Click the Parts sub-tab. Click the Part No pop-up and select a part. The related fields will be automatically populated.
Click Save.
Click the Tools sub-tab. Click the Tool ID pop-up and select a tool. All of the related fields will be automatically populated.
Click Save.
Click the Variables sub-tab. Click the Variable pop-up and make a selection. All of the related fields will be automatically populated.
Click Save.
Click the Procedures sub-tab. Click the Procedure Name pop-up and make a selection. (If you click the View Procedure button, the procedure text displays in a separate window. Close the window.)
Click Save.
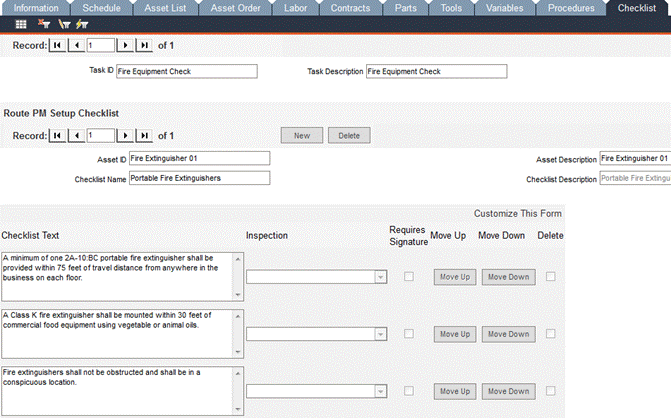
Click the Checklist sub-tab. Click the Checklist Name pop-up and make a selection. All related fields will be automatically populated. The Inspection drop-down list includes the following options: Do Item Only, Do Inspection Only and Do Item and Inspection. Select the appropriate option for your asset.
Click Save.
The associated records: labor, contracts, parts, tools, variables, procedures and checklist can be carried from the first specified asset to another asset that will be added to Asset List.
Navigate to the Asset List -> Information sub-tab.
Click the New button.
Click the Asset ID pop-up and make a selection. All related fields (Asset Description, Asset Type, Current Location, Priority, Asset User 1 and Asset User 2) will be automatically populated.
Click Save. You will be asked if you want to copy all resources from the first asset record to this asset.
Click Yes.
Open all sub-tabs to see that the related labor, contracts, parts, tools, variables, procedures and checklist records have been carried forward from the original asset to the newly added asset in the Asset List.
If you need to delete an asset from your Asset List, follow these instructions:
Click the Information sub-tab and use the record navigation bar to locate the asset you want to delete.
Click the Delete button to the right of the record navigation bar. You will be prompted to confirm the deletion.
Click Yes. FaciliWorks 8i refreshes to complete the action.
If one of your assets will require that the facility be shut down, follow these instructions:
In the Asset List -> Information sub-tab, locate the record for the asset that will require a shutdown and check the Shutdown Facilities checkbox.
Click the Save button.
Navigate to the main Information tab in Route Preventative Maintenance Setup. The Shutdown Facilities checkbox will be checked to reflect the change you’ve made.
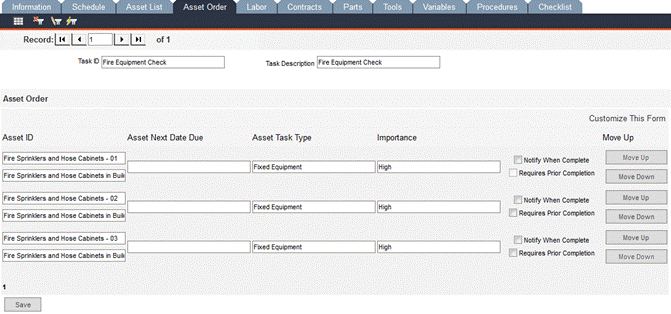
Route Preventative Maintenance Setup - Asset Order Tab
Set the order of your assets in this screen. Use the Move Up and Move Down buttons to change the order of the assets in the list. Check the Requires Prior Completion checkbox for an asset if it must be completed before another asset can be completed.
In this screen, you can select from previously entered active employees to assign one or more of them to the task. You can change the employee assigned to the task, the craft code or the estimated hours.
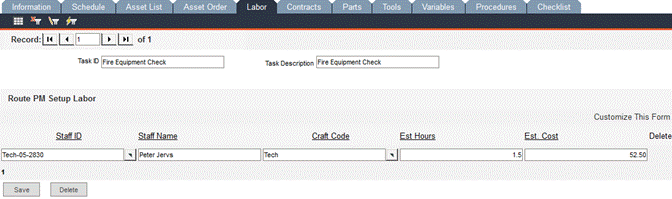
A labor record can be entered here in the Route Preventative Maintenance Setup -> Labor tab and it can be edited or deleted here as well; however, this labor record will not be visible on any of the Asset List ->Labor sub-tabs, because it applies only to the task as a whole, not to the individual assets in the Asset List.
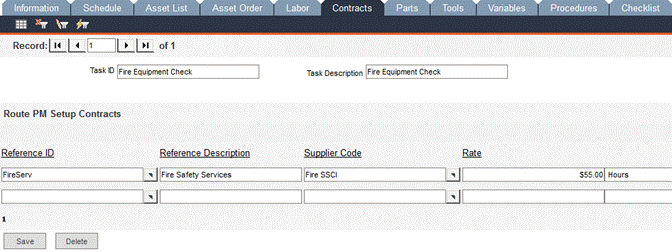
Enter any contractor information that applies to this task.
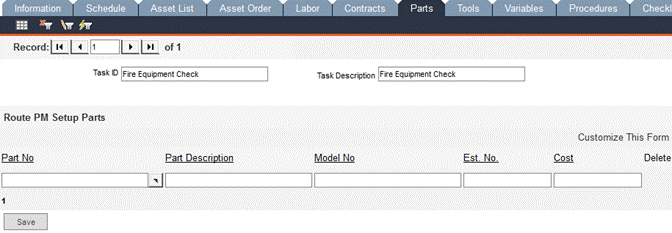
Enter records for parts in this window.
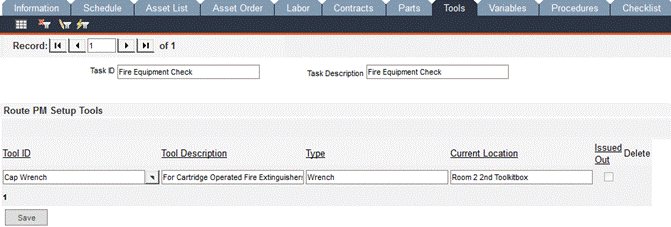
Enter records for tools in this screen.
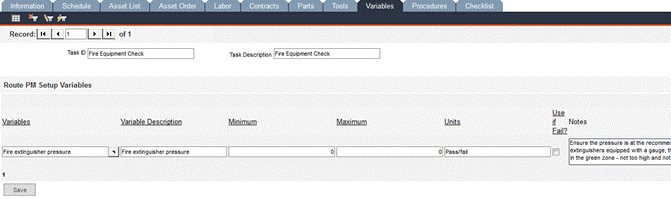
Route Preventative Maintenance Setup - Variables Tab
You can edit all of the variable information except the variable name on this screen, modifying each according to the task. For more information on variables, please see Variable Data.
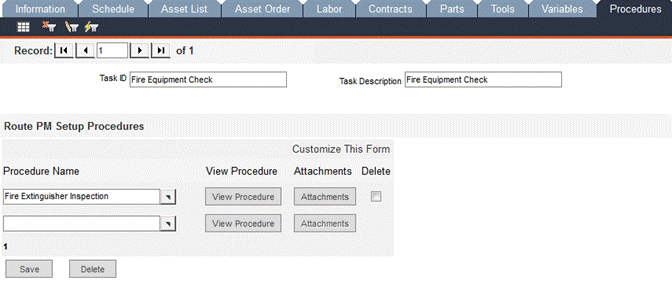
In the Procedures form, you can select one or more previously entered procedures that apply to the task. To select an additional procedure, go to the last blank record and click the pop-up menu; select another procedure name from the list of procedures. Clicking the View Procedure button will display the procedure in a separate, read-only window.
A checklist is a user-defined set of points that must be checked to complete a task. You must enter a checklist record in Data Administration -> Checklists before it can be assigned to a task. You can apply a checklist to the entire route PM here, but if you have applied checklists to individual assets within the asset list, those checklists will display here.
Manual Create Route Preventative Maintenance Order
Now that the Route Preventative Maintenance Setup is defined, you can continue to the manual creation of the Route Preventative Maintenance Order.
Navigate to the Preventative Maintenance menu and select Manual Create PMs. Scroll to the bottom section of the form and you’ll see that the route PM task is shown with the corresponding assets.
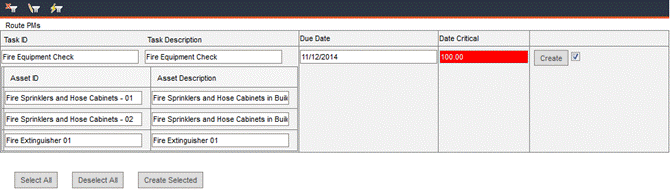
Click the Create button associated with the record. A confirmation message is displayed; click OK to close the message.
To see that the PM for your task has been created, navigate to the Preventative Maintenance menu and select Route Preventative Maintenance. The Progress Name field will display PM Created.
Complete a Route Preventative Maintenance Order
Once the maintenance has been completed, navigate to the Preventative Maintenance -> Route Preventative Maintenance -> Asset List -> Information sub-tab. Locate the record for your first asset (or the asset that requires prior completion). If you try to complete the assets out of order, FaciliWorks will display an alert message.
Click the Checklist sub-tab and check the Item Done and/or Inspection Done checkboxes (depending on your prior selection regarding Do Item Only, Do Inspection Only and Do Item and Inspection).
Click Save.
Return to the Information sub-tab.
Type a numeric value in the Downtime _ Hours field (the amount of downtime required for this asset’s maintenance).
Enter Budget Month and Budget Year information, as applicable.
Click the Save button.
Check the Completed Notice checkbox. The Maintenance Done Date field auto-fills with the current system date.
Navigate to the Route Preventative Maintenance Setup -> Asset List -> Information sub-tab and locate each additional asset record. Complete the steps above for each remaining asset in the list.
In Preventative Maintenance -> Route Preventative Maintenance access the main Checklist tab for your task.
Check the Item Done and/or Inspection Done checkboxes, as applicable. Remember that we are completing the checklist for the task, not for specific assets within the task.
Click the Save button.
Return to the main Information tab for your task.
Enter Budget Month and Budget Year information, as applicable.
Check the Completed Notice checkbox to complete the task. FaciliWorks will alert you to any missing information.
Click Save.
We have now completed the task. Completing the task will automatically complete all assets within the asset list.