From the Main Menu, navigate to Tools -> Tool Entry to create and edit records for all tools, including each tool’s usage history.
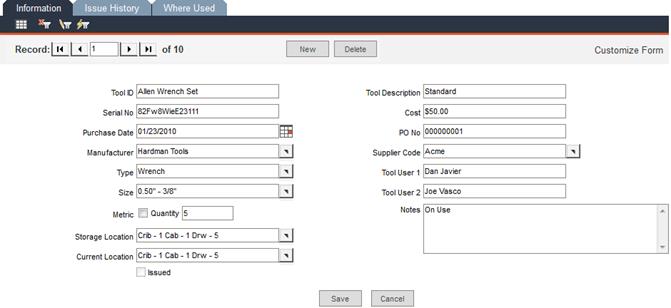
In this screen, enter general information about the tool.
Tool ID: Enter a unique alphanumeric code for each tool.
Tool Description: Enter a 50-character (maximum) description of the tool.
Serial No: Enter the tool’s serial number or model number.
Purchase Date: Enter the date the tool was purchased or select the date from the pop-up calendar, accessed by clicking the calendar icon to the right of the Purchase Date field.
Manufacturer: Enter the name of the tool’s manufacturer or select a manufacturer from the pop-up list.
Type: Enter the type of tool or select the type from the pop-up list. Because this field can be used to filter your tool records, it is recommended to be consistent in your entries.
Size: Enter information about the tool’s size or its range of use or select it from the pop-up list. Because this field can be used to filter your tool records, it is recommended to be consistent in your entries.
Metric: Check this checkbox if the tool is metric.
Quantity: If this is a multi-piece tool or this tool is part of a set, enter the total number of pieces in the Quantity field.
Storage Location: Enter the tool’s storage location or select a location from the pop-up list.
Current Location: When you first enter a tool record, enter the tool’s current location here or select it from the pop-up list. FaciliWorks automatically updates this field when the tool is issued and returned.
Issued: FaciliWorks automatically updates this field as the tool is issued or returned. The Issued checkbox is checked when the tool is issued; the box is not checked when the tool is returned.
Cost: Enter the tool’s original cost.
PO No: Enter the purchase order number used to purchase the tool.
Supplier Code: Enter the code of the tool’s supplier or select a supplier from the pop-up list.
Tool User 1 and Tool User 2: Enter any user-defined information you need for each tool.
Notes: Enter any additional notes about the tool.
Save: Save the changes made to the record.
Cancel: Click Cancel to discard any changes you’ve made.
The Tool Entry -> Issue History tab lists every occasion on which a tool has been issued and returned; the most recent information is listed first. Information that appears on this form can only be edited within Tools -> Edit Tool Issue and Return.
In this screen, you can manually list every asset that uses this tool. Select an Asset ID from the pop-up list and the remaining asset information will automatically display in the appropriate fields. Click Save and a new blank row of fields will appear, in which an additional asset can be entered. Click the Fill from Maintenance Jobs button to automatically insert asset information based on completed work orders.
Delete checkbox and Delete button: To delete a line item, check the corresponding Delete checkbox and click the Delete button.
Save: Save the changes made to the record.
Cancel: Click Cancel to discard any changes you’ve made.
Navigate to Tools -> Issue Tools to track tool location and usage, reasons for use and number of times used. To issue a tool, you must create a new issue record. When a tool has been issued out via this form, the Issued checkbox in that tool’s Tools -> Tool Entry -> Information tab will be checked and the Current Location field will show the Staff ID of the person to whom the tool was issued.
Tool ID: Select the tool to issue from the pop-up list; only the tools that are currently not issued out will be on this list.
Issue Date and Issue Time: These fields auto-fill with the current system date and time. If you do not want to use today’s date, enter a date in the Issue Date field or select a date from the pop-up calendar. If the time displayed in the Issue Time field is not accurate, reset the clock for your computer using the Windows Control Panel. If you wish to alter the time for any other reason, type a new time in the Issue Time field, directly overwriting the existing time.
Issued To: Use the pop-up list to select the Staff ID of the person to whom the tool is being issued. From this selection, the Issued Department field will auto-fill from the Staff Entry form if the information exists.
Issued Department: This field is automatically populated when a Staff ID is selected in the Issued To field, but you can also use the pop-up list to select a department.
Asset ID: If the tool is being issued on a particular asset, select the Asset ID from the pop-up list.
The Received Date, Received Time, Received From and Cycles fields will be automatically populated upon the return of the tool.
Notes: Enter any additional notes regarding the issuance of this tool.
When you’re finished entering in the tool issuance information, click the Issue button to issue the tool and save the record. A Tool Successfully Issued message will appear; click OK. A new blank issue form is displayed.
Click Cancel to discard your changes to return to a fresh issuance form.
To return tools, navigate to the Tools menu and select Return Tools.
Select the ID of the tool being returned from the Tool ID pop-up list; only those tools currently issued will be on this list. The tool’s issue information and associated Asset ID (if applicable) will automatically populate the appropriate fields. When a tool has been returned via this form, the Issued checkbox in that tool’s Tools -> Tool Entry -> Information tab will be unchecked.
The Received Date and Received Time fields will auto-fill with the current system date and time; these fields are editable.
Use the Received From pop-up list to select the Staff ID of the person returning the tool.
Cycles: Enter the number of cycles for which this tool was used during its issuance.
Notes: Enter any additional notes regarding the issuance and return of this tool.
Click Cancel to discard any changes that have been made to the record since the last time the record was saved.
Click the Return button to return the tool and save the record. When you receive Tool Successfully Returned message, click OK; a new blank return form is displayed.
Navigate to Tools -> Edit Tool Issue and Return. This form stores information about each issuance and subsequent return of a tool. Use the record navigation bar to locate the record you wish to edit. Change any of the field contents as necessary. Click Save to save your changes or click Cancel to discard your changes.
Within this form, you can issue and return a tool, but none of the fields will auto-fill as they do in the Issue Tools and Return Tools forms. Click New to create a new record and enter necessary information. When a tool has been issued out via this form, the Issued checkbox in that tool’s Tools -> Tool Entry -> Information tab will be checked. When a tool is returned via this form, the Issued checkbox for that tool will then be unchecked.
Click Delete to delete an entire record. You will receive a confirmation message warning that once this record is deleted, the action cannot be undone and asking if you would like to continue.
To continue with the deletion of the record, click Yes; to cancel, click No.