Preventative maintenance orders are very similar to work orders, except for one major difference: work orders apply to unscheduled maintenance while preventative maintenance is scheduled. Once preventative maintenance is created and scheduled through Data Administration -> Assets they can be edited and completed similarly to work order records in this module.
When an asset record is entered into FaciliWorks, its preventative maintenance schedule is included in the record. Based on its meter-based or date-based schedule, once the asset is scheduled for maintenance, FaciliWorks sends a notification that the asset is due for work and that the maintenance order must be created. These notifications are listed in Preventative Maintenance -> Manual Create PMs. Only assets marked as Active in the Status field will be included in this list. This Status field is found on the Assets -> Information tab.
At the top of the Manual Create PMs form is a list of all regular PMs that are ready to be created. If the PM is overdue, the Due Date field is flagged in red. All PMs are listed in date due order.
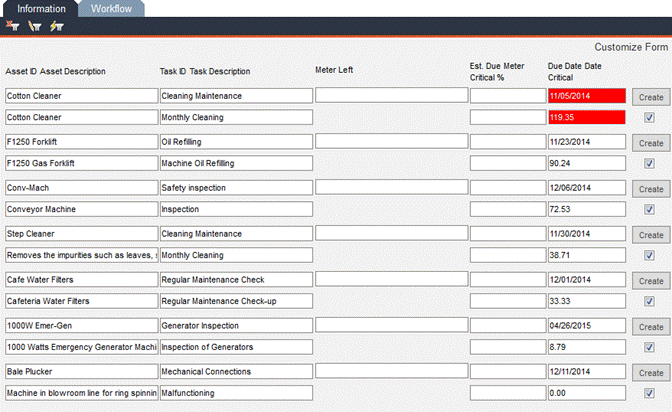
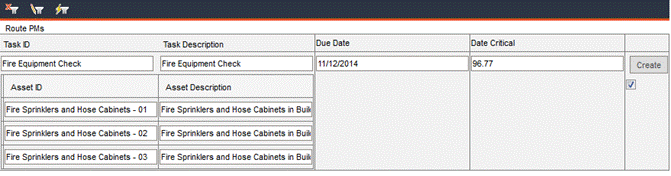
At the bottom of the Manual Create PMs form are closed out PMs and Route PMs that are due and ready to be created:
To manually create a single PM, click the Create button associated with that record. To manually create multiple PMs, check the associated checkboxes and then click the Create Selected button at the bottom of the form. To manually create PM orders for all assets in the list, click the Select All button at the bottom of the form (this will check all checkboxes) and then click the Create Selected button. To uncheck all boxes, click the Deselect All button.
Once a PM has been created for an asset-task, FaciliWorks will not schedule the next due date until the current PM has been completed. If the asset-task does not turn up on the notification list, check to see if there is an open PM. Navigate to the Assets -> PM Task -> Task sub-tab. If the Open PM checkbox is checked, the open PM can be located in Preventative Maintenance ->Edit PMs. If this checkbox is not checked, the asset-task will appear in the Manual Create PMs notification list. If the checkbox is not checked but the asset-task is not in the notification list, there may be a discrepancy with the last maintenance date and the next due date. Navigate to Assets -> PM Task -> Schedule sub-tab to correct the date discrepancy.
Suppose it’s currently February and an asset has a monthly PM schedule. The PM that was due in January was not completed but now it’s time for February’s PM. By default, FaciliWorks will not create the February PM (i.e., it will not be listed in Manual Create PMs) until the January PM is either completed or closed out.
If you would prefer to have FaciliWorks create new PMs even when the old ones are still open, navigate to the Configuration -> Admin Settings -> Options tab. Scroll down to the Manual Create Preventative Maintenance section and check the Allow Duplicate Preventative Maintenance Jobs checkbox. This option can only be enabled by a user with administrator rights.
Next, navigate to the Assets -> PM Task -> Task tab. Uncheck the Open PM checkbox. You will be prompted with a confirmation message; click OK to allow the duplicate and close the message.
Calibration Required (8i Calibration Only)
If an asset that requires calibration is due for both calibration and preventative maintenance and the calibration must be completed first, the asset will be shown in the Manual Create PMs list flagged with Calibration Required to the right of the record.
If you have administrator rights, navigate to Configuration -> Admin Settings -> Options tab and locate the Task Priority section. Use the drop-down list to select either Calibration Tasks or Maintenance Tasks. The type of task you select here will take priority over the other.
For example, if an asset has both a calibration schedule and a preventative maintenance schedule and Calibration Tasks are set as the priority, then the calibration must be performed before the preventative maintenance order can even be created. So, in Manual Create PMs, when an asset shows Calibration Required, you won’t be able to create the PM record until the calibration is complete.
Once a PM order has been created, it can be modified, completed or closed out in Edit PMs.
Although all complete and incomplete PMs can be viewed here, FaciliWorks can be configured to filter the records to initially display those that are incomplete. To show all PMs, click the Show All Records icon above the record navigation bar.
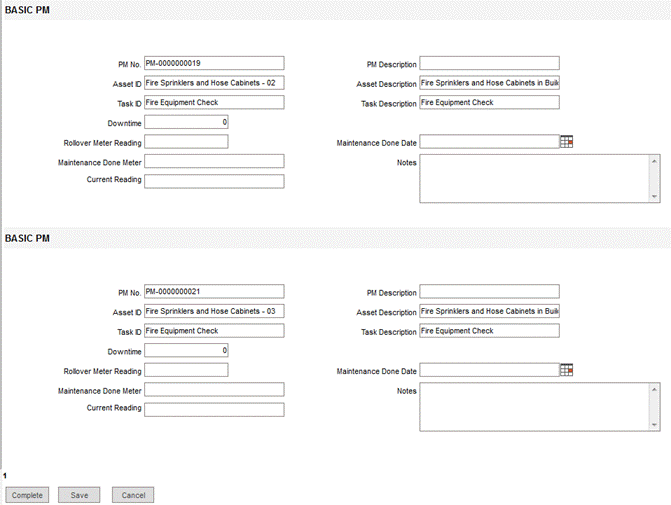
At the top of each form are the PM number, asset and task IDs and their descriptions. Most information in Edit PMs is drawn from the information entered within the Data Administration -> Assets -> PM Task sub-tabs. The few exceptions are discussed in detail in this section. Simply click each tab to edit or complete the preventative maintenance information.
When the PM information has been entered, click the Preview PM button at the bottom of the Information tab to view the preventative maintenance order with full detail. From this window, you can print the PM order to give to the technician who will be completing the work or export it as various file types.
To view a summarized version of the PM, click the Preview Compact PM button. Though summarized, this version contains full procedure text. From this window, you can print the PM order to give to the technician who will be completing the work or export it as various file types.
The only fields in this tab that are not included in the Assets -> PM Task -> Task tab are in the PM Completion, Progress and Budgeting panes at the bottom of the form.
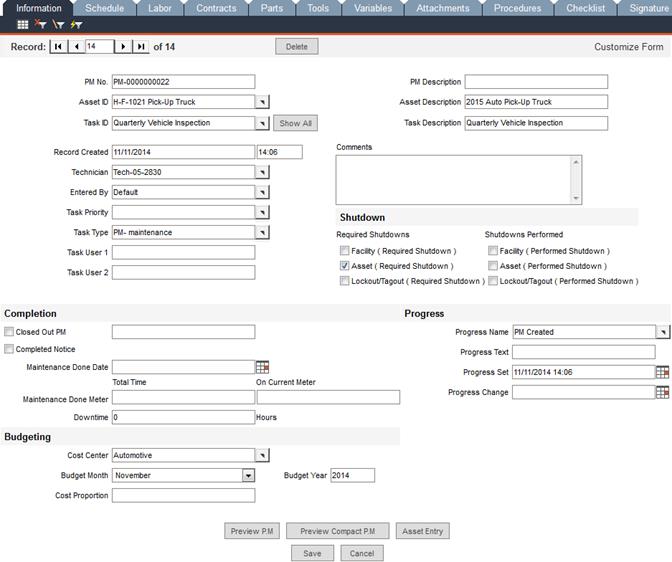
The fields in the Progress pane will be automatically updated as a PM moves through its various stages, from creation to completion.
The Labor and Contracts tabs contain fields for entering cost center information and cost proportions. Whatever percentages of the costs are not attributed to a particular cost center within these tabs will be applied to the cost center specified in the Information tab.
For example, suppose the labor cost for a PM is $100.00 and you specify 80% of that to be applied to Cost Center A (done within the Labor tab). If you want the remainder of that cost to be applied to Cost Center B, you would specify this on the Information tab by choosing Cost Center B and entering 100% in the Cost Proportion field. This 100% represents 100% of the remaining value (after the 80% has been applied to the other cost center). So, $80.00 would be applied to Cost Center A and $20.00 would be applied to Cost Center B.
If in the same scenario, you enter 50% for Cost Center B on the Information tab, $10.00 would be applied to that cost center.
This information is tracked and displayed within Data Administration -> Budget Entry.
When the work for a PM order has been completed, scroll down to the Completion pane and check the Completed Notice checkbox. You will be alerted to any missing information.
For assets with meter-based schedules, enter the appropriate meter values in the Total Time and On Current Meter fields.
Be sure to click Save after any changes.
If the work for a PM order has not been completed, but the PM record must be bypassed, then the PM must be closed out. To allow this as an option, navigate to Configuration -> Admin Settings -> Options and in the Maintenance Jobs section, check the Allow Closing out of Preventative Maintenance Jobs checkbox. (This setting can only be modified by a user with administrator rights.)
The Closed Out PM checkbox is now enabled and editable in the Edit PMs -> Information tab.
For example, suppose you have an asset with a daily PM schedule and only one of your technicians can do this type of work, but he or she is out sick. The PM for the next day will not be generated until the current PM is completed; work will be delayed until the technician is available. In order to generate subsequent PMs to keep the asset on schedule, you can close out the PM for the day missed.
On the Edit PMs -> Information tab, check the Closed Out PM checkbox; the field beneath it will auto-fill with the current date and time and the asset-task will be listed in the Closed Out PMs section of Manual Create PMs.
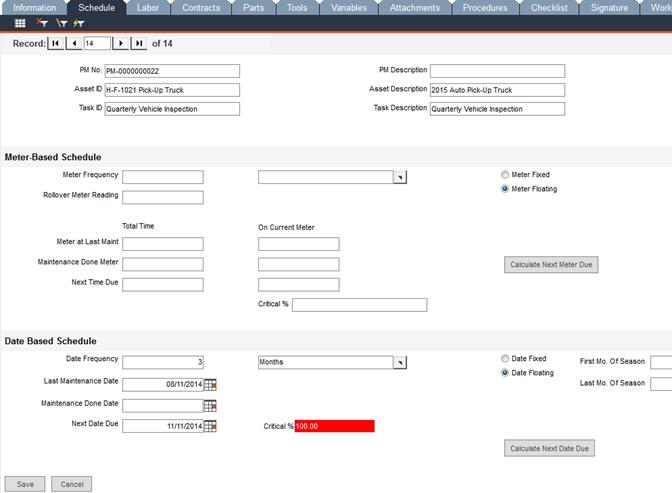
This tab is identical to the Assets -> PM Task -> Schedule tab. If schedule information was entered in the asset record, that information will populate this screen in Edit PMs. For information about entering maintenance schedules, please see PM Task - Schedule Sub-tab.
In this tab, use the Staff ID pop-up list to assign a staff member; associated fields will be automatically populated.
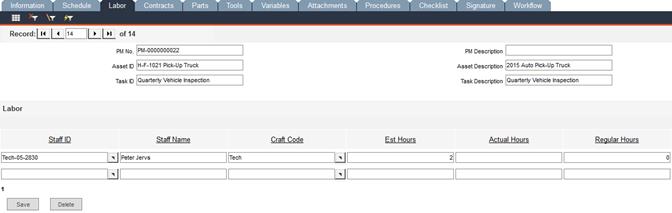
Estimate the number of hours this task should require and enter the numeric value in the Est Hours field. Press the Tab key on your keyboard and the Labor Cost field will be populated. This dollar amount is the product of the staff member’s hourly rate and the estimated number of hours.
When work is completed, enter the number of hours spent on the job in the Actual Hours field and press the Tab key on your keyboard; the Labor Cost field will be updated with the new amount.
If the time spent on the job involves overtime, enter the number of Overtime Hours. FaciliWorks will automatically enter a value in the Regular Hours field (the difference between Actual Hours and Overtime Hours). The Labor Cost field will be adjusted accordingly.

If you would like to attribute a percentage of the labor cost to a particular cost center, choose one from the Cost Center pop-up. The Budget Month and Budget Year fields will populate with the current month and year. These fields can be edited. In the Cost Proportion field, enter the percentage of this labor record to be attributed to the specified cost center for the specified month and year. This information is tracked and displayed within Data Administration -> Budget Entry.
To delete a row, click the Delete checkbox associated with the row and then click the Delete button.
Access the Contracts tab to enter contractor information associated with the preventative maintenance. Make a selection from the Reference ID pop-up list. All related fields will auto-fill from information entered within Data Administration -> Contractors.
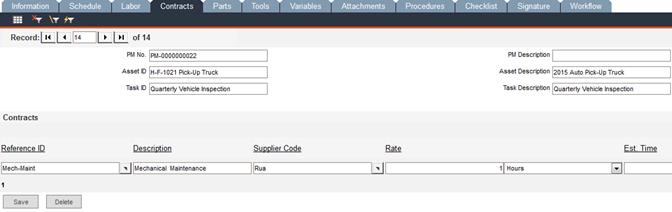
Enter the number of hours the job required in the Actual Hours field; the Rate Cost field will be populated. The value in this field is the product of the number of Actual Hours spent and the contractor’s hourly rate.
If you would like to attribute a percentage of the Rate Cost to a particular cost center, choose one from the Cost Center pop-up. The Budget Month and Budget Year fields will populate with the current month and year. These fields can be edited. In the Cost Proportion field, enter the percentage of this contractor record to be attributed to the specified cost center for the specified month and year. This information is tracked and displayed within Data Administration -> Budget Entry.
On this form, enter information about the parts used for this preventative maintenance.
Use the Part No pop-up list to select a part; associated fields will auto-fill with information that was entered within Inventory -> Part Entry. When the task record was originally entered within Data Administration, it may have included an estimated number of a particular part(s) to use for this task. If that is the case, this number will appear in the Est. No. field here.
When the work has been completed, enter the number of parts used in the Number Used field and press the Tab key on your keyboard. The Part Cost field will be populated with the product of the Number Used and the cost per unit.
If you would like to attribute a percentage of the Part Cost to a particular cost center, choose one from the Cost Center pop-up. The Budget Month and Budget Year fields will populate with the current month and year. These fields can be edited. In the Cost Proportion field, enter the percentage of this part record to be attributed to the specified cost center for the specified month and year. This information is tracked and displayed within Data Administration -> Budget Entry.

To enter a record for a non-inventory part, type the part name or number in the Part No field and press the Tab key on your keyboard. You’ll be prompted to either add the part to inventory (FaciliWorks will take you to Part Entry) or use it solely on this PM order (you’ll be prompted to enter the cost of the part).
Those prompts will now be closed and you’re returned to the Parts tab. Enter a Description and Model of the non-inventory part, if necessary. Enter the Number Used during this maintenance job. Upon saving the record, the Part Cost field will be populated with the product of the Number Used and the cost per unit.
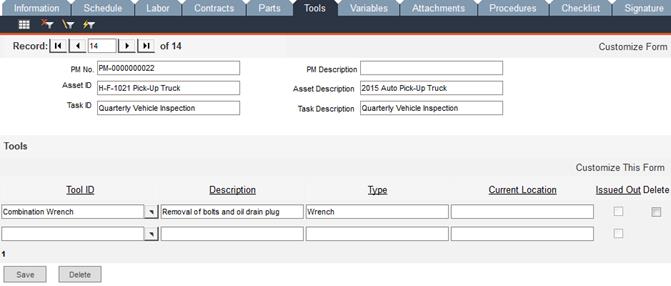
Use the Tool ID pop-up list to select a tool; related fields will populate with information from the tool entry record. If the tool is issued out, the Issued Out checkbox will be checked. The checkbox cannot be checked or unchecked here; FaciliWorks does this automatically based on the current status of the tool. Click Save and a new blank row of fields will appear, allowing you to enter another tool record.
If a preventative maintenance job involves taking variable readings, access the Variables tab to enter this information. Use the Variables pop-up list to select the variable and the associated fields will auto-fill with information from the variable entry form, including the Use Allowed if Not in Tolerance checkbox. When a reading has been taken, enter this value in the Reading field along with any additional information in the Notes field. Click Save.
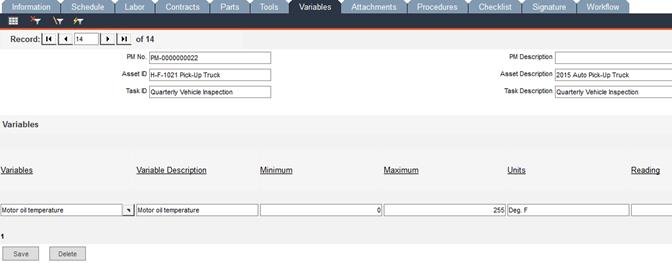
If the reading entered is not within the range specified by the Minimum and Maximum values (i.e. the reading is out of tolerance), you will be prompted to create a service request for the out-of-tolerance condition for this variable. If you do not want to create a service request at this time, click No and you’ll be returned to the Variables tab. If, however, you would like to create a service request, click Yes and you will receive a confirmation message that the service request has been created.
If the preferences specified in Configuration involve sending an email to a person or team when a service request is created, FaciliWorks will display an email confirmation message.
If the value entered in the Reading field is within the range specified by the Minimum and Maximum values (i.e., the reading is within tolerance), FaciliWorks will automatically check the Pass checkbox (when the record is saved).
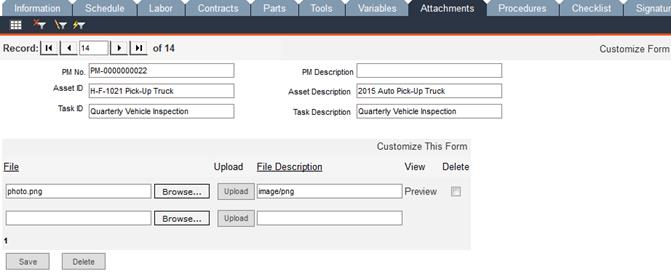
Use this tab to attach instance-specific documents to PMs, such as the asset’s warranty or service contract information, manuals, photos or special handling instructions. You can have all the information at your fingertips in the PM without having to reference the asset record.
Click Browse… to locate and select the file you would like to attach and then click the Upload button. When the upload is complete, the File Description field will be auto-filled. Upon successful upload, a new blank field appears, allowing you to attach another file.
Be sure to click Save after any modifications.
To view the file, click Preview and the attachment will open in a new window.
Use this tab to attach procedure records to the preventative maintenance order. Make a selection from the Procedure ID pop-up list. Click View Procedure to open a window that displays the full procedure text (your browser may open a new tab to display the procedure).
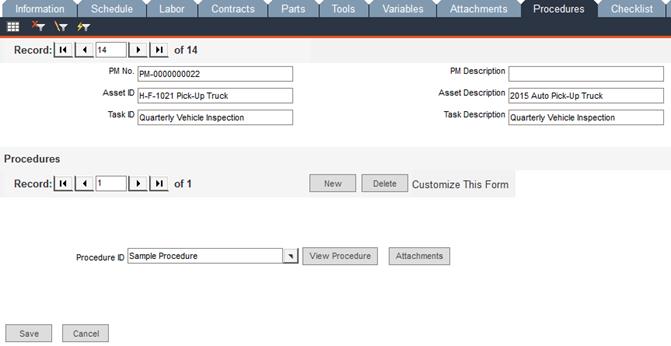
To view any files previously attached to the procedure or to attach a new file, such as an image, click Attachments. If any files were attached to the procedure when the procedure was originally entered (Data Administration -> Procedures), those files will be listed here in the Attachments window.
To add a new attachment, click the Browse… button to locate and select the file. Click Upload to upload the file to the database and the Description field will auto-fill. To view the attachment, click Preview.
Upon saving the attachment record, a new blank field will appear, allowing you to attach another file.
Adding an attachment to a procedure in this window will add the attachment globally to the procedure, not just for the preventative maintenance job you’re currently modifying.
Use this tab to add a checklist to the PM via the associated task.
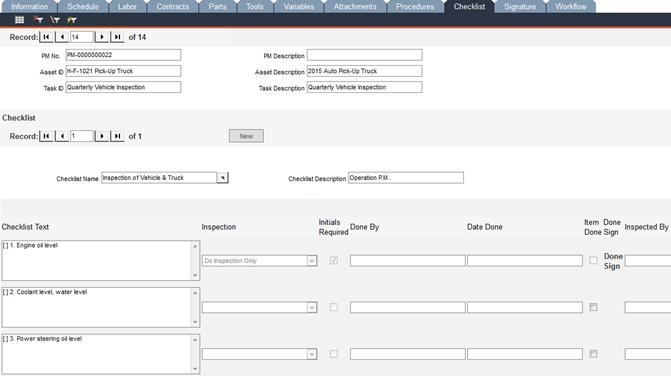
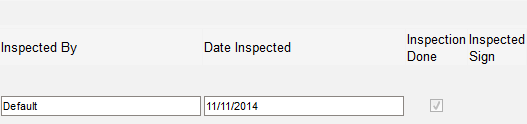
If the original checklist record shows that initials are required for a particular step, the Edit PMs -> Checklist tab will show Done Sign in the row associated with that step. When a checklist item has been done, click Done Sign and a Log In window will be displayed. Enter your User ID and Password and click OK. Only the current user logged in can sign. This action checks the Item Done checkbox and attaches your electronic signature to the checklist item.
When an inspection is required (i.e., the Inspection field shows Do Inspection Only or Do Item and Inspection), click Inspected Sign and the Sign In form will open. Enter your User ID and Password and click OK. Only the current user logged in can sign. This action checks the Inspection Done checkbox and attaches your electronic signature to the checklist item inspection:
If a checklist item does not require a signature, simply check the Item Done or Inspection Done checkboxes as appropriate.
Be sure to click Save when finished.
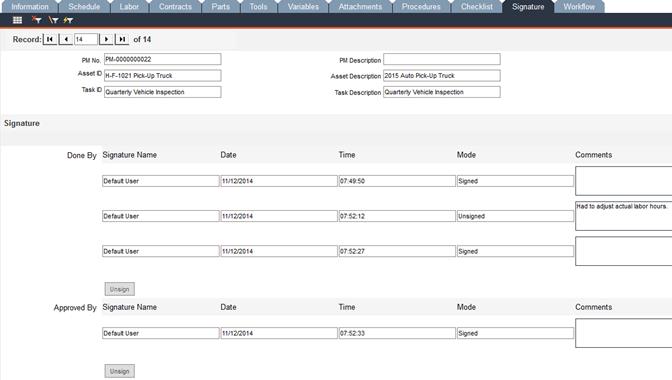
To attach your electronic signature to the PM (after it has been completed), access the Signature tab.
Click the Sign button in the Done By pane; the Sign In form will open. Enter your User ID and Password and click OK. This action attaches your electronic signature and the button previously labeled as Sign is now labeled as Unsign. Only the currently logged in user can sign a record.
Use the same steps to attach an electronic signature in the Approved By pane.
If a PM must be modified after signing, it must first be unsigned. If a signature has been attached to the approval, the Approved By record must be unsigned before the Done By record can be unsigned (the Unsign button in the Done By pane will be inactive until the approval has been unsigned).
To unsign a record, click Unsign. The Sign In form will open. Enter your User ID and Password and click OK. A Comments box opens, giving you the opportunity to enter any necessary notes. If you enter notes here, click Save to save the notes and complete the unsigning. If you do not want to enter any notes, you can click Cancel to close the Comments box and complete the unsigning.
FaciliWorks will show the electronic signature details of each signing and unsigning of the record.
A record can only be unsigned by the user who signed it.
While the actual steps and triggers are defined in Workflow Trigger Setup and Workflow Step Setup, this tab shows the history of the actions and approvals implemented upon the creation of work orders. For more information about Workflow Trigger Setup and Workflow Step Setup, please see the FaciliWorks Administrator Guide.
The Workflow History pane details all the steps executed after a particular workflow is triggered. Keep in mind that a workflow is triggered when a record is created, deleted, changed or verified.
The Approvals pane displays the history of approvals for a particular job. It also lists items set as
Approved or Not Approved. Set the approval status of an item in the Approval Needed List. When a job is approved, it is then added to the Approvals pane.
To avoid having to access every open PM in order to enter meter readings, enter dates and/or mark every one as completed, you can access Batch Complete PM to enter this information and mark all open PMs as complete with the click of a button.
Navigate to Preventative Maintenance -> Batch Complete PM. This screen displays a brief summary of every open PM listed in alphabetical/numerical order.
Scroll to the bottom of the screen to see the number of pages of open PMs (in the sample below, there are three pages) and the Complete, Save and Cancel buttons.
Enter any necessary information regarding meter readings, dates and notes on any or all PMs and click the Save button before navigating to the next page.
To mark all open PMs as complete, click the Complete button. A prompt will alert you to possible missing information and ask you if you want to continue. Click Yes to complete the action; a message will appear to inform you that all PM records are complete.
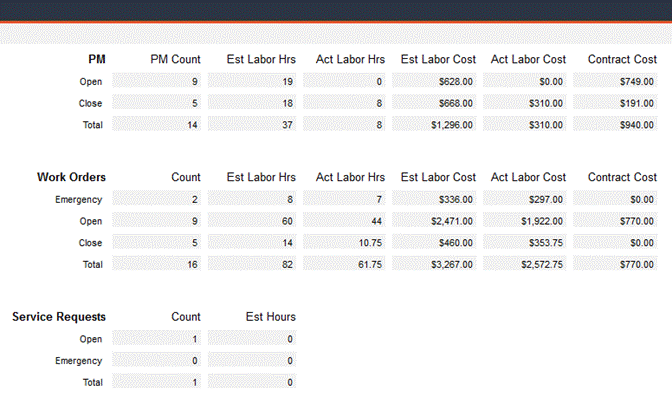
Navigate to Preventative Maintenance -> Maintenance Jobs Status to view a chart of PM, work order and service request information, including open and closed total counts of each and total labor hours, labor cost and contract cost. This form is read-only.