To save time and provide consistency, FaciliWorks uses certain operational conventions. It is highly recommended that you become familiar with these conventions before you begin using FaciliWorks. Conventions help you navigate through, add, edit, delete, retrieve and print records. Shortcut keys help you save data entry time and avoid mistakes.
Located below the tab title of a primary record form is the icon toolbar, containing the record filter buttons. These buttons allow you to toggle between Form View and Datasheet View, Show All Records, Show only Assets or only Gages (available with FaciliWorks 8i Calibration only) and use Advanced and Quick Filters.
![]()
Form
View and Datasheet View
Form View ![]() displays
only one record at a time and is the default presentation of data whereas
Datasheet View
displays
only one record at a time and is the default presentation of data whereas
Datasheet View ![]() displays
a list of all pertinent records in a spreadsheet format, each row representing
a single record and each column representing a field. Modifications to
the default presentation of data can be made within Configuration ->
Global Settings. For more information, please see the Administrator
Guide.
displays
a list of all pertinent records in a spreadsheet format, each row representing
a single record and each column representing a field. Modifications to
the default presentation of data can be made within Configuration ->
Global Settings. For more information, please see the Administrator
Guide.
You can easily switch back and forth between Form and Datasheet Views by using the appropriate icon on the icon toolbar. When in Datasheet View, only the Form View icon is visible; when in Form View, only the Datasheet View icon is visible.
Form view is recommended when displaying related records in an embedded table (for example, when viewing Asset records, the related Task records can be displayed in Form View. Datasheet View is not available for every form.
From Datasheet View, click the square button to the left of a record to view that specific record in Form View.
Click the Show All Records icon ![]() to
remove any current filters. The current filters can be removed in both
Datasheet View and Form View. Showing all records in form view will display
one record at a time, but all records will be available for viewing by
using the record navigation buttons.
to
remove any current filters. The current filters can be removed in both
Datasheet View and Form View. Showing all records in form view will display
one record at a time, but all records will be available for viewing by
using the record navigation buttons.
Record Type Selector (8i Calibration only)
Hovering the mouse pointer over the Record Type Selector icon
![]() will display a two-option
list; Show All Assets or Show All Gages for navigation and viewing.
will display a two-option
list; Show All Assets or Show All Gages for navigation and viewing.
Use the Quick Filter ![]() to
find records based on a simple search. The fields available in the filter
window are specific to the form from which the filter is called. A value
can be entered by typing it in manually (the asterisk * can be used as
a wild card character) or by selecting it from a pop-up list. After making
your selections, click the Find button to view your search results.
Fields can be added to the Quick Filter from within the Configuration
-> Admin Settings-> Advanced tab. For more information, please
see the Administrator Guide.
to
find records based on a simple search. The fields available in the filter
window are specific to the form from which the filter is called. A value
can be entered by typing it in manually (the asterisk * can be used as
a wild card character) or by selecting it from a pop-up list. After making
your selections, click the Find button to view your search results.
Fields can be added to the Quick Filter from within the Configuration
-> Admin Settings-> Advanced tab. For more information, please
see the Administrator Guide.
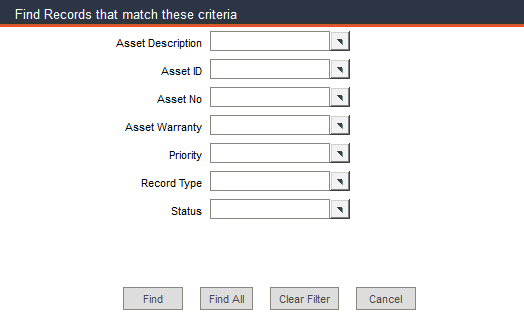
When you need to filter records based on multiple criteria in addition
to those integrated into the Quick Filter function, i.e., a filter
based on Maintenance Frequency, use the Advanced Filter ![]() feature. The
advanced filter accommodates user-defined filter criteria based on single
or multiple field-value relations.
feature. The
advanced filter accommodates user-defined filter criteria based on single
or multiple field-value relations.
Save Search: You can save search criteria so that you don’t have to set up the same searches repeatedly. To do so, first enter a title for the criteria in the Advanced Filter Name field. Then, click the Save Search button after you enter your criteria.
Open Search: Click this button to open a list of previously saved criteria. Click the name of the search you want to open and click Select. To delete a saved search, click the search title to select it and then click Delete. A deletion confirmation message will appear; click OK to proceed.
Advance Filter Name: Enter a title for your saved criteria. Click the Save Search button.
And / Or: When defining criteria, use these radio buttons to connect criteria. Select And if both premises need to be true; Or if only one premise needs to be true. These buttons are only active once a criterion has been added to the list; otherwise, the […] radio button is active.
Field: The Field drop-down list shows all available search fields. These field names appear as column headings in Datasheet View.
Condition: This drop-down list shows the field operators you can use to create search criteria.
Value: Enter a value to be used in your search. Values may be letters and/or numbers or a date. However, the Value field will not permit you to enter letters in a numeric field and it will only allow dates in a date field.
Add to List: Click this button to add the new criterion to the list of criteria.
New Search: Click this button to clear the current search criteria and begin a new search.
Find: Displays all records that meet the criteria.
Reset: Click this button to clear the current search criteria and begin a new search.
Close: Closes the filter window.
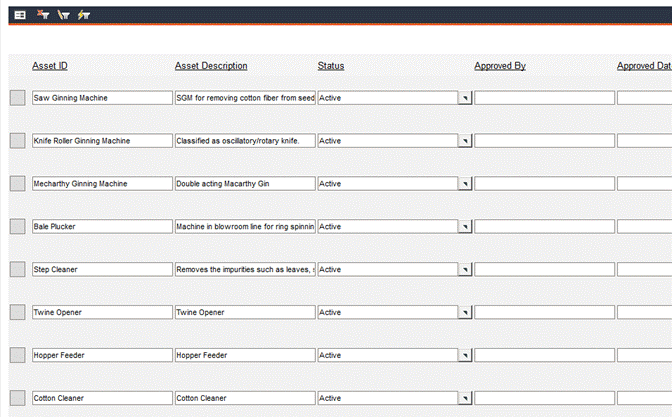
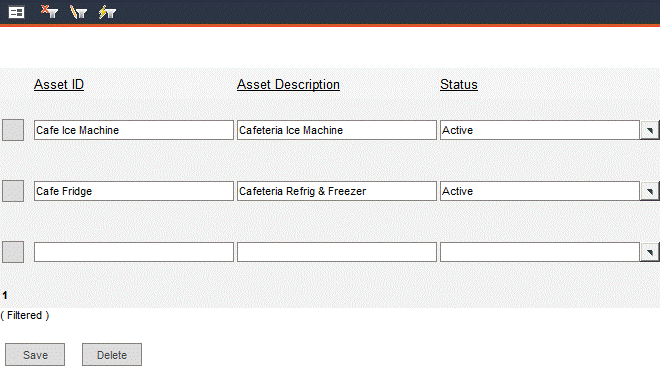
The following example will illustrate an advanced filter based on multiple field-value relations. Navigate to the Data Administration -> Assets -> Information tab; Datasheet View. Scroll to the right to see all available fields.
Suppose we want to access records for all cafe-related equipment located in Building 1. This can be done by defining the criterion using two field-value relations. Click the Advanced Filter icon to open the filter window. If you plan on saving your search for future use, enter a name for your search in the Advanced Filter Name field.
First, filter the asset records to display assets whose IDs contain the word Cafe. Use the Field drop-down list to select Asset ID. In the Condition field, use the drop-down to select Contains. In the Value field, type Cafe.
Click Add to List and your first field-value relation will appear at the top of the filter window.
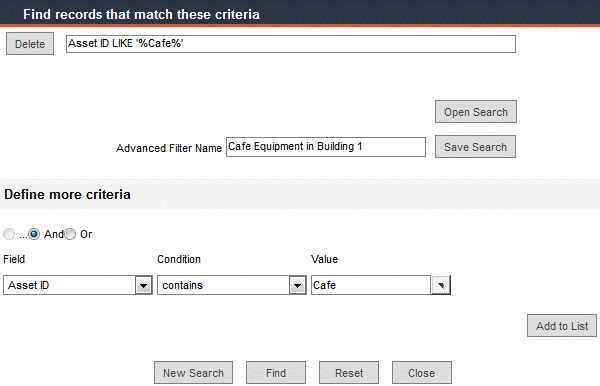
Further narrow your search by using another field value-relation. First, make sure the And radio button is selected, signifying that both conditions must be met when retrieving records. Use the Field drop-down list to select Current Location. Use the Condition drop-down list to select Is. Use the Value pop-up list to select Building 1. Click the Add to List button; the criterion is displayed in the upper area of the form.
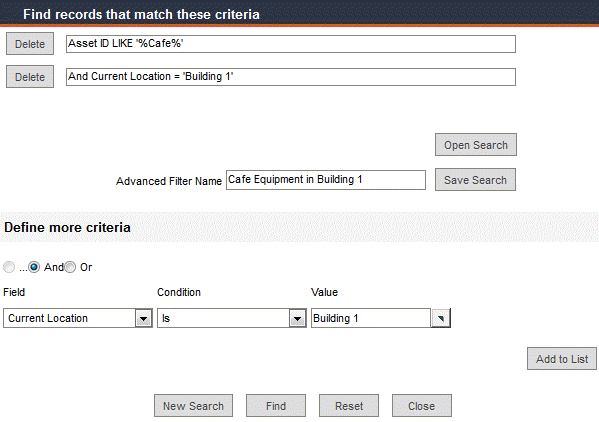
Click Save Search to save your search for future use.
Click the Find button.
The filter window closes and FaciliWorks displays the results of your search in Datasheet View:
Click the Show All Records icon to remove the filter.
To open a previously saved search, click the Advanced Filter icon to open the filter window.
Click Open Search.
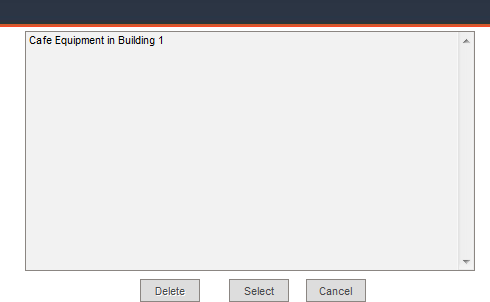
Click the name of the search you want to open and click Select. The filter window will be populated with the search criteria. Click Find to see the search results.
Below the icon toolbar is the Record Navigation Bar which allows you to move through records forward or backward, one at a time or to the first or last record of the set. The number field displays the current record number and to the right of the buttons is the total number of records available for viewing. If you happen to know the number of the record you would like to view, simply type it in the number field (overwriting the field’s current value) and press Enter on the keyboard. (The number of the record is the location compared to the other records; it is not a record identifier.)
![]()
![]() Go to the first record.
Go to the first record.
![]() Go to the previous record.
Go to the previous record.
![]() Go to the next record.
Go to the next record.
![]() Go to the last record.
Go to the last record.
![]() The current record number
as it relates to the total number of records currently available for navigation.
The current record number
as it relates to the total number of records currently available for navigation.
![]()
New and Delete Buttons
Within many of the FaciliWorks forms, to the right of the record navigation bar are New and Delete buttons. To open a new, blank record form, click New. To delete a record, click the Delete button.
To delete a record while in Datasheet View (or in other formats that display data in rows), scroll to the right of the record, check the Delete checkbox associated with the record, and then click the Delete button.
FaciliWorks will display a confirmation message; to proceed with the deletion, click OK; otherwise, click Cancel.
With Web-based applications, it is important to remember that you must always click the Save button before moving to a different record or form, creating a new record, clicking on a different menu item, closing the browser, etc.
If you do not want to save the changes you’ve made, click the Cancel button.
![]()
A pop-up list button to the right of a field indicates the availability of options for the field value. When the button is clicked, a pop-up window will open to display the list of options. Click any value in the list to enter it in the field. To enter a new value, type the value in the field and press the Tab key on your keyboard or click in another field. The following window will appear:
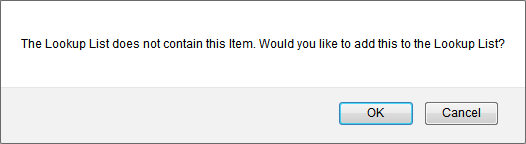
Click OK to add your new value to the pop-up list or click Cancel to return to your active window. Deleting an option from a pop-up list or locking the list (so nothing new can be added) can be done in the Configuration -> Admin Settings -> Advanced tab. For detailed information about Admin Settings, please consult the FaciliWorks Administrator Guide.
![]()
A drop-down list button to the right of a field indicates the availability of options for the field value. When the button is clicked, a drop-down list will appear to display the scrollable list of options. Click any value in the list to enter it in the field.
Pop-up Calendar Button
![]()
Associated with date fields throughout FaciliWorks is a pop-up calendar icon. You can type a date directly into a date field in the MM/DD/YYYY format (or a format that you have specified in Configuration -> Global Settings) or click the calendar icon to select a date from the calendar.
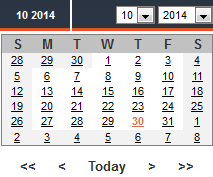
Use the month and year drop-down boxes to display the month of your choice. Click the desired date on the calendar to enter that date into the date field and the calendar window will automatically close. To enter today’s date, click the Today button.
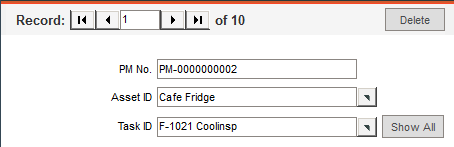
A pop-up list may be filtered depending on selections previously made on a form. For instance, the work order form allows you to choose an Asset ID from a pop-up list and beneath that is a corresponding Task ID field. Before selecting an Asset ID, the Task ID field has a Hide All button; all Task IDs are available. When you select an Asset ID, the list of Task IDs that are available is filtered; only those tasks that have already been attached to the asset when setting up PMs will be included in the list for the asset. The Task ID field will now have a Show All button that when clicked, will remove the filter from the Task ID pop-up list, making all tasks available for selection.
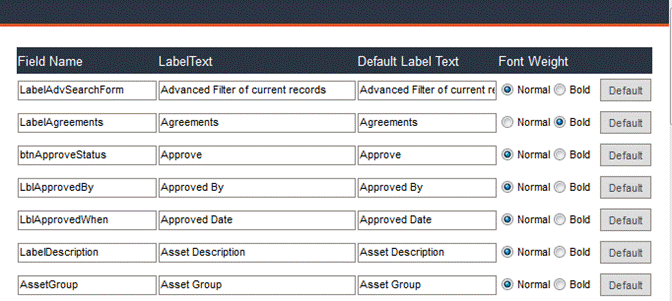
If a form within FaciliWorks is customizable, you will see a Customize Form link in the upper-right corner of the form.

Click Customize Form to modify field labels and font weight. When renaming the label, use the middle column (Label Text ) to make the change. The Field Name column is used by the database and the Default Label Text column, specifying the default settings, cannot be modified. Simply highlight the current label text and overwrite the current contents. To bold the label font, click the Bold radio button to the right of the label. Click the Default button associated with a particular row to return that label to its default settings. After any changes, be sure to click the Save button at the bottom of the form.
A primary key field contains unique values which are used to identify each record. This key identifier is used to establish appropriate relationships between the data tables. There are certain restrictions when entering data into the record ID fields:
ID fields must not be blank.
Enter a unique value for each record; ID values must not be duplicated in another record.
ID fields can contain letters, numbers and dashes (-). Avoid using /, #, *,?, !, ‘, [ ] or any other special characters in your ID field or other fields, as the database uses them as wildcard characters; wildcards help you search and filter records and set numbering formats.
The asterisk (*), question mark (?), number sign (#), exclamation point (!) and brackets ([ ]) are all wildcard characters that cannot be used in ID fields, as these characters are used by the database for other functions. You can use them in record and report filters and in Find/Replace commands to include all records that begin with specific characters or to match a certain pattern.
Wildcard Enter Result
* wh* what, white, why
* *at cat, bat, what
* */*/09 any date in 2009
* 11/*/* any date in November
? b?ll ball, bill, bell
# 1#3 103, 113, 123
[ ] b[ae]ll ball, bell – any single character within the brackets
[ ] bell [#] bell #1 – a literal search to find records that contain the wildcard character #
! b[!ae]ll bill, bull – characters not shown in the brackets
- B[a-c]d bad, bbd, bcd – any character within the range shown in the brackets